gin框架 摘要: Gin是一个golang的微框架,封装比较优雅,API友好,源码注释比较明确,已经发布了1.0版本。具有快速灵活,容错方便等特点。其实对于golang而言,web框架的依赖要远比Python,Java之类的要小。自身的net/http足够简单,性能也非常不错。框架更像是一些常用函数或者工具的集合。借助框架开发,不仅可以省去很多常用的封装带来的时间,也有助于团队的编码风格和形成规范。
下面就Gin的用法做系统的讲解。
web简介: web是基于http协议进行交互的应用网络
web就是通过使用浏览器/app访问的各种资源
浏览器——(request)——》服务器
服务器——(response)——》浏览器
一个请求对应一个响应
1
2
3
4
5
6
7
8
9
10
11
12
13
14
15
16
17
18
19
20
21
22
package mainimport ( "fmt" "io/ioutil" "net/http" ) func sayHello (w http.ResponseWriter, r *http.Request) b, _ := ioutil.ReadFile("./hello.txt" ) _, _ =fmt.Fprintln(w,string (b)) } func main () http.HandleFunc("/hello" ,sayHello) err := http.ListenAndServe(":9090" ,nil ) if err!=nil { fmt.Printf("http serve failed, err:%v\n" ,err) return } }
hello.txt(html)
1 2 3 <h1 style ='color:orange' > welcome!</h1 > <h2 > how are you?</h2 > <img id ='i1' src ='https://img1.baidu.com/it/u=1980119653,2367229126&fm=11&fmt=auto&gp=0.jpg' >
使用特点 1)go的web框架
2)性能比较好
3)使用简单
gin的安装 1)确保已安装go环境(环境配置)
2)go get gopkg.in/gin-gonic/gin.v1
git clone https://github.com/gin-gonic/gin.git(生成gin文件夹 )
3)gin拷贝到gopath下面的src/github.com/gin-ginic/gin
4)其他依赖->放到src/github.com下
gin-contrib;
gin-gonic;
golang;
ugorji
初步运行代码
1
2
3
4
5
6
7
8
9
10
11
12
13
14
15
16
package mainimport ( "github.com/gin-gonic/gin" "net/http" ) func main () router :=gin.Default() router.GET("/hello" ,func (context *gin.Context) context.String(http.StatusOK,"HelloWorld" ) }) router.Run(":2333" ) }
还有:(性质相同)
1
2
3
4
5
6
7
8
9
10
11
12
13
14
15
package mainimport "github.com/gin-gonic/gin" func main () r := gin.Default() r.GET("/ping" , func (c *gin.Context) c.JSON(200 , gin.H{ "message" : "pong" , }) }) r.Run() }
在安装gin框架过程中遇到的大坑: 1.文件配置问题:
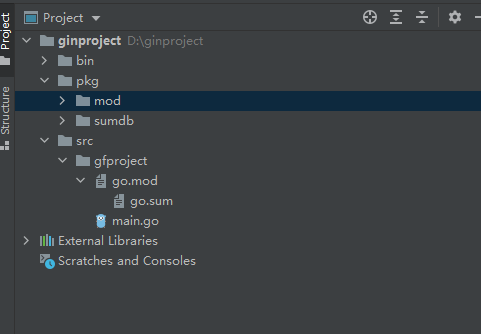
我们知道,go项目的目录格式推荐在工作区的文件夹下添加名为bin,pkg,src的三个文件夹;
注意:每个项目放到src子文件夹中最优。
由于gin是github上的开源项目,我们直接拉取可能会连接超时,所以我们需要梯子或代理,我选择使用代理。
代理:
查看环境变量:
修改环境变量:
1
2
go env -w GO111MODULE=on go env -w GOPROXY=https://goproxy.io,direct
代理配置完成。
2.设置go.mod, go.sum文件
在项目文件夹下 运行:
1
2
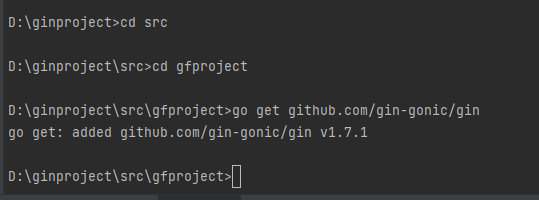
go mod init 项目名 go get -u github.com/gin-gonic/gin
这样,就会自动添加go.sum。
有关gin的主体代码会放在ginproject\pkg\mod文件夹中。
运行程序:
1
2
3
4
5
6
7
8
9
10
11
12
13
14
15
16
17
18
19
20
21
22
23
package mainimport ( "fmt" "github.com/gin-gonic/gin" ) func main () var r = gin.Default() r.GET("/ping" , func (c *gin.Context) c.JSON( 200 , gin.H{ "message" : "pong" , }, ) }) err := r.Run() if err != nil { fmt.Printf("http serve failed, err:%v\n" ,err) return } }
若系统不报错,github.com/gin-gonic/gin不飘红则成功!
RESTful API REST与技术无关,代表的是一种软件架构的风格,REST是Representational State Transfer的简称,中文翻译为“表征状态转移”或“表现层状态转化”。
(1)每一个URI代表一种资源;
(2)客户端和服务器之间,传递这种资源的某种表现层;
(3)客户端通过四个HTTP动词,对服务器端资源进行操作,实现”表现层状态转化”。
简单来说,REST就是客户端与web服务器之间进行交互的时候,使用HTTP协议中的4个请求方法代表不同的动作 。
GET用来获取资源;
POST用来新建资源
PUT用来更新资源
DETELE用来删除资源
详见:
https://www.runoob.com/w3cnote/restful-architecture.html
http://www.ruanyifeng.com/blog/2011/09/restful.html
实例:
1
2
3
4
5
6
7
8
9
10
11
12
13
14
15
16
17
18
19
20
21
22
23
24
25
26
27
28
29
30
31
32
33
34
35
36
37
38
39
40
41
42
43
44
45
46
47
package mainimport ( "github.com/gin-gonic/gin" "net/http" ) func sayhello (c *gin.Context) c.JSON(200 ,gin.H{ "message" : "Hello golang!" , }) } func main () r := gin.Default() r.GET("/hello" ,sayhello) r.GET("/book" , func (c *gin.Context) c.JSON(200 ,gin.H{ "method" :"GET" , }) }) r.POST("/book" , func (c *gin.Context) c.JSON(http.StatusOK,gin.H{ "method" :"POST" , }) }) r.PUT("/book" , func (c *gin.Context) c.JSON(http.StatusOK,gin.H{ "method" :"PUT" , }) }) r.DELETE("/book" , func (c *gin.Context) c.JSON(http.StatusOK,gin.H{ "method" :"DELETE" , }) }) r.Run(":9090" ) }
Postman 可通过postman来解决浏览器对用户API请求的限制
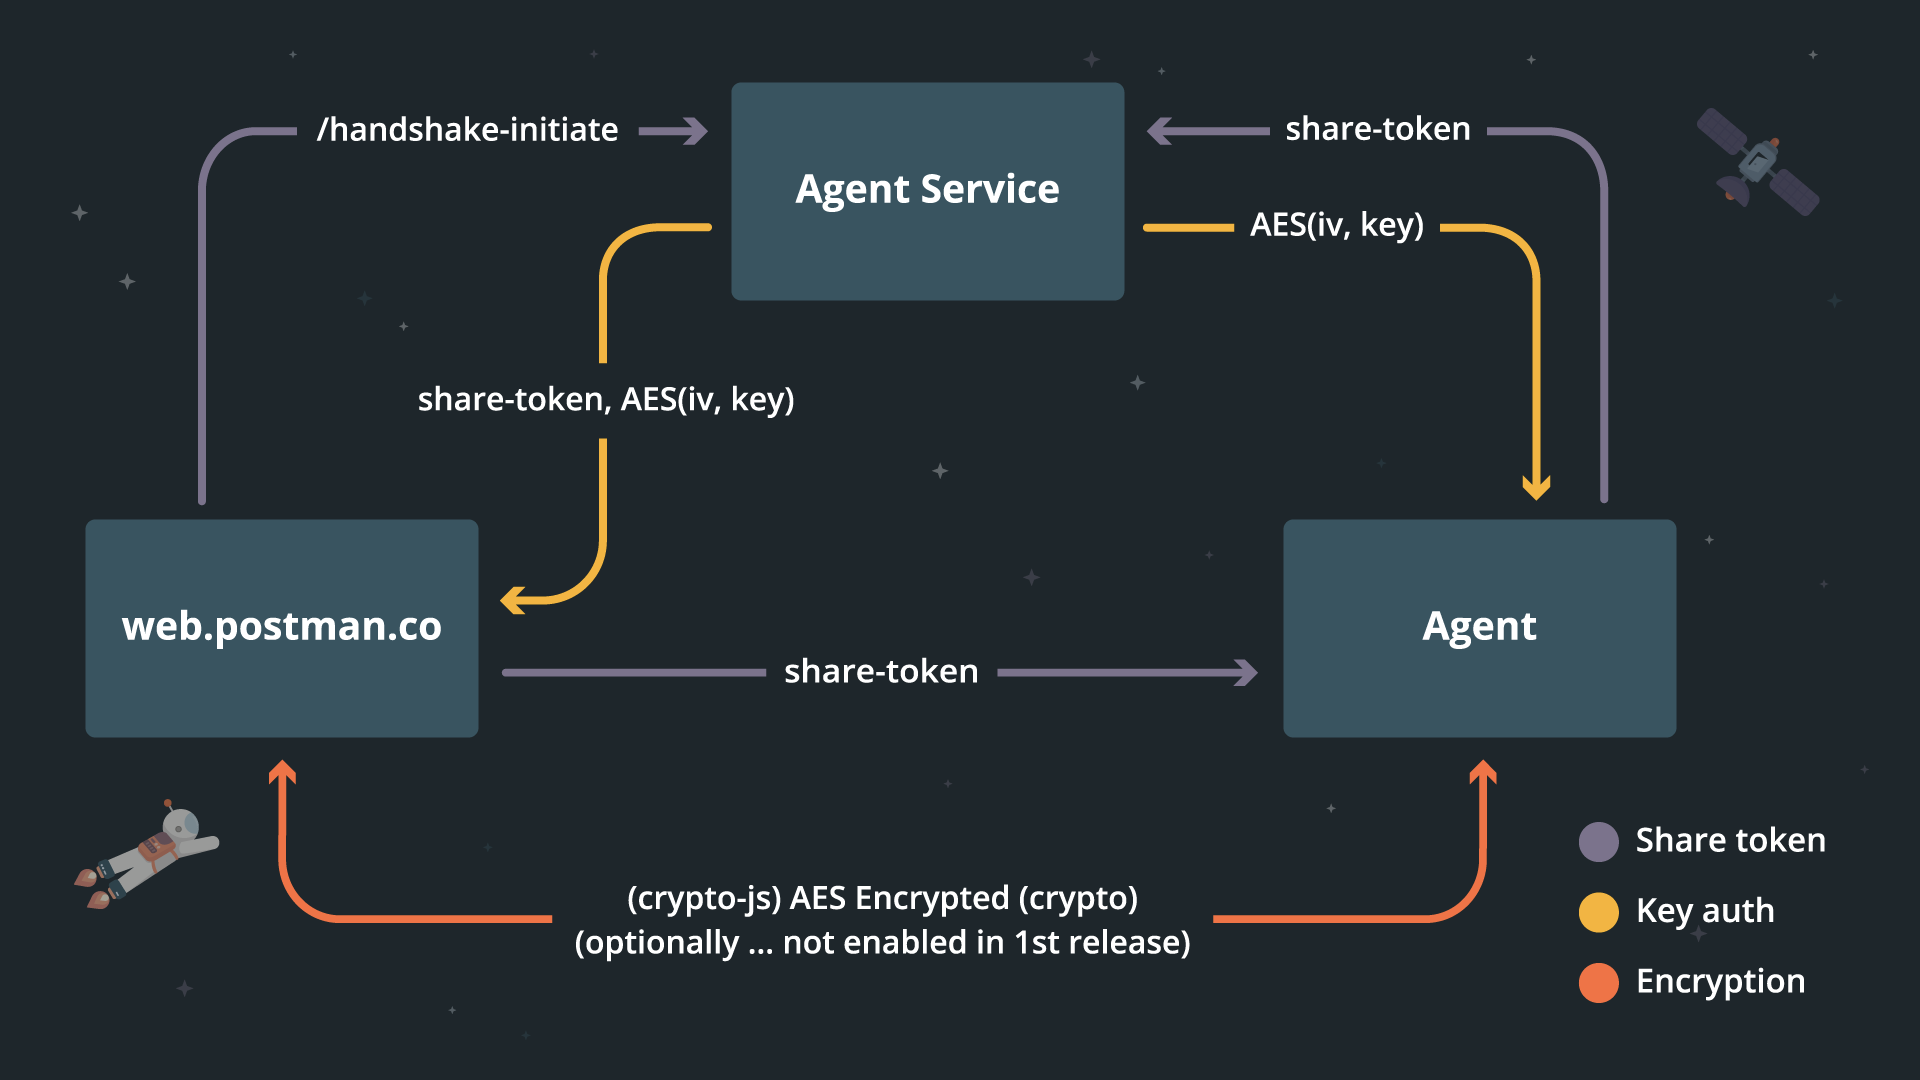
Postman代理是一个微型应用程序,可在您的桌面本地运行,并充当代表您进行API调用的代理。为了克服浏览器中的限制,Postman Web界面现在会将API调用路由到本地代理,并且该代理将使用您的本地配置文件,配置和网络代表您在本地发出API请求,以发出每个请求并传递响应回到网页界面。通过使用Postman代理,您可以允许API请求在浏览器中发出,但可以通过本地计算机和网络进行路由,然后再返回,从而可以最大程度地限制桌面上本地访问的同时,绕过浏览器中存在的限制。
http/template https://www.liwenzhou.com/posts/Go/go_template/#autoid-0-0-0
html/template包:用于生成HTML文档
text/template包:文本模板引擎
模板与渲染 在一些前后端不分离 的Web架构中,我们通常需要在后端将一些数据渲染到HTML文档中,从而实现动态的网页 (网页的布局和样式大致一样,但展示的内容并不一样)效果。
我们这里说的模板可以理解为事先定义好的HTML文档文件,模板渲染的作用机制可以简单理解为文本替换操作 –使用相应的数据去替换HTML文档中事先准备好的标记。
模板引擎规定
模板文件通常定义为.tmpl和.tpl为后缀(也可以使用其他的后缀),必须使用UTF8编码。
模板文件中使用{{`和`}}包裹和标识需要传入的数据。
传给模板这样的数据就可以通过点号(.)来访问,如果数据是复杂类型的数据,可以通过{ { .FieldName }}来访问它的字段。
除{{`和`}}包裹的内容外,其他内容均不做修改原样输出。
模板引擎的使用 三部分:定义模板文件、解析模板文件和模板渲染
定义模板文件 见实例
解析模板文件 1 2 3 func (t *Template) Parse (src string ) (*Template, error) func ParseFiles (filenames ...string ) (*Template, error) func ParseGlob (pattern string ) (*Template, error)
当然,可以使用func New(name string) *Template函数创建一个名为name的模板,然后对其调用上面的方法去解析模板字符串或模板文件。
1 2 3 4 5 6 7 t, err := template.New("hello.tmpl" ).ParseFiles("./hello.tmpl" ) if err != nil { fmt.Printf("parse template1 failed, err:%v\n" , err) return }
模板渲染 渲染模板简单来说就是使用数据去填充模板,当然实际上可能会复杂很多。
1 2 func (t *Template) Execute (wr io.Writer, data interface {}) error func (t *Template) ExecuteTemplate (wr io.Writer, name string , data interface {}) error
实例: 1 2 3 4 5 6 7 8 9 10 11 12 13 14 15 16 17 18 19 20 21 22 23 24 25 26 27 28 29 30 31 32 33 34 35 36 37 38 39 40 41 42 package mainimport ( "fmt" "html/template" "net/http" ) func sayHello (w http.ResponseWriter,r *http.Request) t , err := template.ParseFiles("./hello.tmpl" ) if err != nil { fmt.Println("Parse template failed, err: %v" ,err) return } name := "Polaris6G" err = t.Execute(w ,name) if err != nil { fmt.Println("render template failed, err: %v" ,err) return } } func main () http.HandleFunc("/" ,sayHello) err := http.ListenAndServe(":9090" , nil ) if err != nil { fmt.Println("HTTP server start failed, err:%v" , err) return } }
hello.tmpl
1 2 3 4 5 6 7 8 9 <!DOCTYPE html > <html lang = "zh-CN" > <head > <title > Hello</title > </head > <body > <p > Hello {{.}}</p >
{{ . }} 中 . 表示后端传来的对象,它的类型可以规定,可以为任意,注意灵活使用。
进一步深入:
1 2 3 4 5 6 7 8 9 10 11 12 13 14 15 16 17 18 19 20 21 22 23 24 25 26 27 28 29 30 31 32 33 34 35 36 37 38 39 40 41 42 43 44 45 46 47 48 49 50 51 52 53 54 55 56 package mainimport ( "fmt" "html/template" "net/http" ) type User struct { Name string Gender string Age int } func sayHello (w http.ResponseWriter,r *http.Request) t , err := template.ParseFiles("./hello.tmpl" ) if err != nil { fmt.Println("Parse template failed, err: %v" ,err) return } u1 :=User{ Name: "Polaris6G" , Gender: "male" , Age: 18 , } m1 := map [string ]interface {}{ "Name" : "Polaris6G" , "Gender" : "male" , "Age" : 18 , } hobbyList :=[]string { "唱" , "跳" , "rap" , "篮球" , } err = t.Execute(w ,map [string ]interface {}{ "u1" : u1, "m1" : m1, "hobby" : hobbyList, }) if err != nil { fmt.Println("render template failed, err: %v" ,err) return } } func main () http.HandleFunc("/" ,sayHello) err := http.ListenAndServe(":9090" , nil ) if err != nil { fmt.Println("HTTP server start failed, err:%v" , err) return } }
hello.tmpl:
1 2 3 4 5 6 7 8 9 10 11 12 13 14 15 16 17 18 19 20 21 22 23 24 25 26 27 28 29 30 31 32 33 34 35 36 37 38 39 40 41 42 43 44 45 <!DOCTYPE html > <html lang = "zh-CN" > <head > <title > Hello</title > </head > <body > <p > Hello {{ .u1.Name -}}</p > <p > 年龄:{{.u1.Age}}</p > <p > 性别:{{.u1.Gender}}</p > <p > Hello {{.m1.Name}}</p > <p > 年龄:{{.m1.Age}}</p > <p > 性别:{{.m1.Gender}}</p > <hr > {{ $v1 := 100}} {{ $age := .m1.Age}} <hr > {{if $v1}} {{ $v1 }} {{else}} 啥也没有 {{end}} <hr > {{if lt .m1.Age 22}} 好好上学 {{else}} 好好工作 {{end}} <hr > {{range $idx, $hobby := .hobby}} <p > {{$idx}}-{{$hobby}}</p > {{else}} 没啥爱好 {{end}} <hr > <p > m1</p > {{with .m1}} <p > {{.Name}}</p > <p > {{.Age}}</p > <p > {{.Gender}}</p > {{end}} <hr > {{index .hobby 2}} </body > </html >
变量 我们还可以在模板中声明变量,用来保存传入模板的数据或其他语句生成的结果。具体语法如下:
其中$obj是变量的名字,在后续的代码中就可以使用该变量了。
移除空格 有时候我们在使用模板语法的时候会不可避免的引入一下空格或者换行符,这样模板最终渲染出来的内容可能就和我们想的不一样,这个时候可以使用{{-`语法去除模板内容左侧的所有空白符号, 使用`-}}去除模板内容右侧的所有空白符号。
例如:
注意: -要紧挨{{`和`}},同时与模板值之间需要使用空格分隔。
条件判断 Go模板语法中的条件判断有以下几种:
1 2 3 4 5 {{if pipeline}} T1 {{end}} {{if pipeline}} T1 {{else}} T0 {{end}} {{if pipeline}} T1 {{else if pipeline}} T0 {{end}}
range Go的模板语法中使用range关键字进行遍历,有以下两种写法,其中pipeline的值必须是数组、切片、字典或者通道。
1 2 3 4 5 {{range pipeline}} T1 {{end}} 如果pipeline的值其长度为0,不会有任何输出 {{range pipeline}} T1 {{else}} T0 {{end}} 如果pipeline的值其长度为0,则会执行T0。
with 1 2 3 4 5 {{with pipeline}} T1 {{end}} 如果pipeline为empty不产生输出,否则将dot设为pipeline的值并执行T1。不修改外面的dot。 {{with pipeline}} T1 {{else}} T0 {{end}} 如果pipeline为empty,不改变dot并执行T0,否则dot设为pipeline的值并执行T1。
预定义函数 执行模板时,函数从两个函数字典中查找:首先是模板函数字典,然后是全局函数字典。一般不在模板内定义函数,而是使用Funcs方法添加函数到模板里。
预定义的全局函数如下:
1 2 3 4 5 6 7 8 9 10 11 12 13 14 15 16 17 18 19 20 21 22 23 24 25 26 27 28 29 30 31 32 33 34 and 函数返回它的第一个empty参数或者最后一个参数; 就是说"and x y"等价于"if x then y else x";所有参数都会执行; or 返回第一个非empty参数或者最后一个参数; 亦即"or x y"等价于"if x then x else y";所有参数都会执行; not 返回它的单个参数的布尔值的否定 len 返回它的参数的整数类型长度 index 执行结果为第一个参数以剩下的参数为索引/键指向的值; 如"index x 1 2 3"返回x[1][2][3]的值;每个被索引的主体必须是数组、切片或者字典。 print 即fmt.Sprint printf 即fmt.Sprintf println 即fmt.Sprintln html 返回与其参数的文本表示形式等效的转义HTML。 这个函数在html/template中不可用。 urlquery 以适合嵌入到网址查询中的形式返回其参数的文本表示的转义值。 这个函数在html/template中不可用。 js 返回与其参数的文本表示形式等效的转义JavaScript。 call 执行结果是调用第一个参数的返回值,该参数必须是函数类型,其余参数作为调用该函数的参数; 如"call .X.Y 1 2"等价于go语言里的dot.X.Y(1, 2); 其中Y是函数类型的字段或者字典的值,或者其他类似情况; call的第一个参数的执行结果必须是函数类型的值(和预定义函数如print明显不同); 该函数类型值必须有1到2个返回值,如果有2个则后一个必须是error接口类型; 如果有2个返回值的方法返回的error非nil,模板执行会中断并返回给调用模板执行者该错误;
比较函数 布尔函数会将任何类型的零值视为假,其余视为真。
下面是定义为函数的二元比较运算的集合:
1 2 3 4 5 6 eq 如果arg1 == arg2则返回真 ne 如果arg1 != arg2则返回真 lt 如果arg1 < arg2则返回真 le 如果arg1 <= arg2则返回真 gt 如果arg1 > arg2则返回真 ge 如果arg1 >= arg2则返回真
为了简化多参数相等检测,eq(只有eq)可以接受2个或更多个参数,它会将第一个参数和其余参数依次比较,返回下式的结果:
比较函数只适用于基本类型(或重定义的基本类型,如”type Celsius float32”)。但是,整数和浮点数不能互相比较。
进一步实例: 1 2 3 4 5 6 7 8 9 10 11 12 13 14 15 16 17 18 19 20 21 22 23 24 25 26 27 28 29 30 31 32 33 34 35 36 37 38 39 40 41 42 43 44 45 46 47 48 49 50 51 52 53 54 55 56 package mainimport ( "fmt" "html/template" "net/http" ) type User struct { Name string Gender string Age int } func sayHello (w http.ResponseWriter,r *http.Request) t , err := template.ParseFiles("./hello.tmpl" ) if err != nil { fmt.Println("Parse template failed, err: %v" ,err) return } u1 :=User{ Name: "Polaris6G" , Gender: "male" , Age: 18 , } m1 := map [string ]interface {}{ "Name" : "Polaris6G" , "Gender" : "male" , "Age" : 18 , } hobbyList :=[]string { "唱" , "跳" , "rap" , "篮球" , } err = t.Execute(w ,map [string ]interface {}{ "u1" : u1, "m1" : m1, "hobby" : hobbyList, }) if err != nil { fmt.Println("render template failed, err: %v" ,err) return } } func main () http.HandleFunc("/" ,sayHello) err := http.ListenAndServe(":9090" , nil ) if err != nil { fmt.Println("HTTP server start failed, err:%v" , err) return } }
hello.tmpl:
1
2
3
4
5
6
7
8
9
10
11
12
13
14
15
16
17
18
19
20
21
22
23
24
25
26
27
28
29
30
31
32
33
34
35
36
37
38
39
40
41
42
43
44
45
<!DOCTYPE html > <html lang = "zh-CN" > <head > <title > Hello</title > </head > <body > <p > Hello {{ .u1.Name -}}</p > <p > 年龄:{{.u1.Age}}</p > <p > 性别:{{.u1.Gender}}</p > <p > Hello {{.m1.Name}}</p > <p > 年龄:{{.m1.Age}}</p > <p > 性别:{{.m1.Gender}}</p > <hr > {{ $v1 := 100}} {{ $age := .m1.Age}} <hr > {{if $v1}} {{ $v1 }} {{else}} 啥也没有 {{end}} <hr > {{if lt .m1.Age 22}} 好好上学 {{else}} 好好工作 {{end}} <hr > {{range $idx, $hobby := .hobby}} <p > {{$idx}}-{{$hobby}}</p > {{else}} 没啥爱好 {{end}} <hr > <p > m1</p > {{with .m1}} <p > {{.Name}}</p > <p > {{.Age}}</p > <p > {{.Gender}}</p > {{end}} <hr > {{index .hobby 2}} </body > </html >
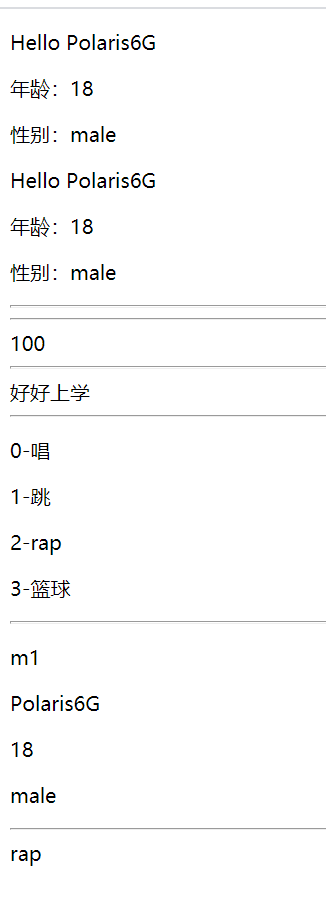
结果展示:
自定义函数 main.go
1 2 3 4 5 6 7 8 9 10 11 12 13 14 15 16 17 18 19 20 21 22 23 24 25 26 27 28 29 30 31 32 33 34 35 36 37 38 39 package mainimport ( "fmt" "net/http" "text/template" ) func f1 (w http.ResponseWriter,r *http.Request) k := func (name string ) (string , error) return name + "年轻又帅气" , nil } t := template.New("hello.tmpl" ) t.Funcs(template.FuncMap{ "kua" : k, }) _, err := t.ParseFiles("./hello.tmpl" ) if err != nil { fmt.Printf("parse template failed,err:%v\n" ,err) return } name := "Polaris6G" t.Execute(w,name) } func main () http.HandleFunc("/" ,f1) err := http.ListenAndServe(":9090" ,nil ) if err !=nil { fmt.Println("server started failed" ) return } }
hello.tmpl
1 2 3 4 5 6 7 8 9 <!doctype html > <html lang ="en" > <head > <title > 自定义模板函数</title > </head > <body > <p > {{kua .}}</p > </body > </html >
结果:
Polaris6G年轻又帅气
嵌套模板 main.go
1 2 3 4 5 6 7 8 9 10 11 12 13 14 15 16 17 18 19 20 21 22 23 24 25 26 27 package mainimport ( "fmt" "net/http" "text/template" ) func demo1 (w http.ResponseWriter,r *http.Request) tmpl, err := template.ParseFiles("./t.tmpl" , "./ul.tmpl" ) if err != nil { fmt.Printf("create template failed, err:%v" , err) return } name := "Polaris6G" tmpl.Execute(w,name) } func main () http.HandleFunc("/tmpl" ,demo1) err := http.ListenAndServe(":9090" ,nil ) if err !=nil { fmt.Println("server started failed" ) return } }
t.tmpl
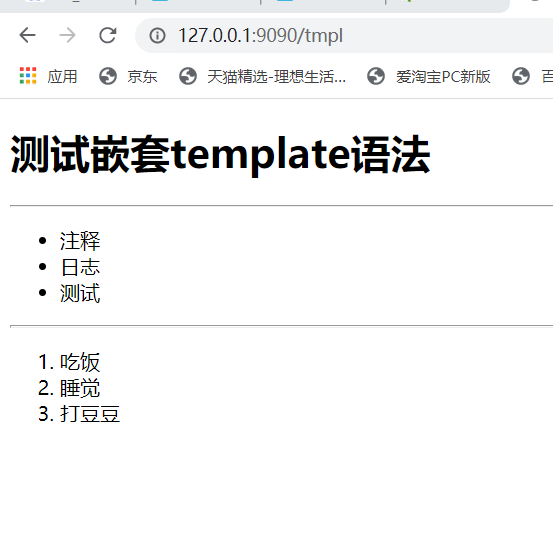
1 2 3 4 5 6 7 8 9 10 11 12 13 14 15 16 17 18 19 20 21 22 <!DOCTYPE html > <html lang ="zh-CN" > <body > <h1 > 测试嵌套template语法</h1 > {{/*我们可以在template中嵌套其他的template。这个template可以是单独的文件,也可以是通过define定义的template*/}} <hr > {{template "ul.tmpl"}} <hr > {{template "ol.tmpl"}} </body > </html > {{/*通过define定义一个模板*/}} {{ define "ol.tmpl"}} <ol > <li > 吃饭</li > <li > 睡觉</li > <li > 打豆豆</li > </ol > {{end}}
ul.tmpl
1 2 3 4 5 <ul > {{/*单独的文件*/}} <li > 注释</li > <li > 日志</li > <li > 测试</li > </ul >
结果:
