- 神经网络概念
- 训练神经网络
- 构建神经网络
- 评估模型的技巧
- 模型修正的技巧
- 数据迁移
- 倾斜数据集的误差度量
神经网络
Neural networks
speech -> images -> text(NLP) -> forecast
比较:
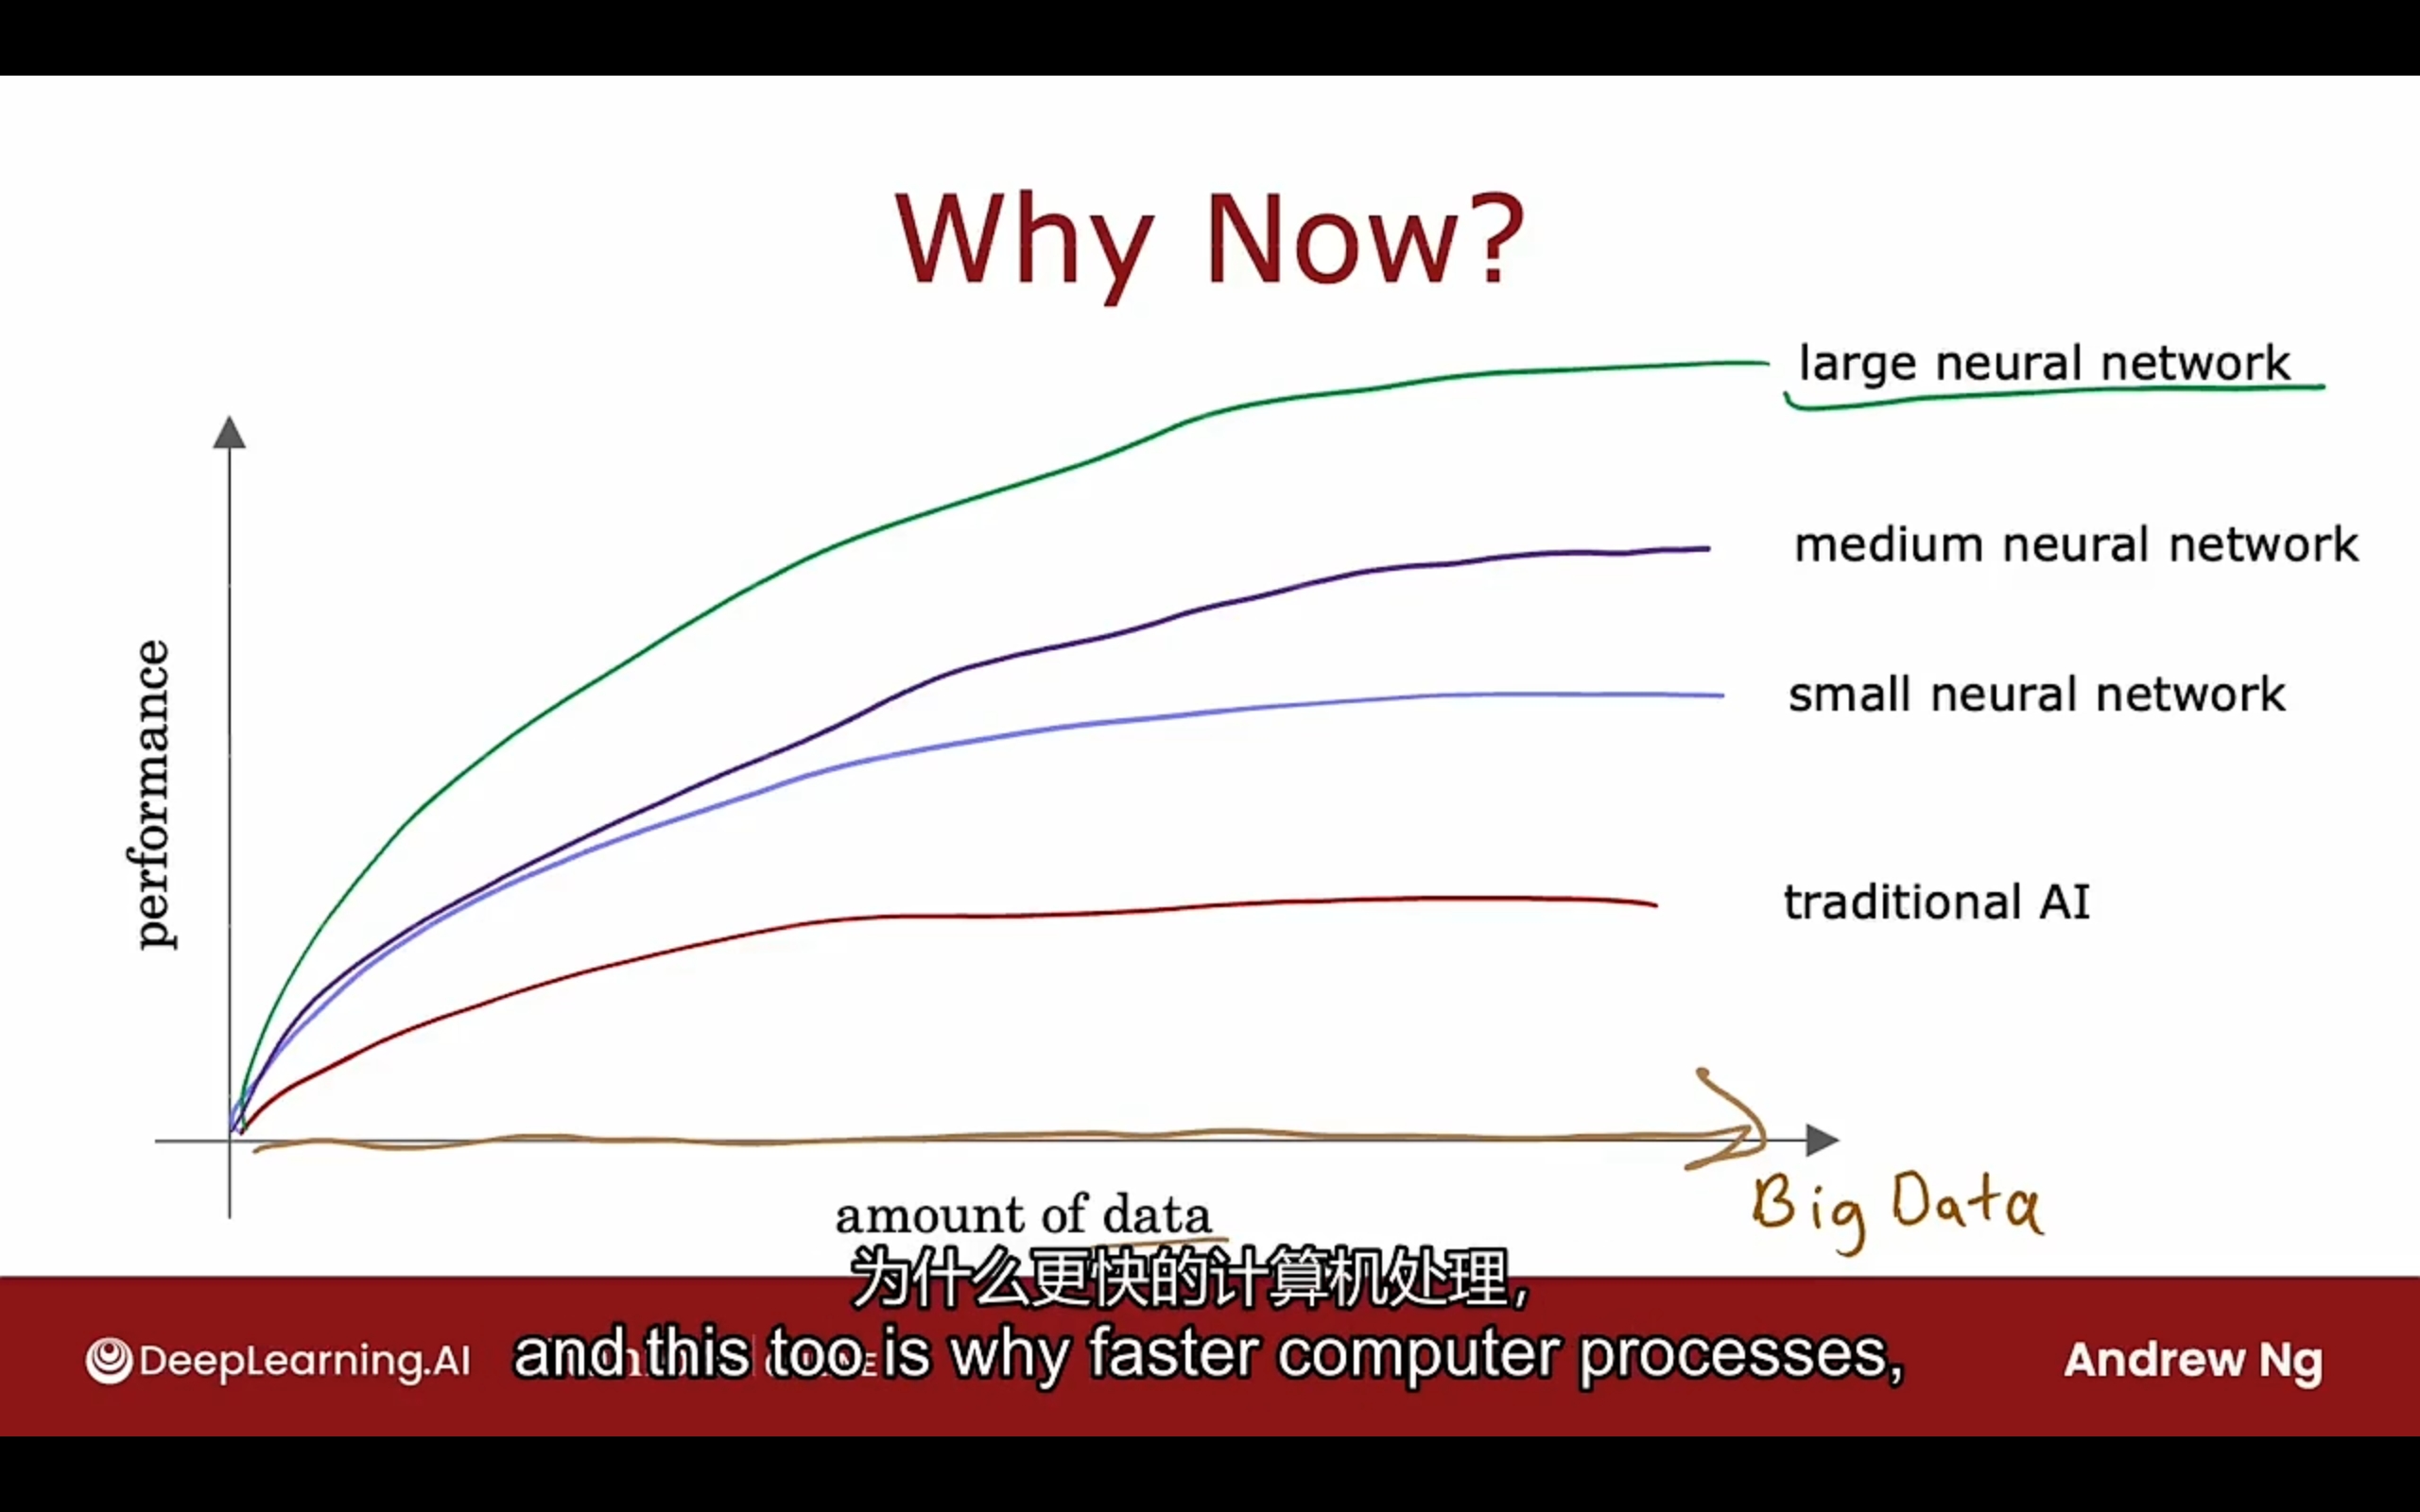
概念
神经网络栗子:
- input layer
- hidden layer -> activation values
- output layer
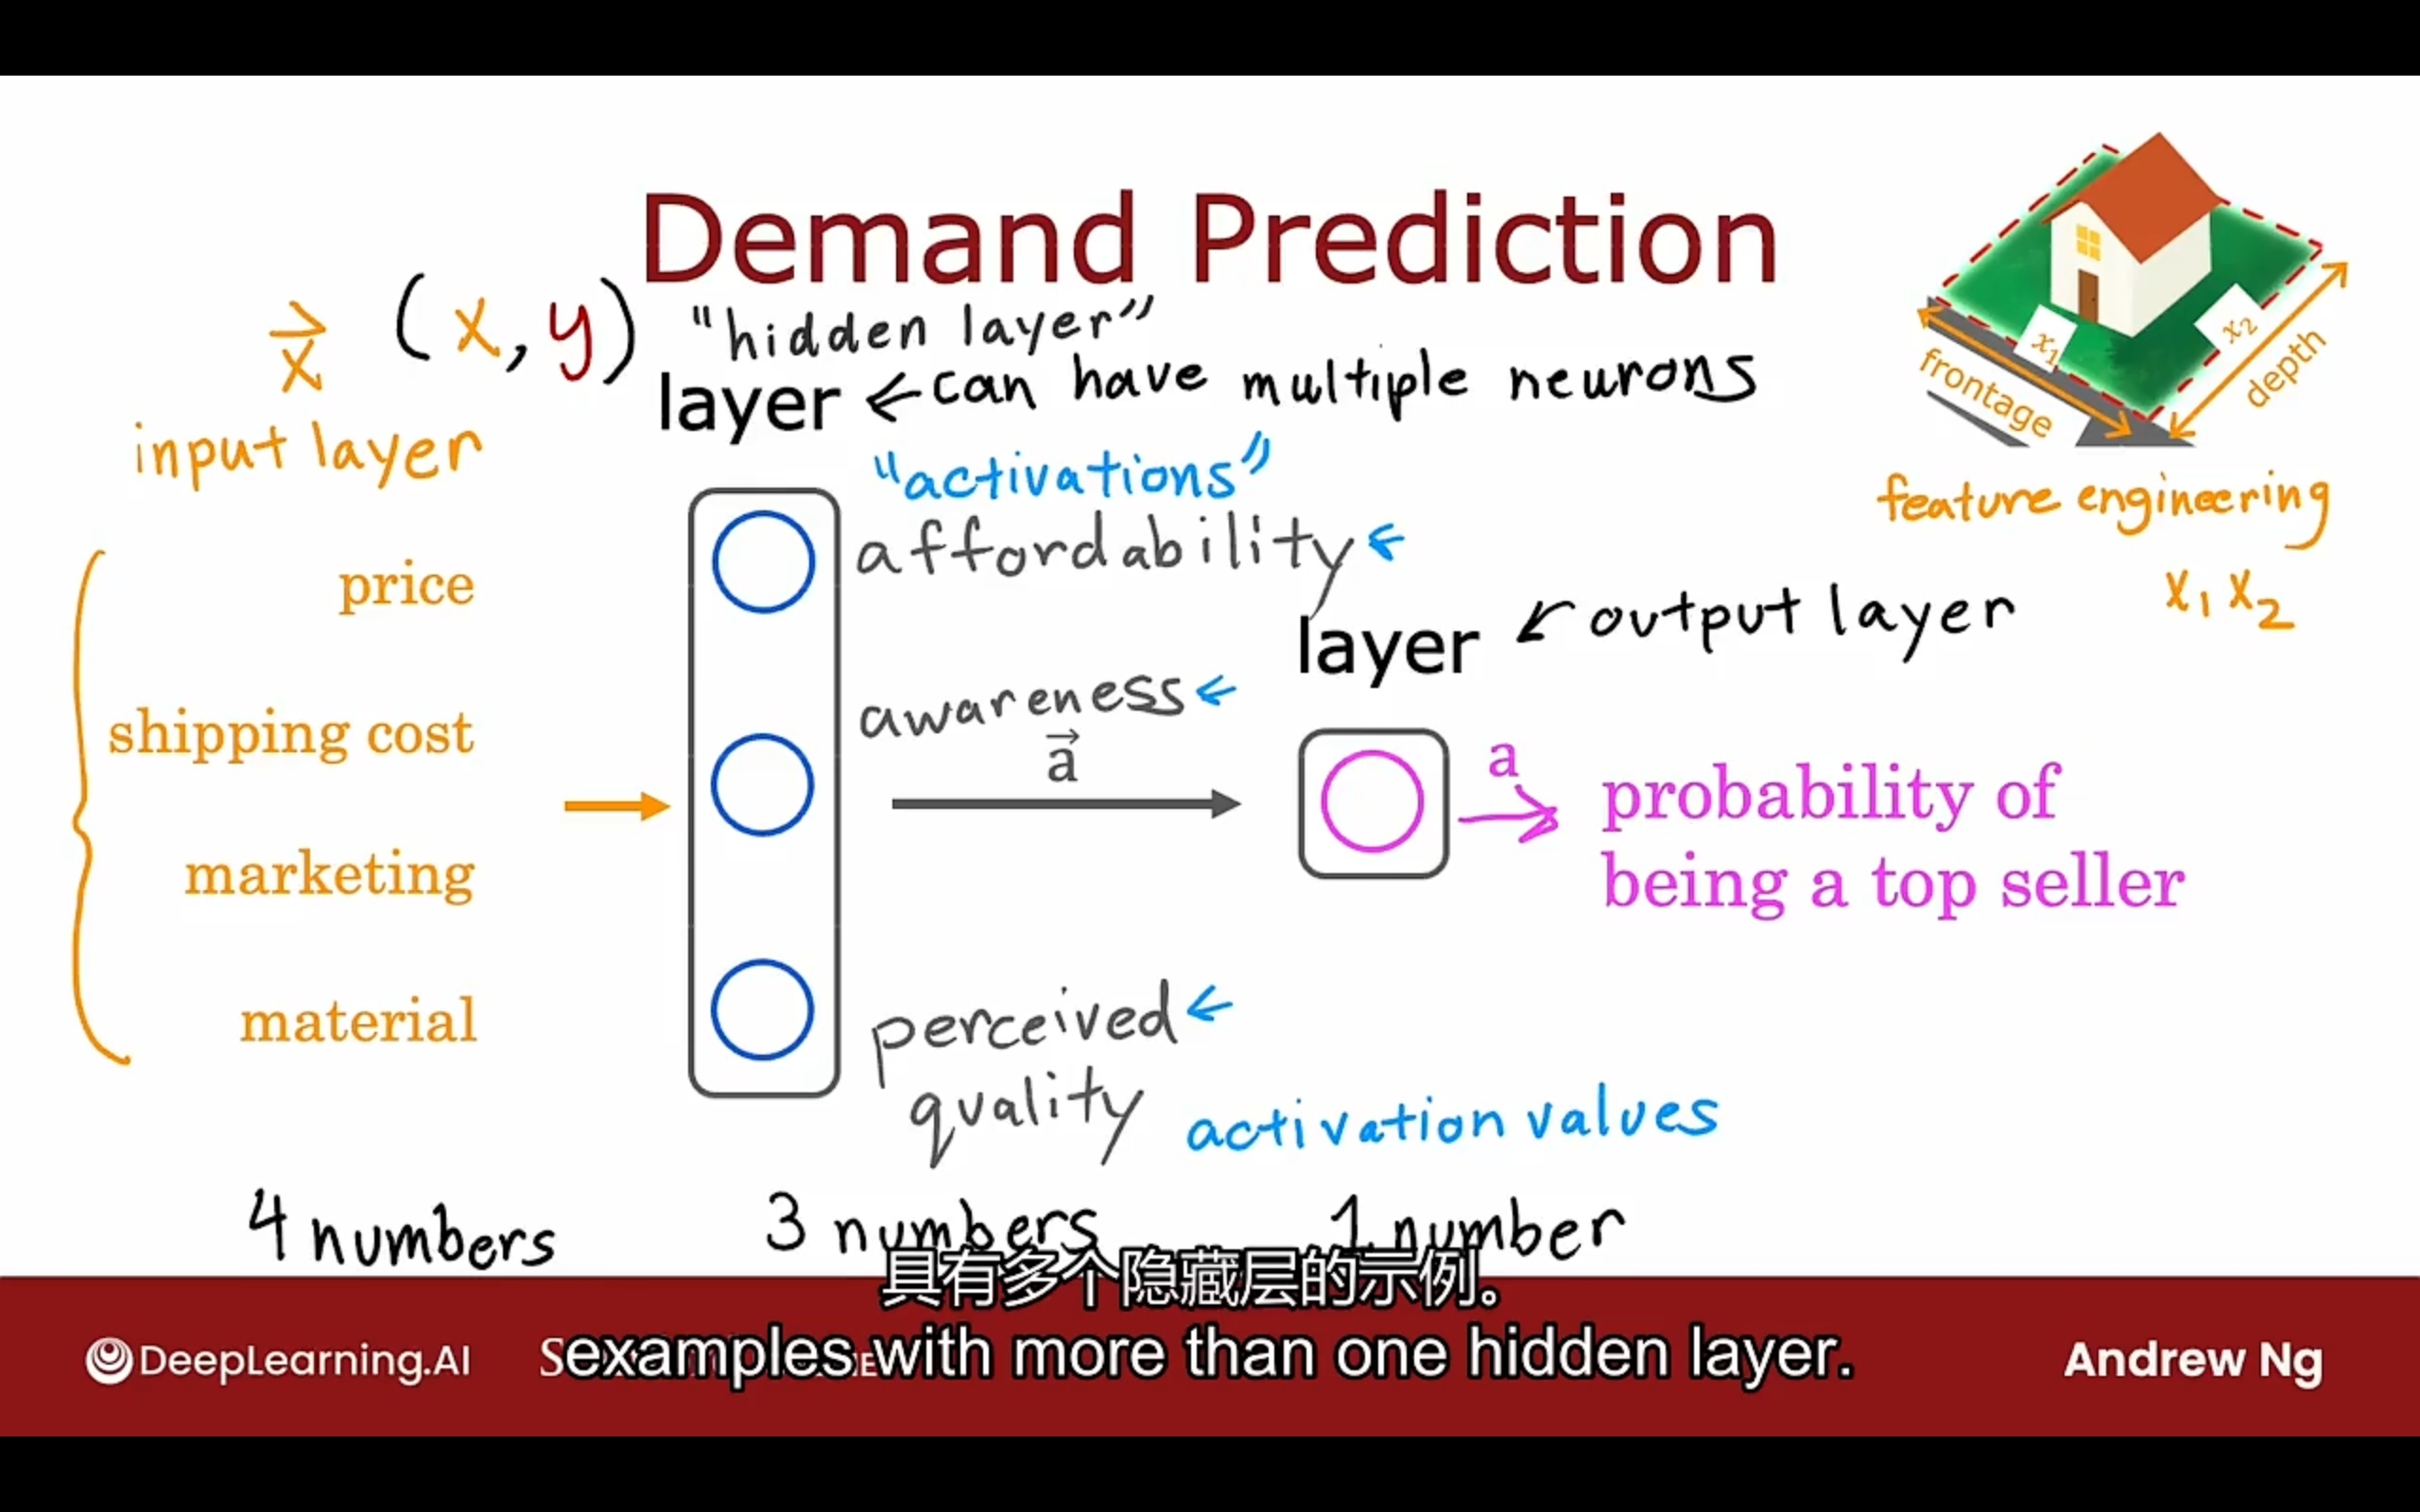
前面的四个特征经过特征工程变成了新的3个特征
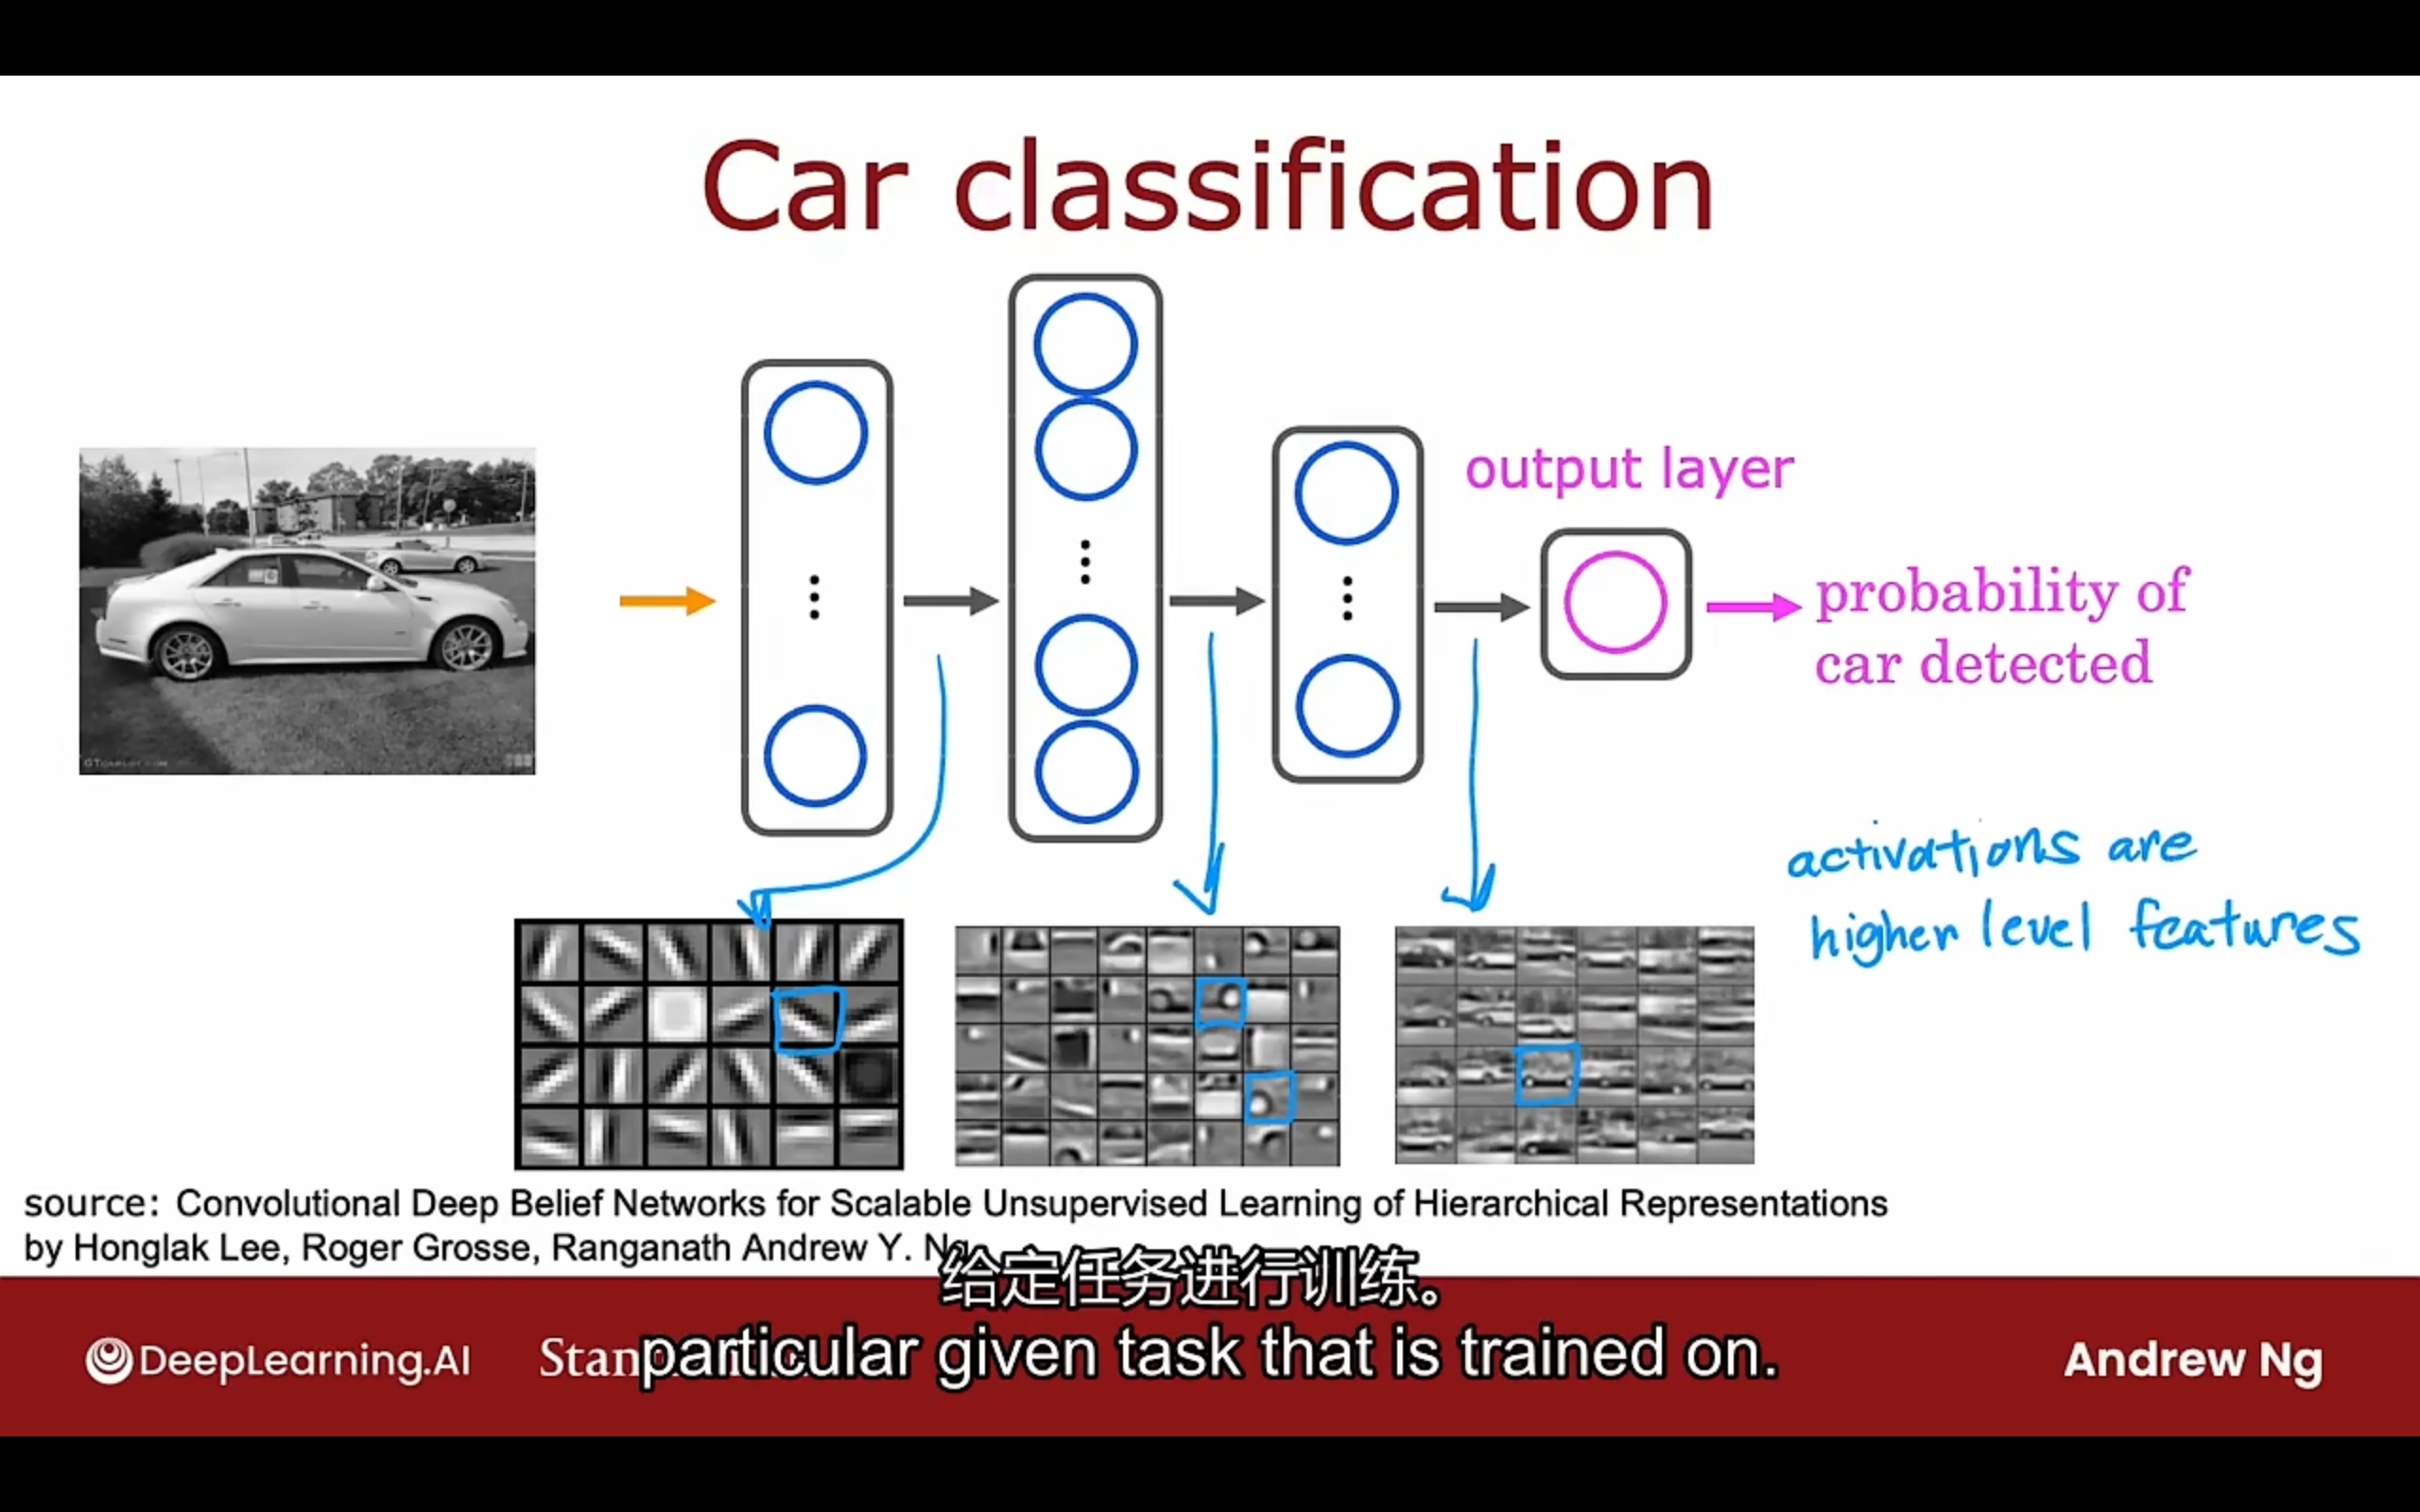
神经网络所做的是提炼自己的特征值(在隐藏层中),而不是人为手动的设计
需要决定的点是神经网络的架构:
- 隐藏层的数量
- 每个隐藏层中神经元的数量
上下标事项:
layer 1:
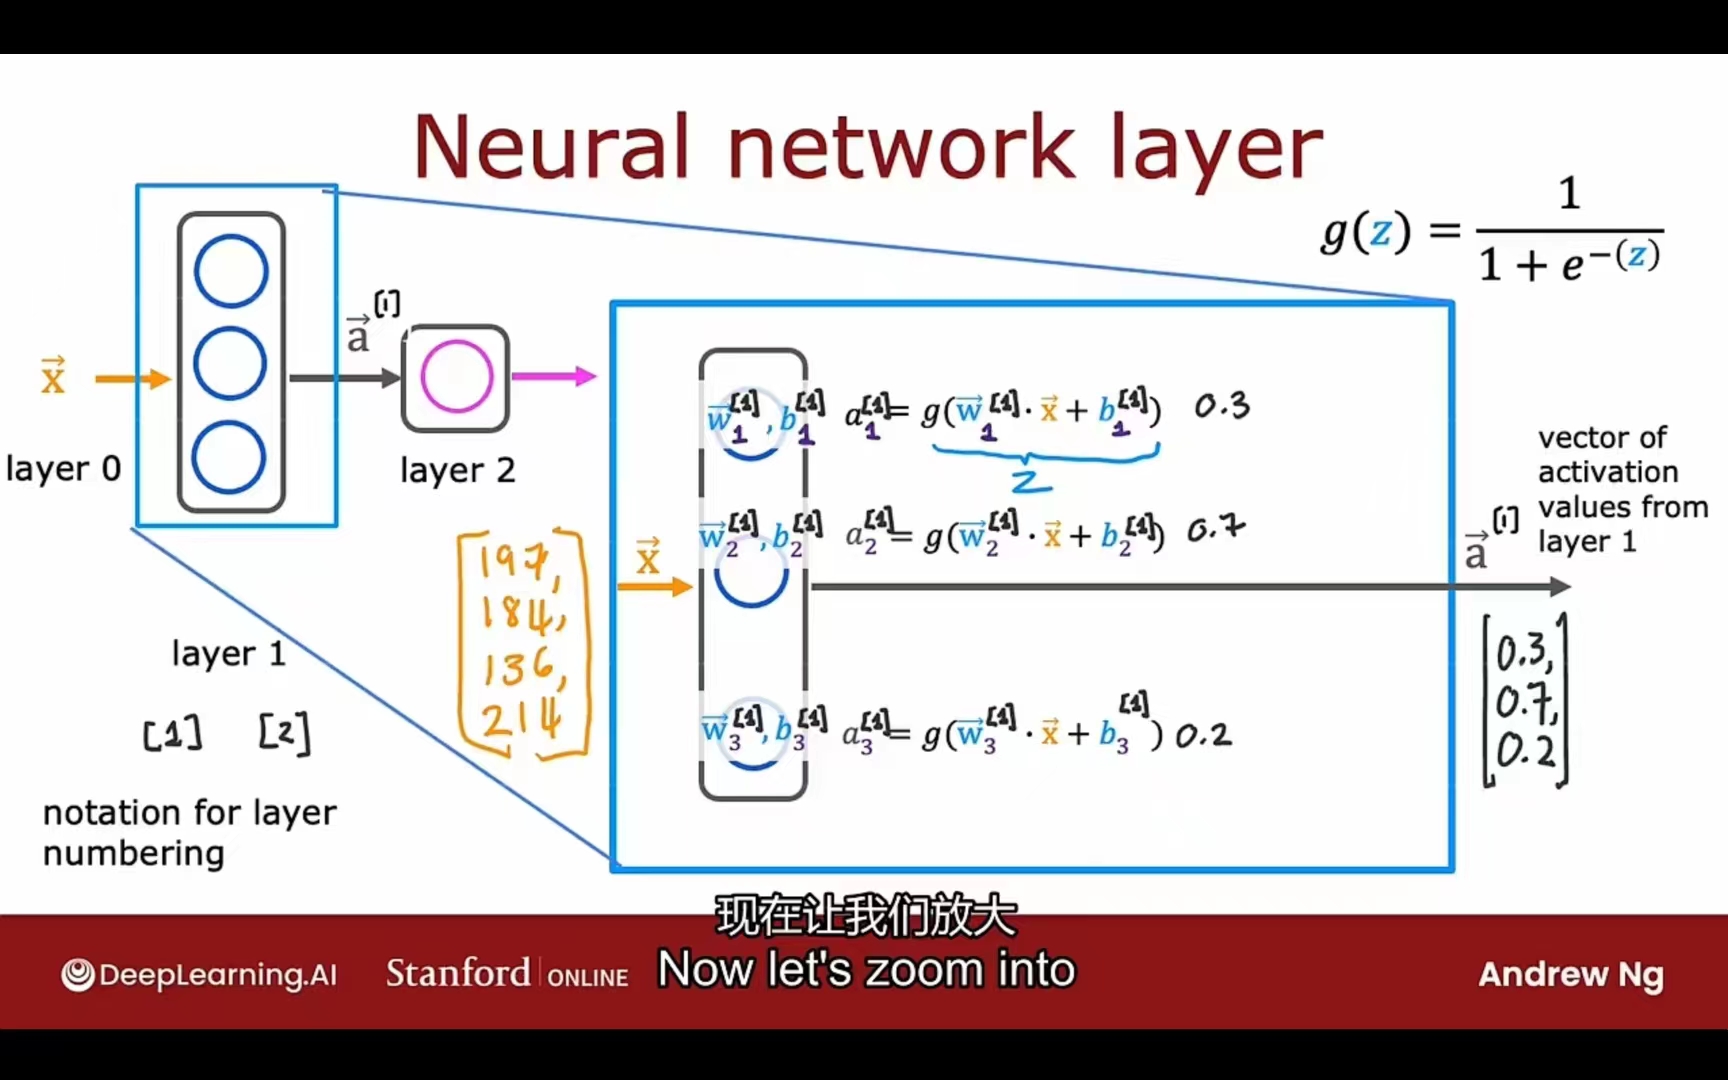
layer 2:
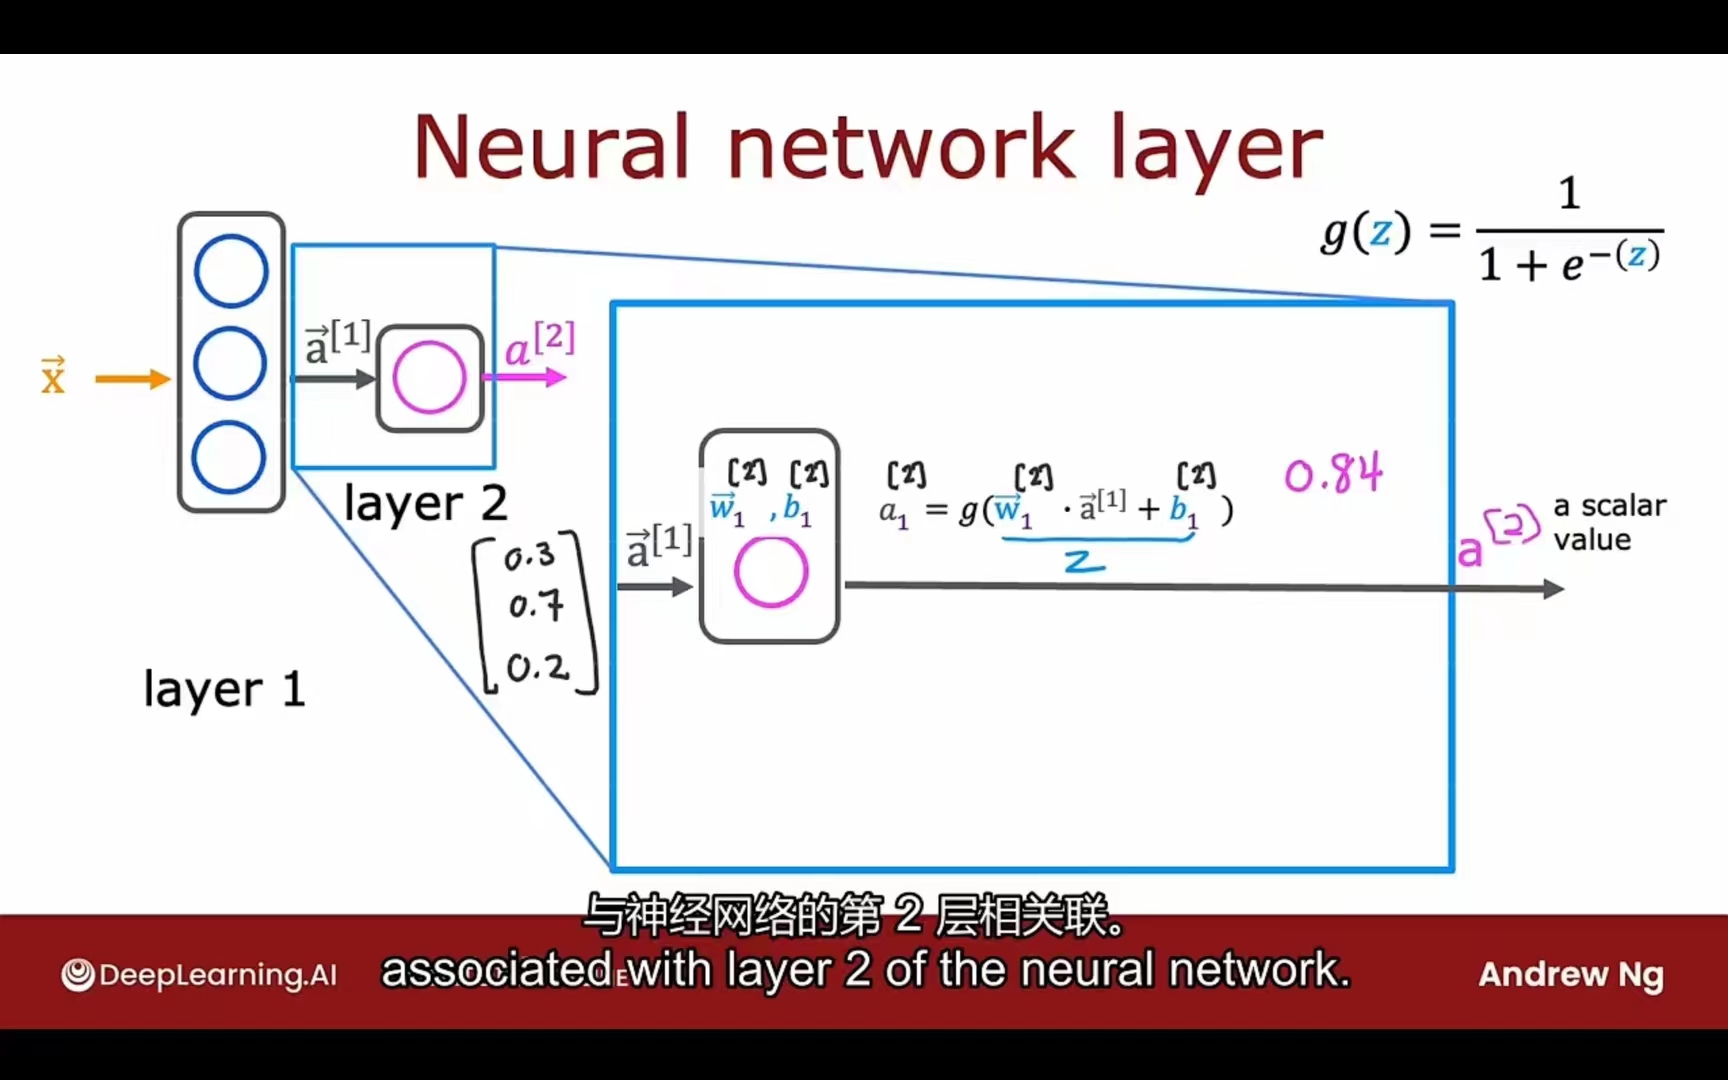
上标:层号
下标:层中神经元号
layer l的第j个神经元的激活函数:
g -> sigmoid (also called activation function 激活函数)
PS:输入层可以是 $\vec x = a^{[0]}$
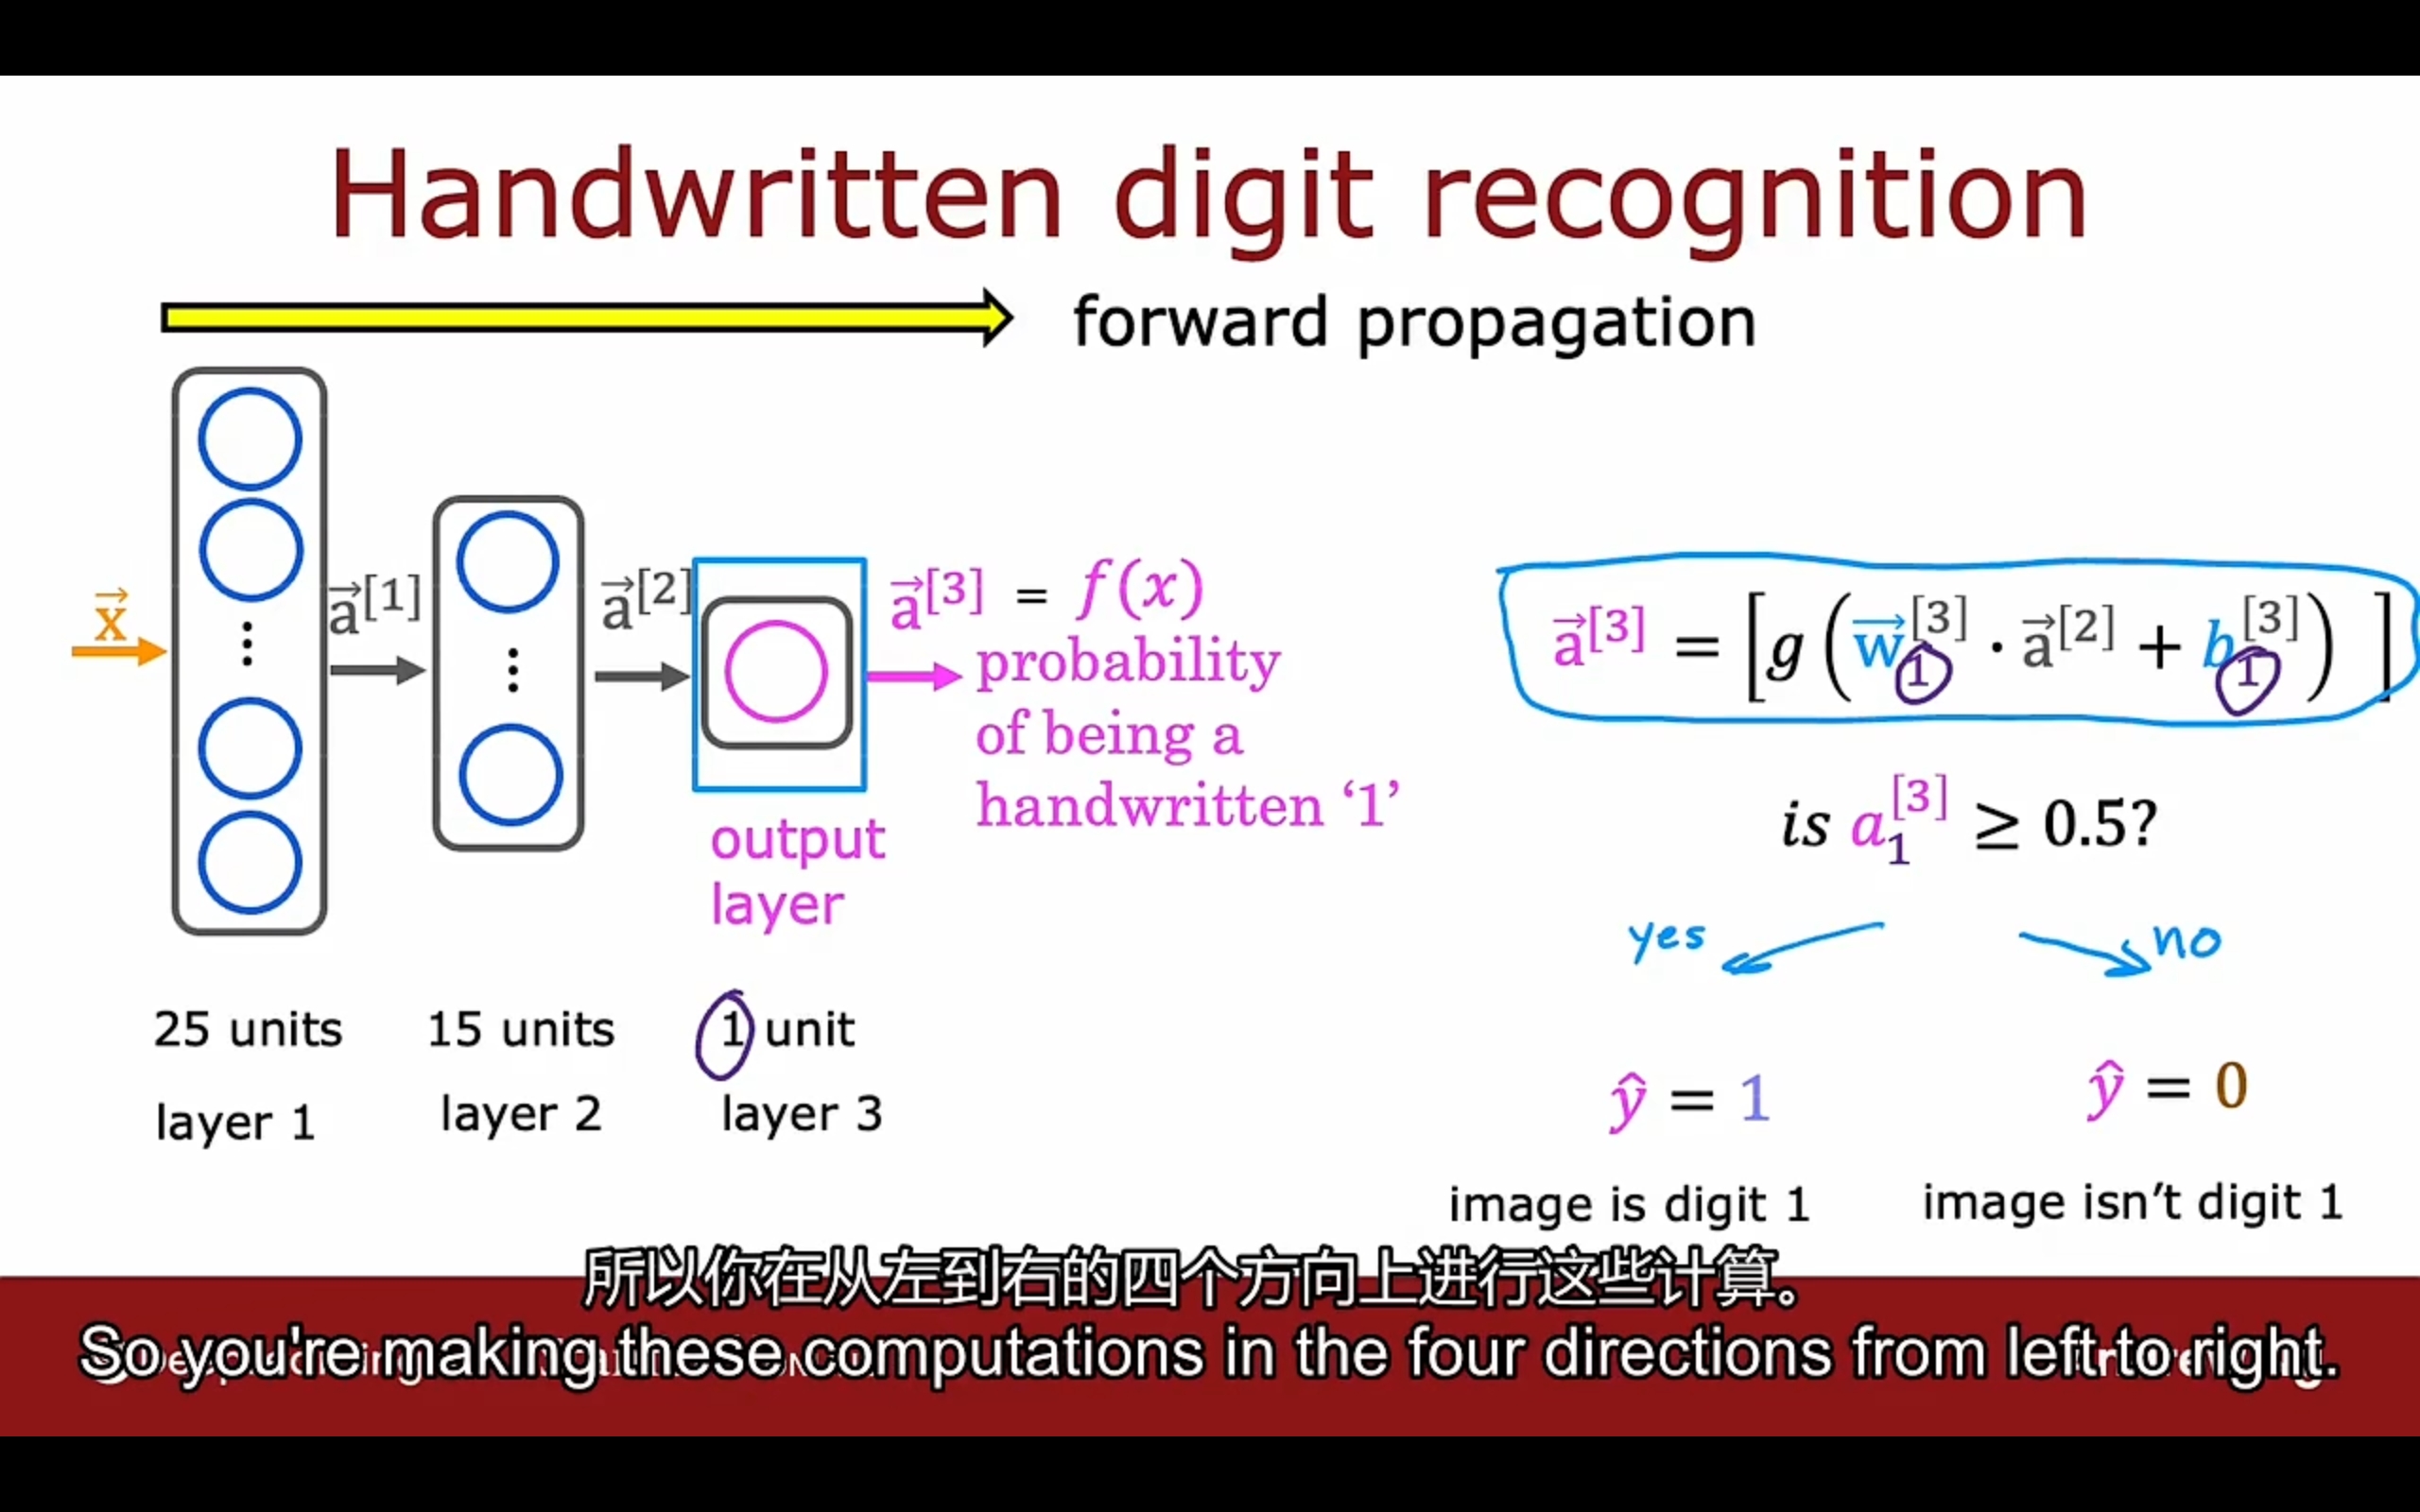
前向传播
forward propagation
tensorflow实现

1 | x = np.array([200.0, 17.0]) |
数据结构
1 | x = np.array([[200, 17]]) # [200, 17] 1 * 2 矩阵 tensorflow中使用 |
tensorflow的设计与发明旨在处理非常大的数据集,所以通过在矩阵而不是一维数组中表示数据
所以转换的时候需要注意!
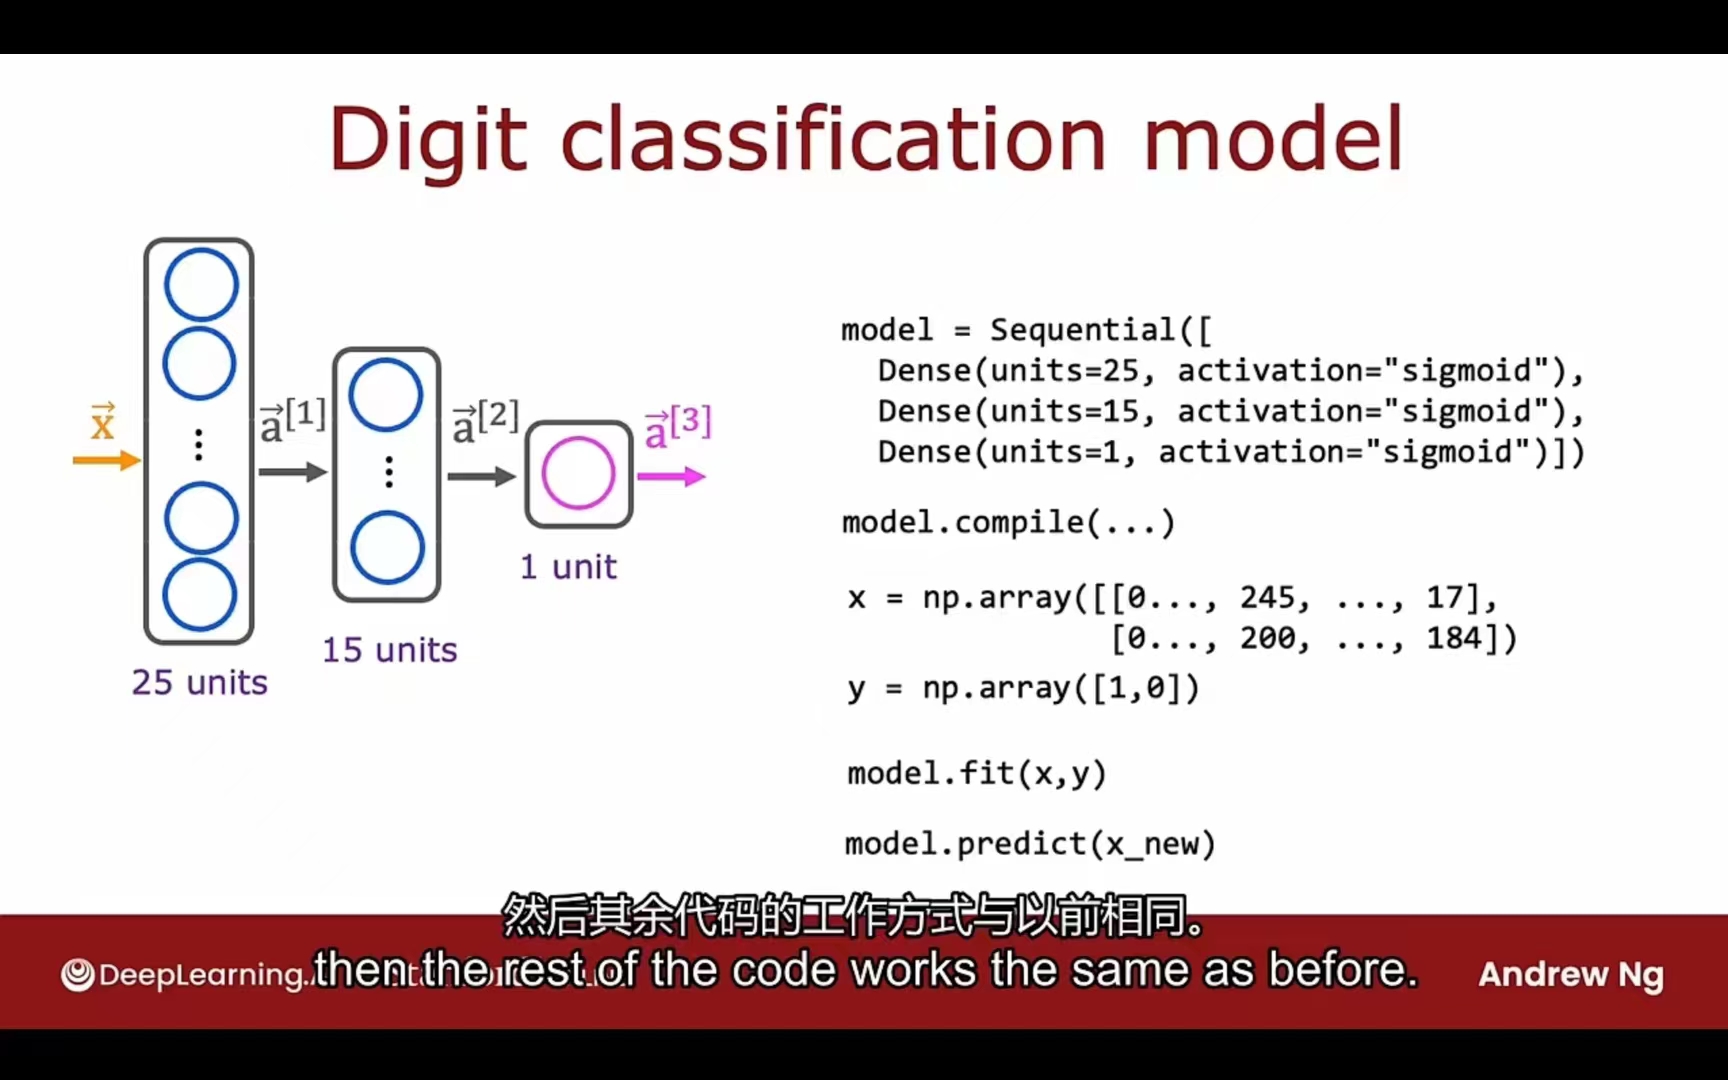
搭建神经网络
1 | layer_1 = Dense(units=3, activation='sigmoid') |
原理 glance
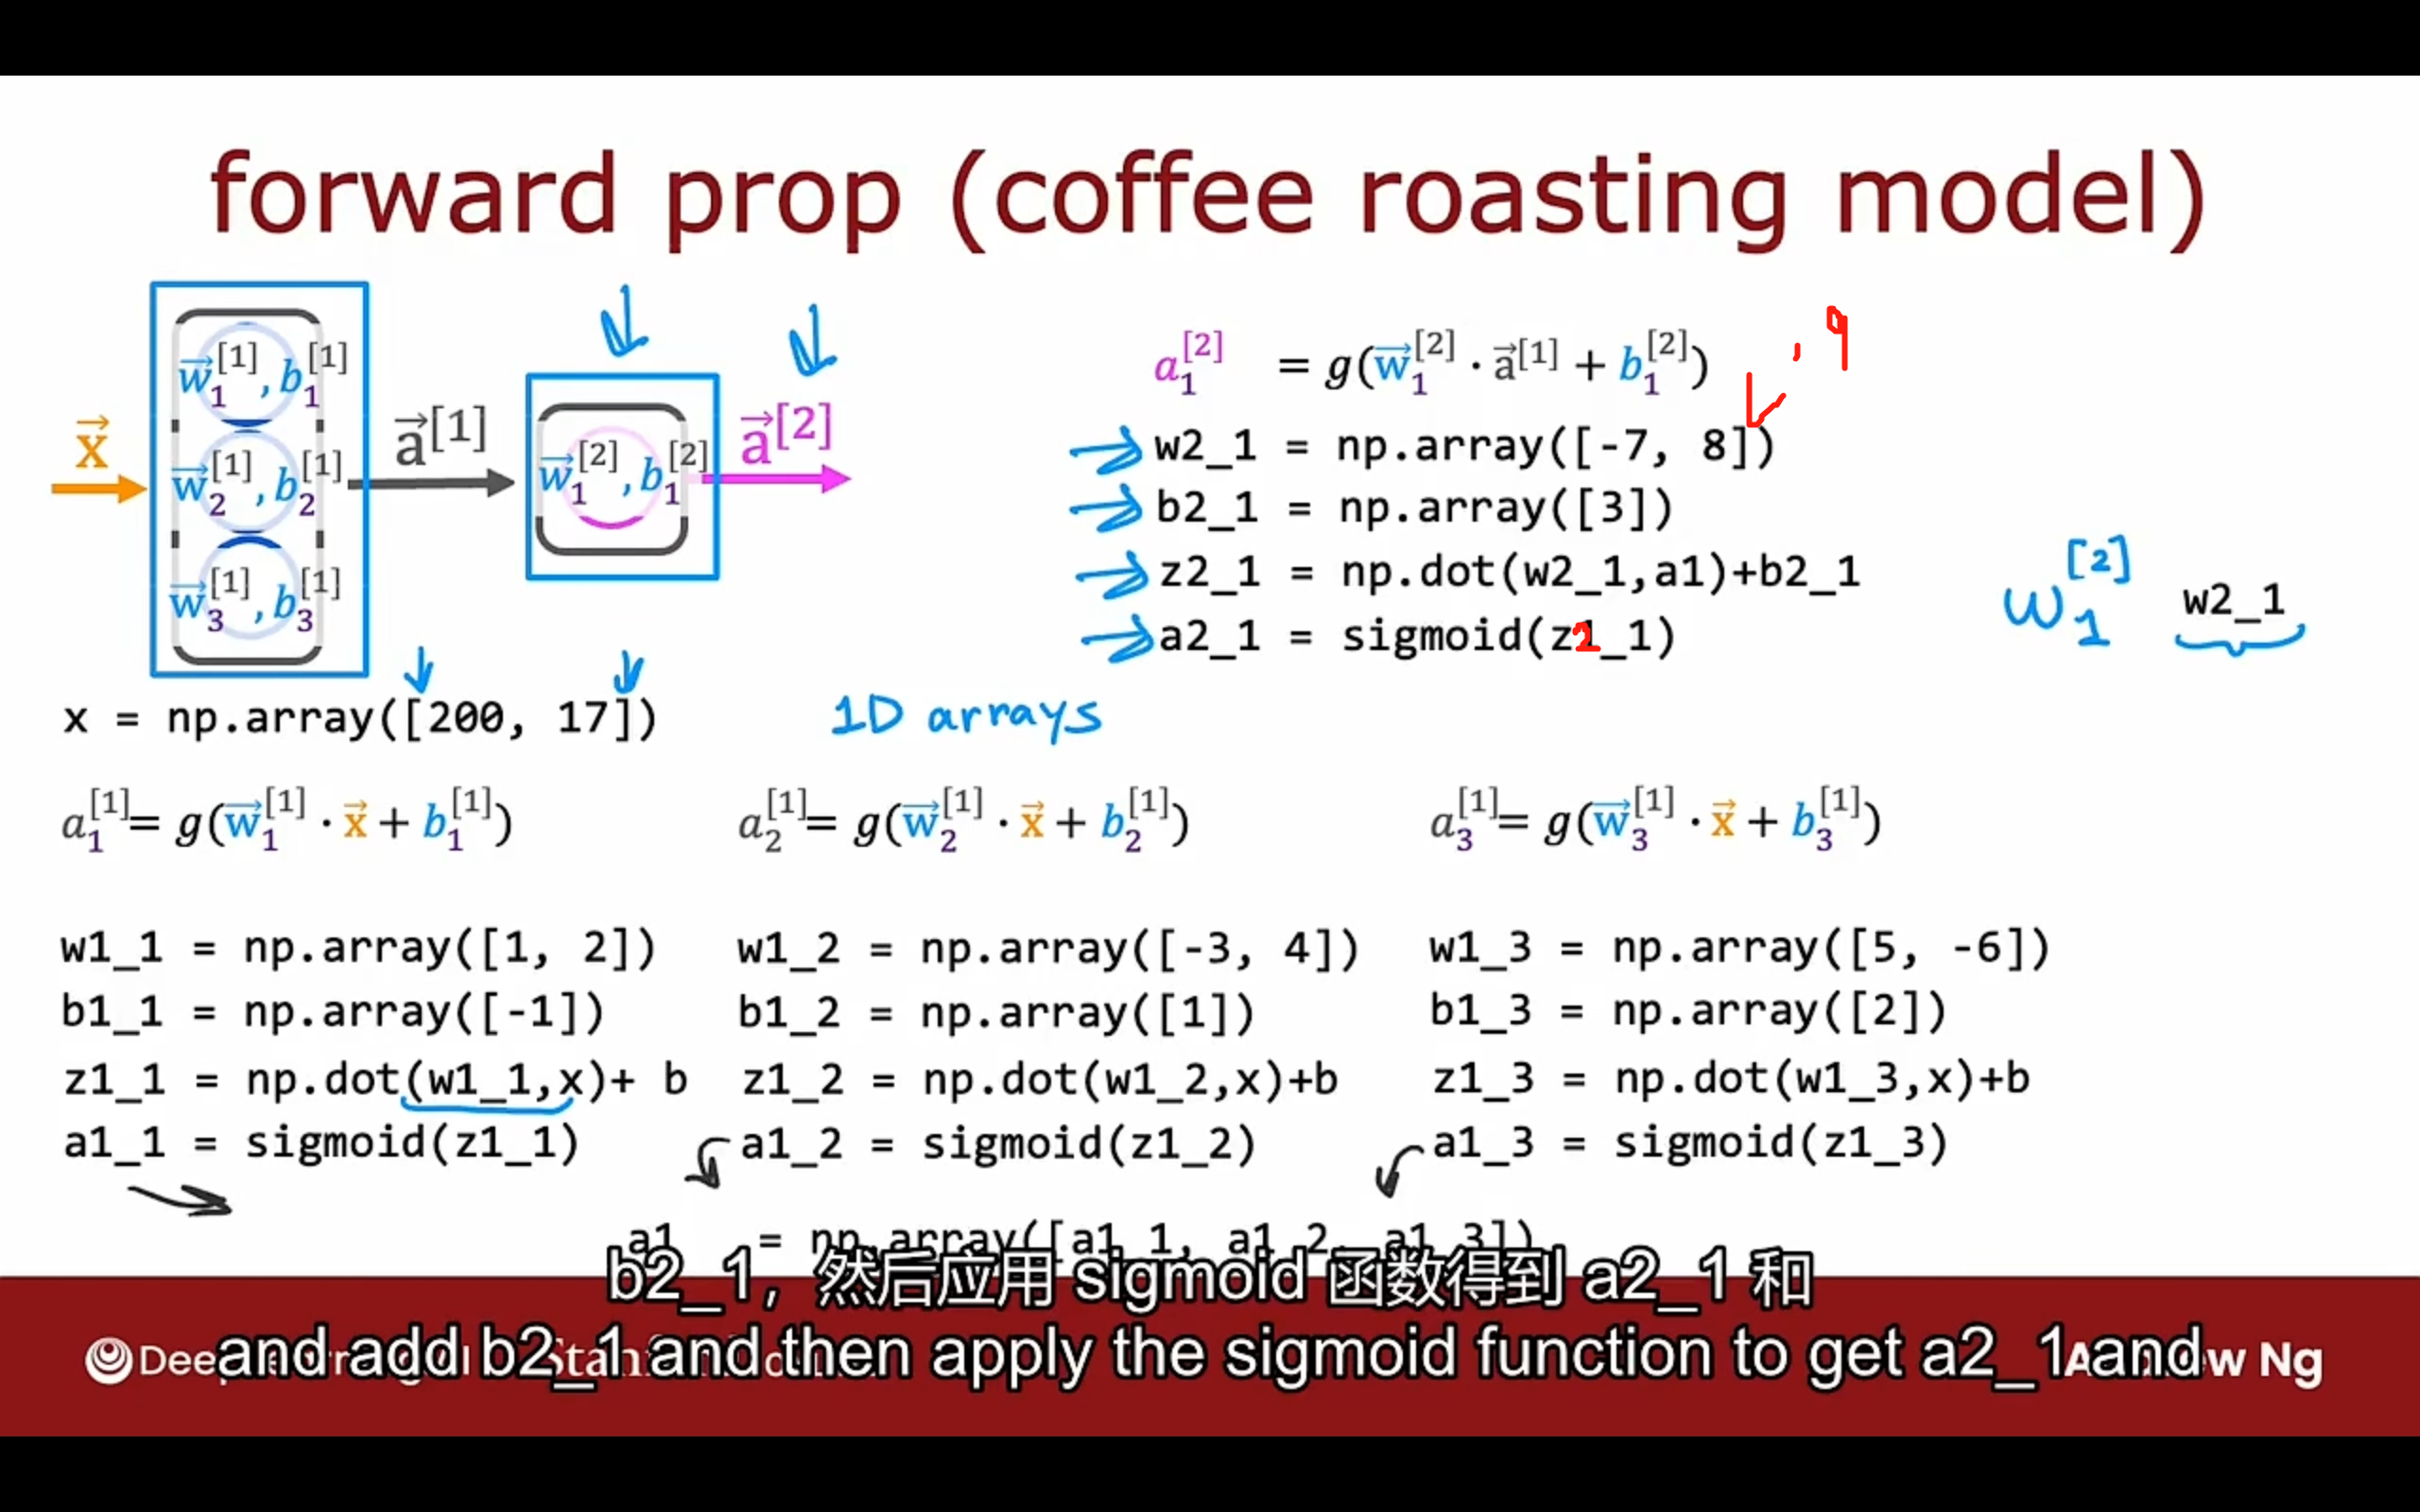
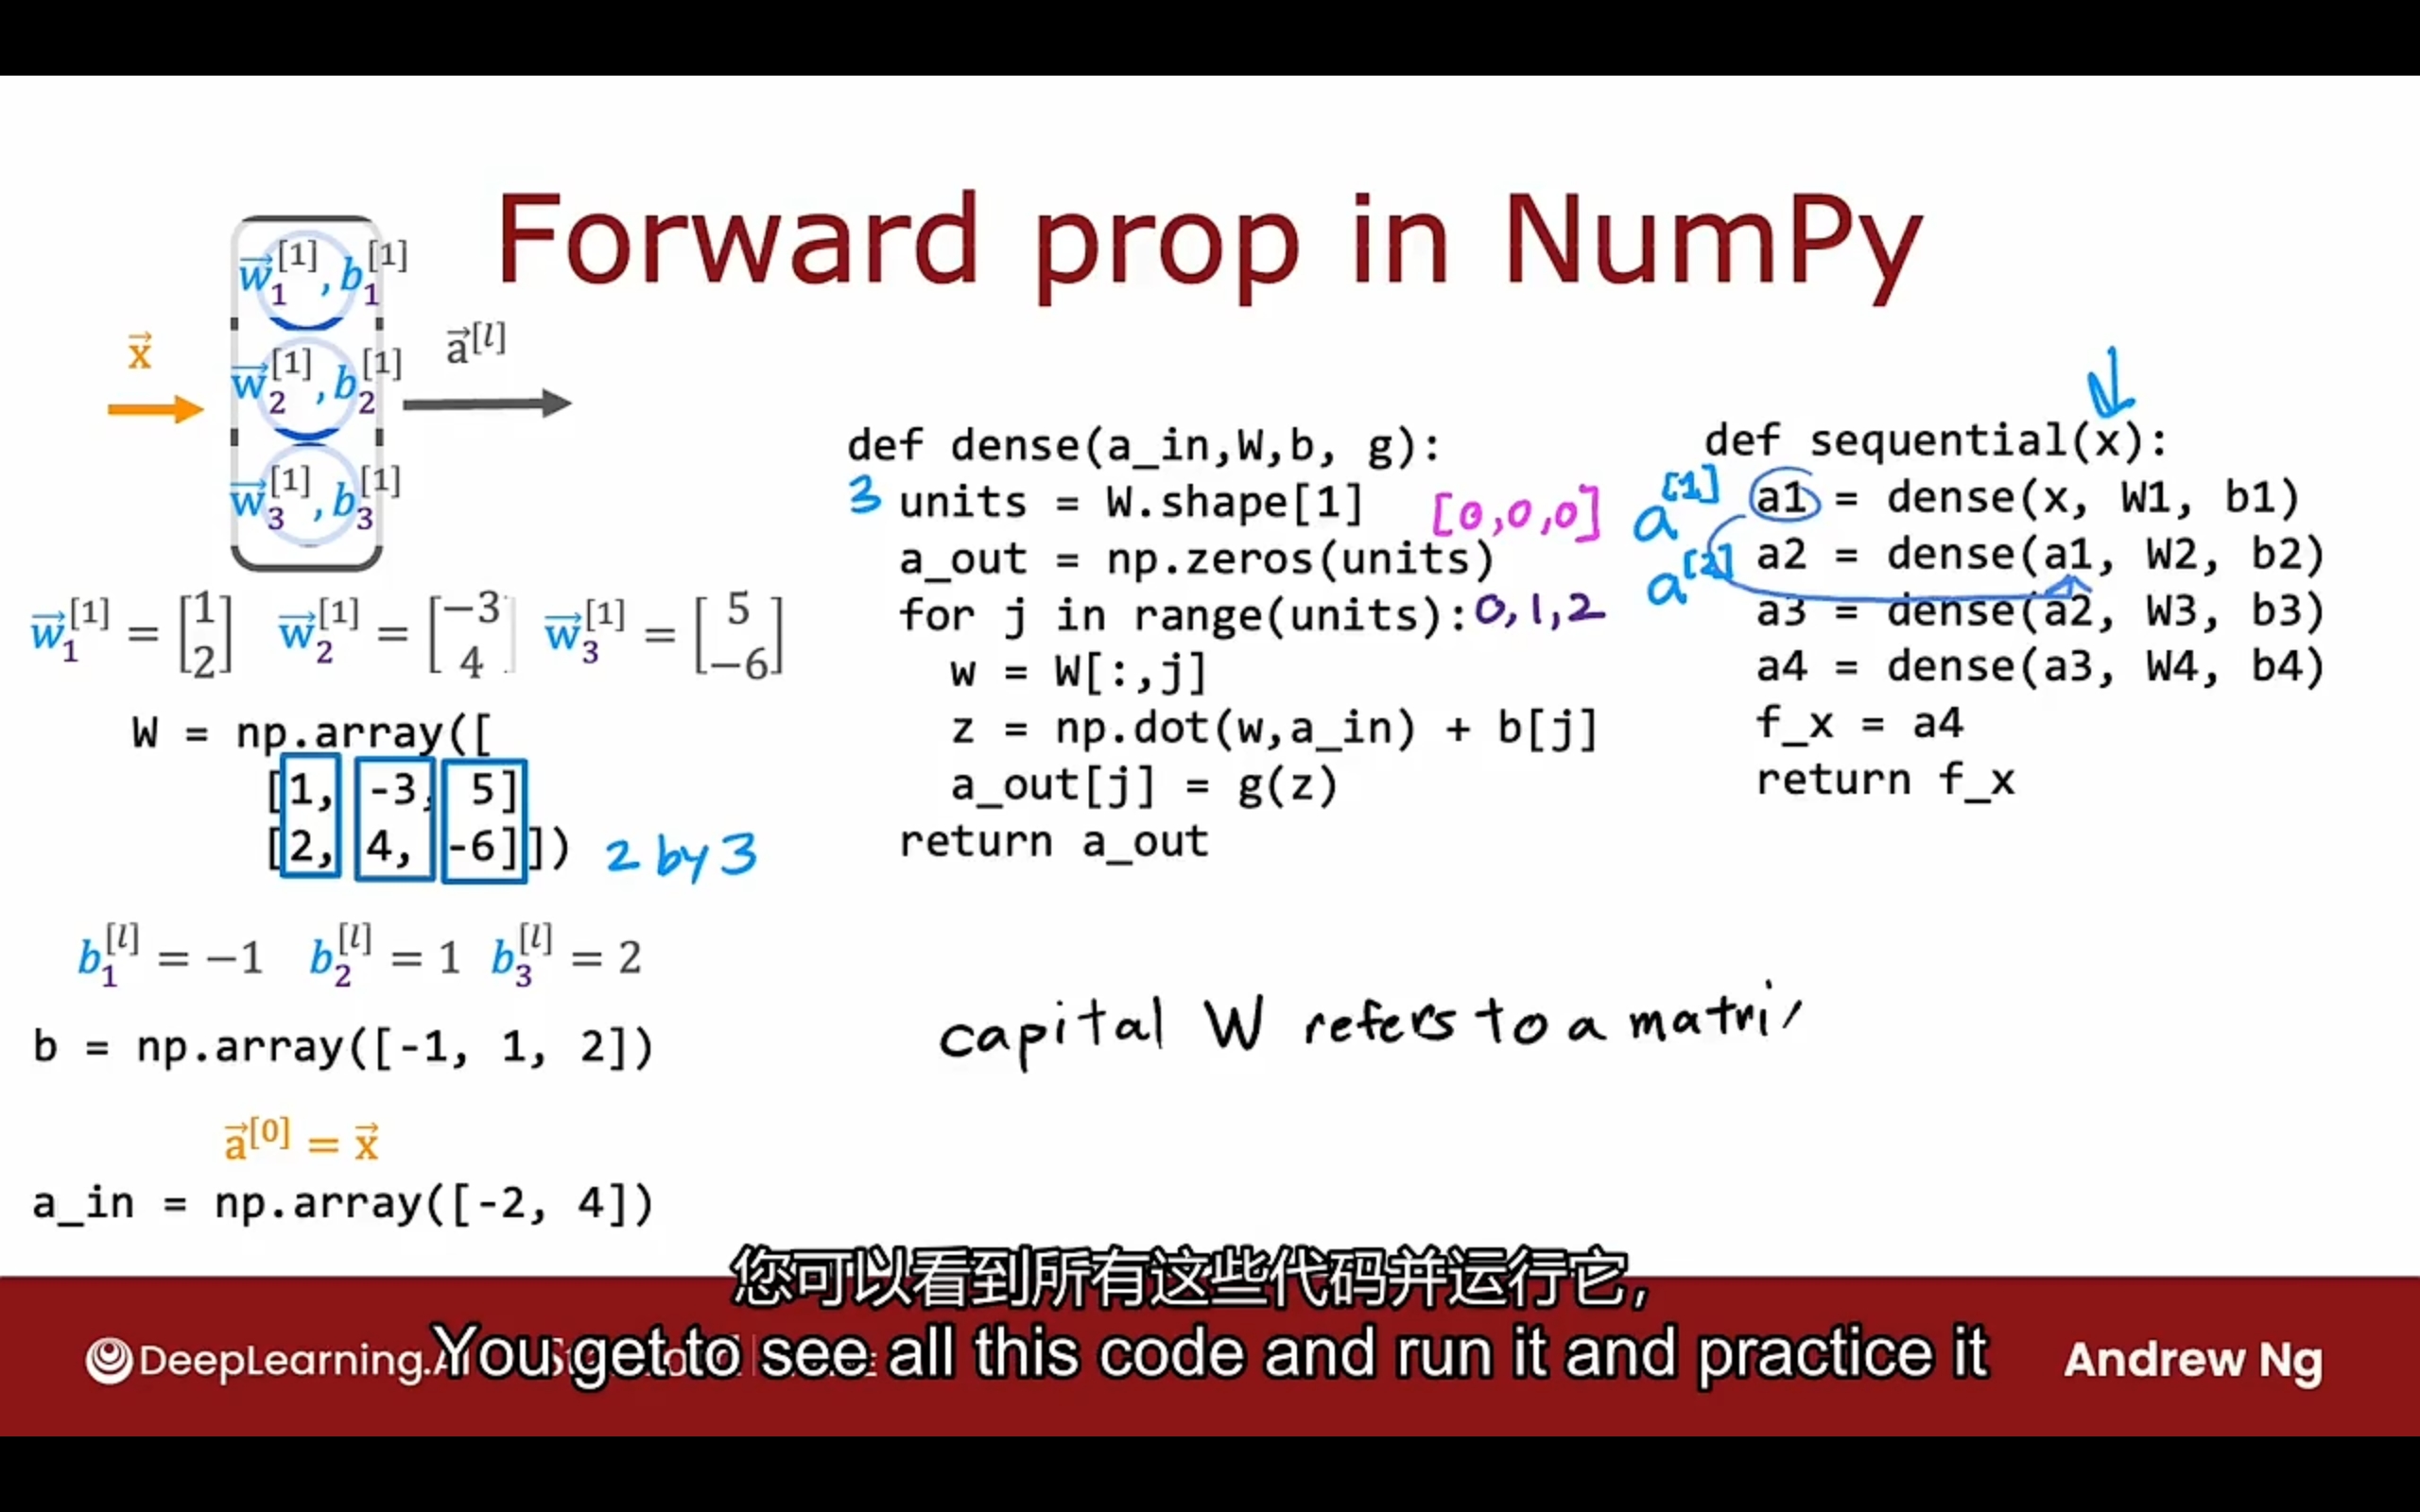
前向传播的一般实现:
人类大脑具有惊人的适应性和可塑性,去处理不同输入范围、不同种类的信息。
小结论:
- 如果当前层的输入为$s_{in}$个单元, 输出为$s_{out}$个单元, 那么$\vec w$ 将是$s_{in} * s_{out}$的矩阵
- b将是一个$s_{out}$的向量
补充知识:
向量点乘和矩阵乘法的关系:
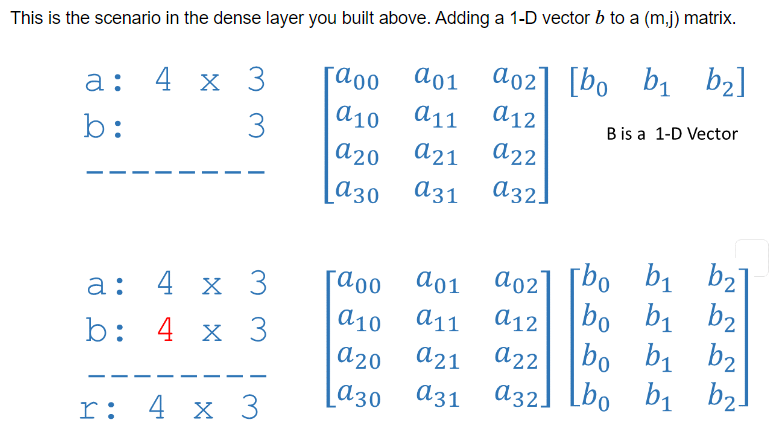
a_in是(m, n),W是(n, j), b是(j, 1)的向量
矩阵乘法会加速训练过程
1 | def dense(A_in, W, b, g) |
其中b能加不报错的原因:
训练神经网络(多层感知机)的细节
1 | import tensorflow as tf |
better version:
1 | import tensorflow as tf |
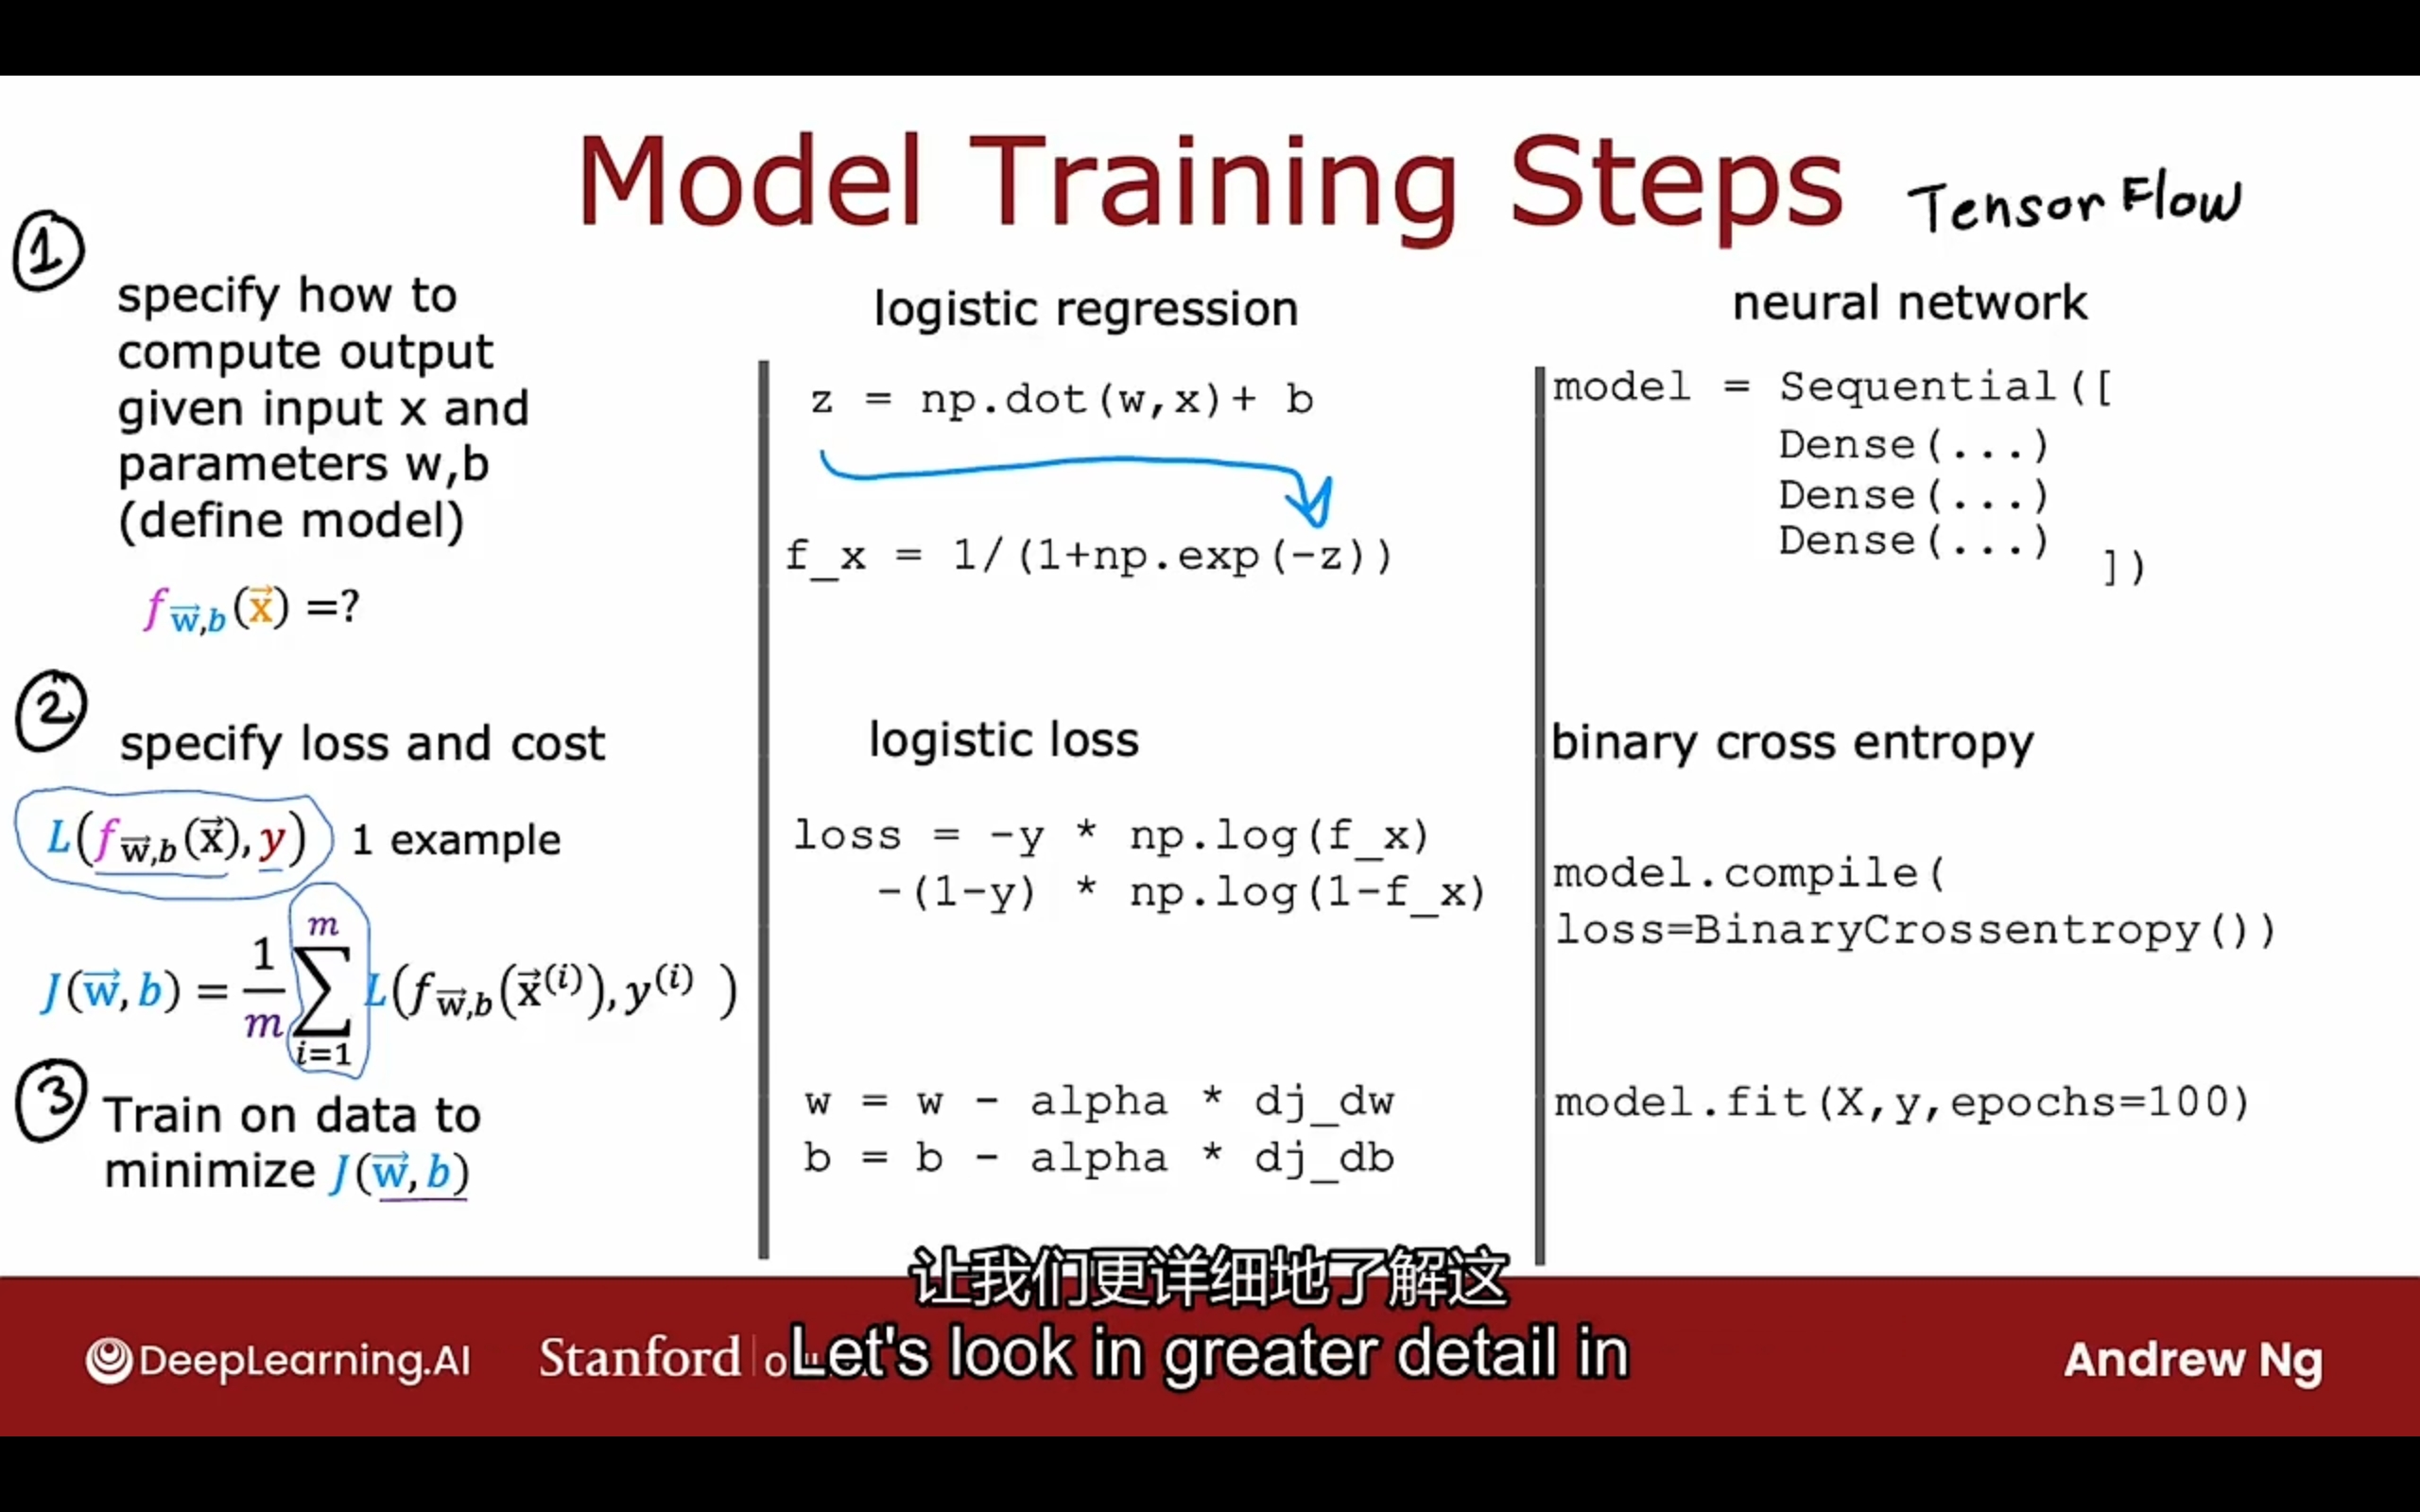
损失函数:
BinaryCrossentropy()二元交叉熵损失函数MeanSquareError()均值方差损失函数
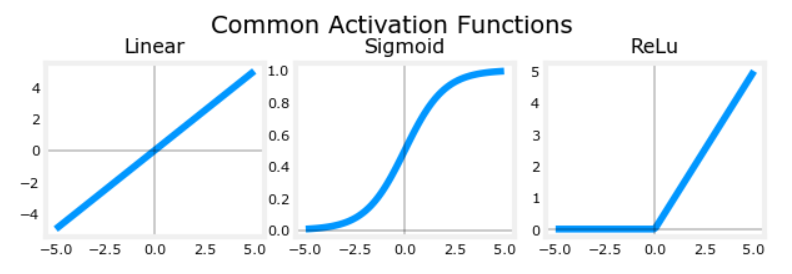
激活函数:
sigmoid
$g(z) = \frac{1}{1 + e^{-z}}$
- 适用范围:y = 0 / 1
ReLU (most common)
$g(z) = max(0, z)$
- 适用范围: y = + / -
- 优势:相较于sigmoid往往训练得更快(因为梯度下降flat的地方很少)
Linear activation function 线性激活函数(相当于没用)
$g(z) = z$
- 适用范围:y = 0 or +
Softmax
- LeakyReLU
- tan h
- swish
建议:
- 输出层:
- sigmoid y = 0 / 1 二分类问题
- linear y = + / -
- ReLU y = 0 or +
- 隐藏层:
- ReLU
使用激活函数的必要性:
如果所有层(hidden + output) 的激活函数都是线性激活函数(或没有激活函数),那么其等价于一个线性回归模型;
如果hidden层的激活函数都是线性激活函数(或没有激活函数),output层的激活函数是sigmoid,那么其等价于一个逻辑回归模型
so, hidden层不要全部使用linear activation function!
Softmax
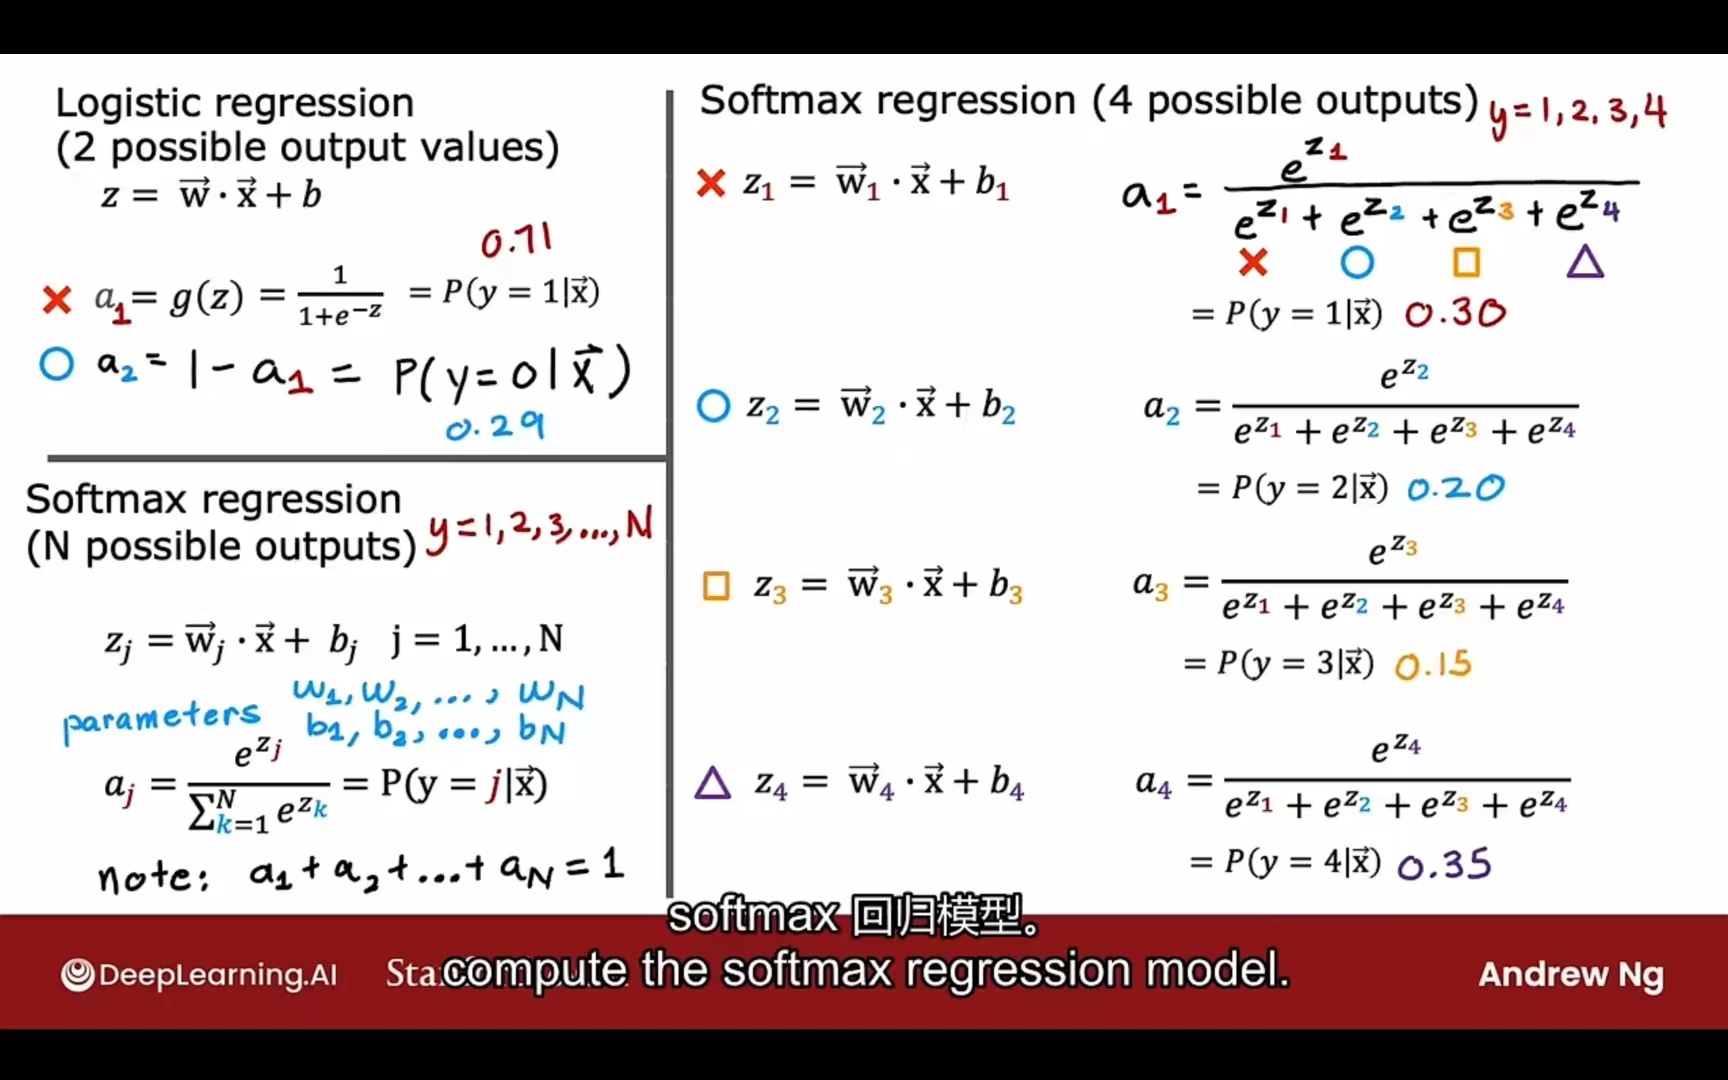
公式:
成本函数:
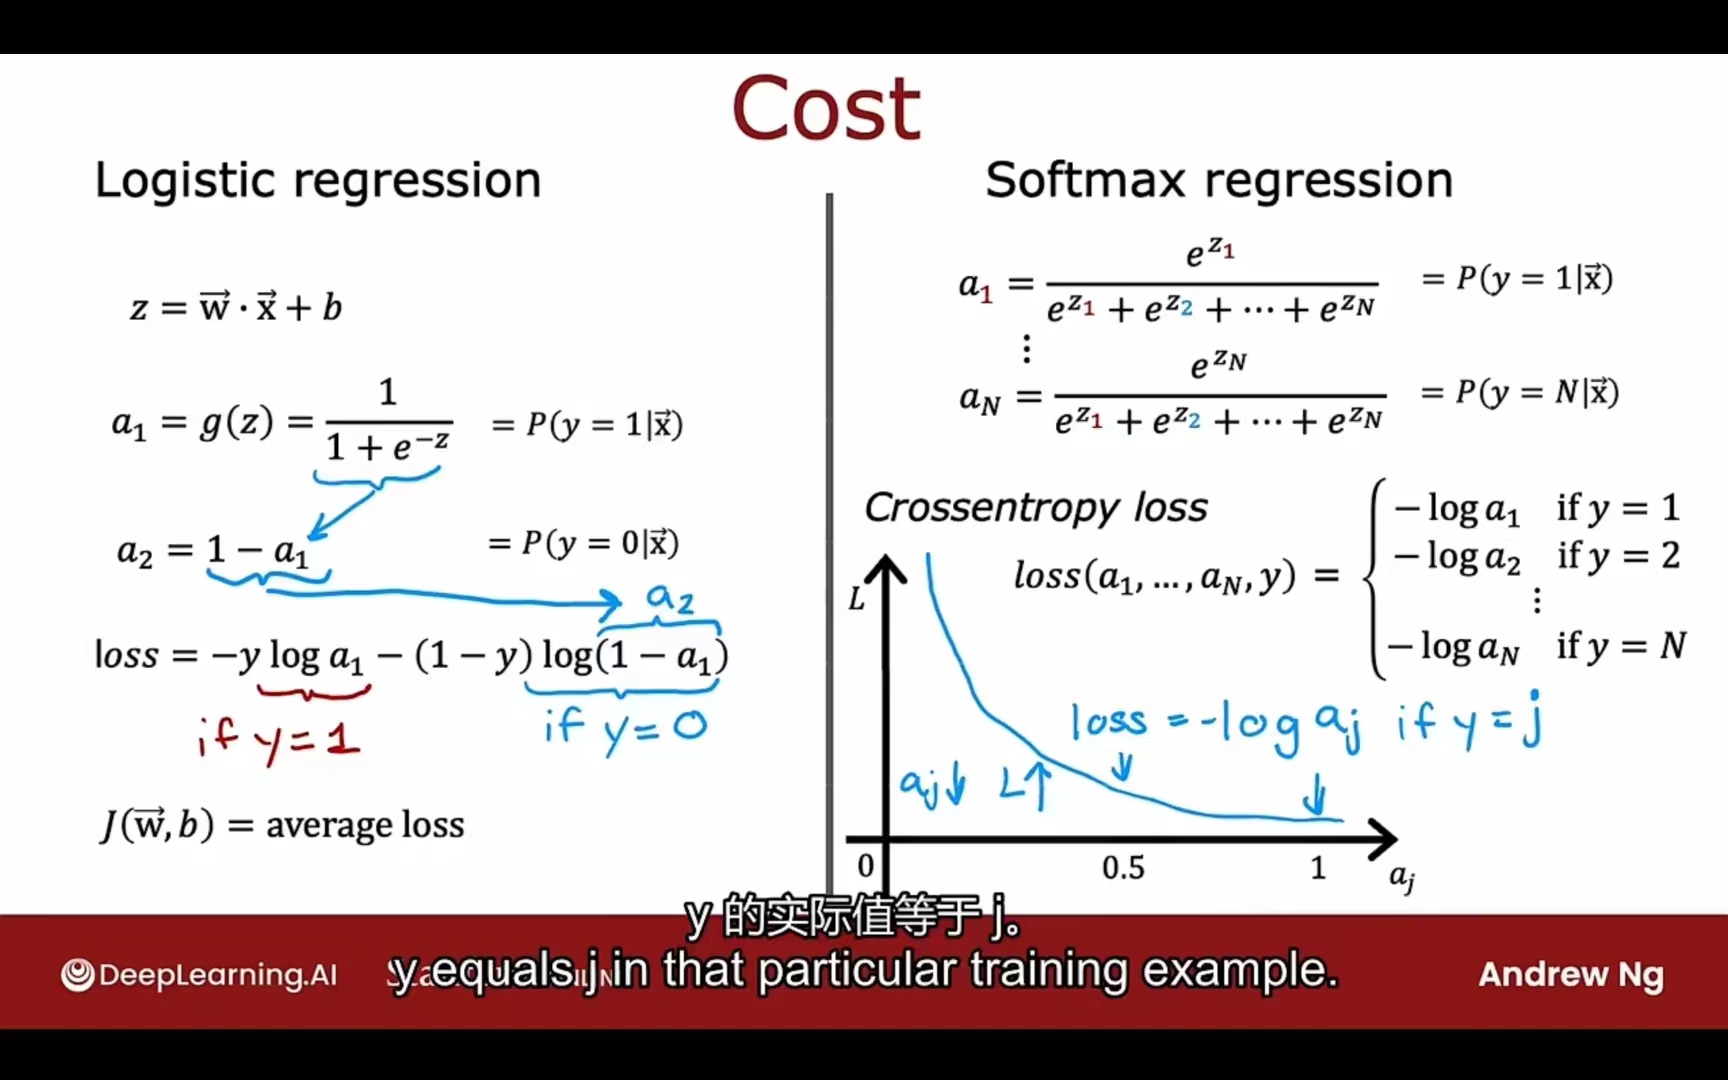
implement in code:
1 | import tensorflow as tf |
better version(改进实现):
1 | import tensorflow as tf |
原理相同,但在数字计算层面更精准(直接带入,tensorflow自动优化)
Softmax函数的准确计算:
原理:
可有效防止指数过大的溢出(overflow)现象
1 | def my_softmax_ns(z): |
交叉熵损失函数的准确计算:
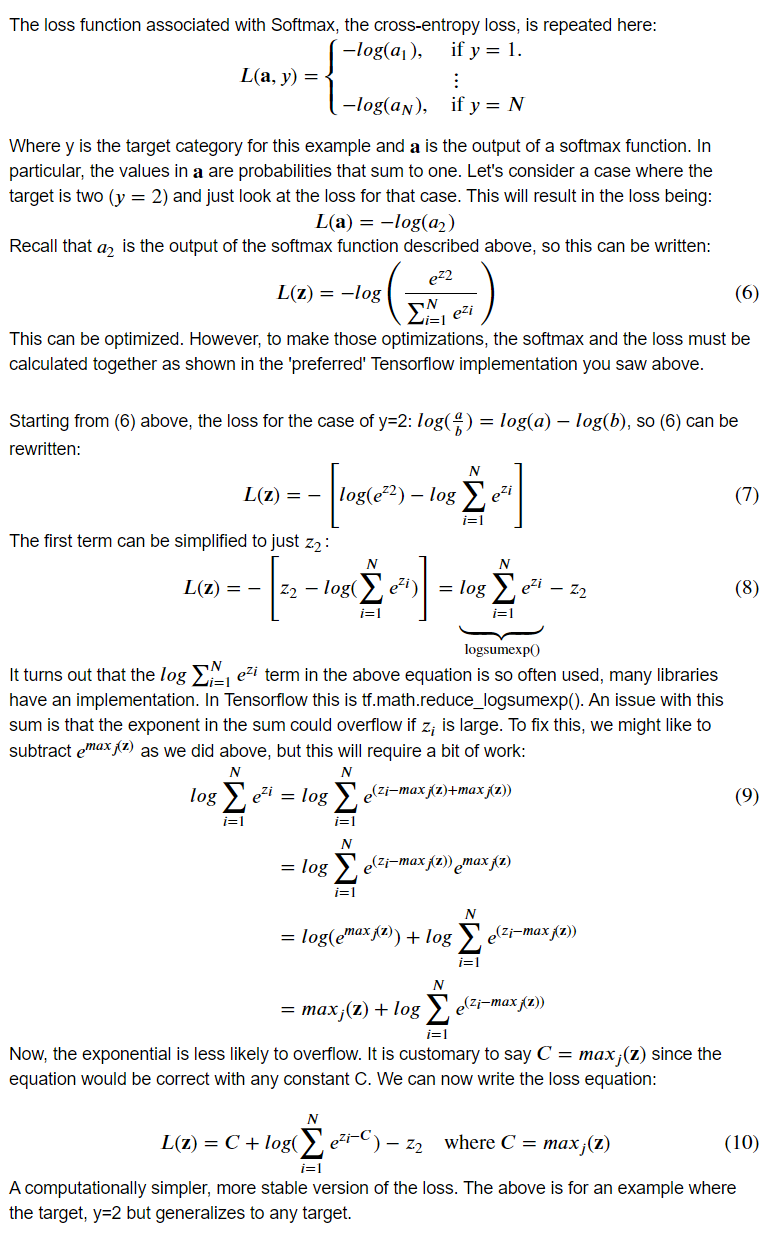
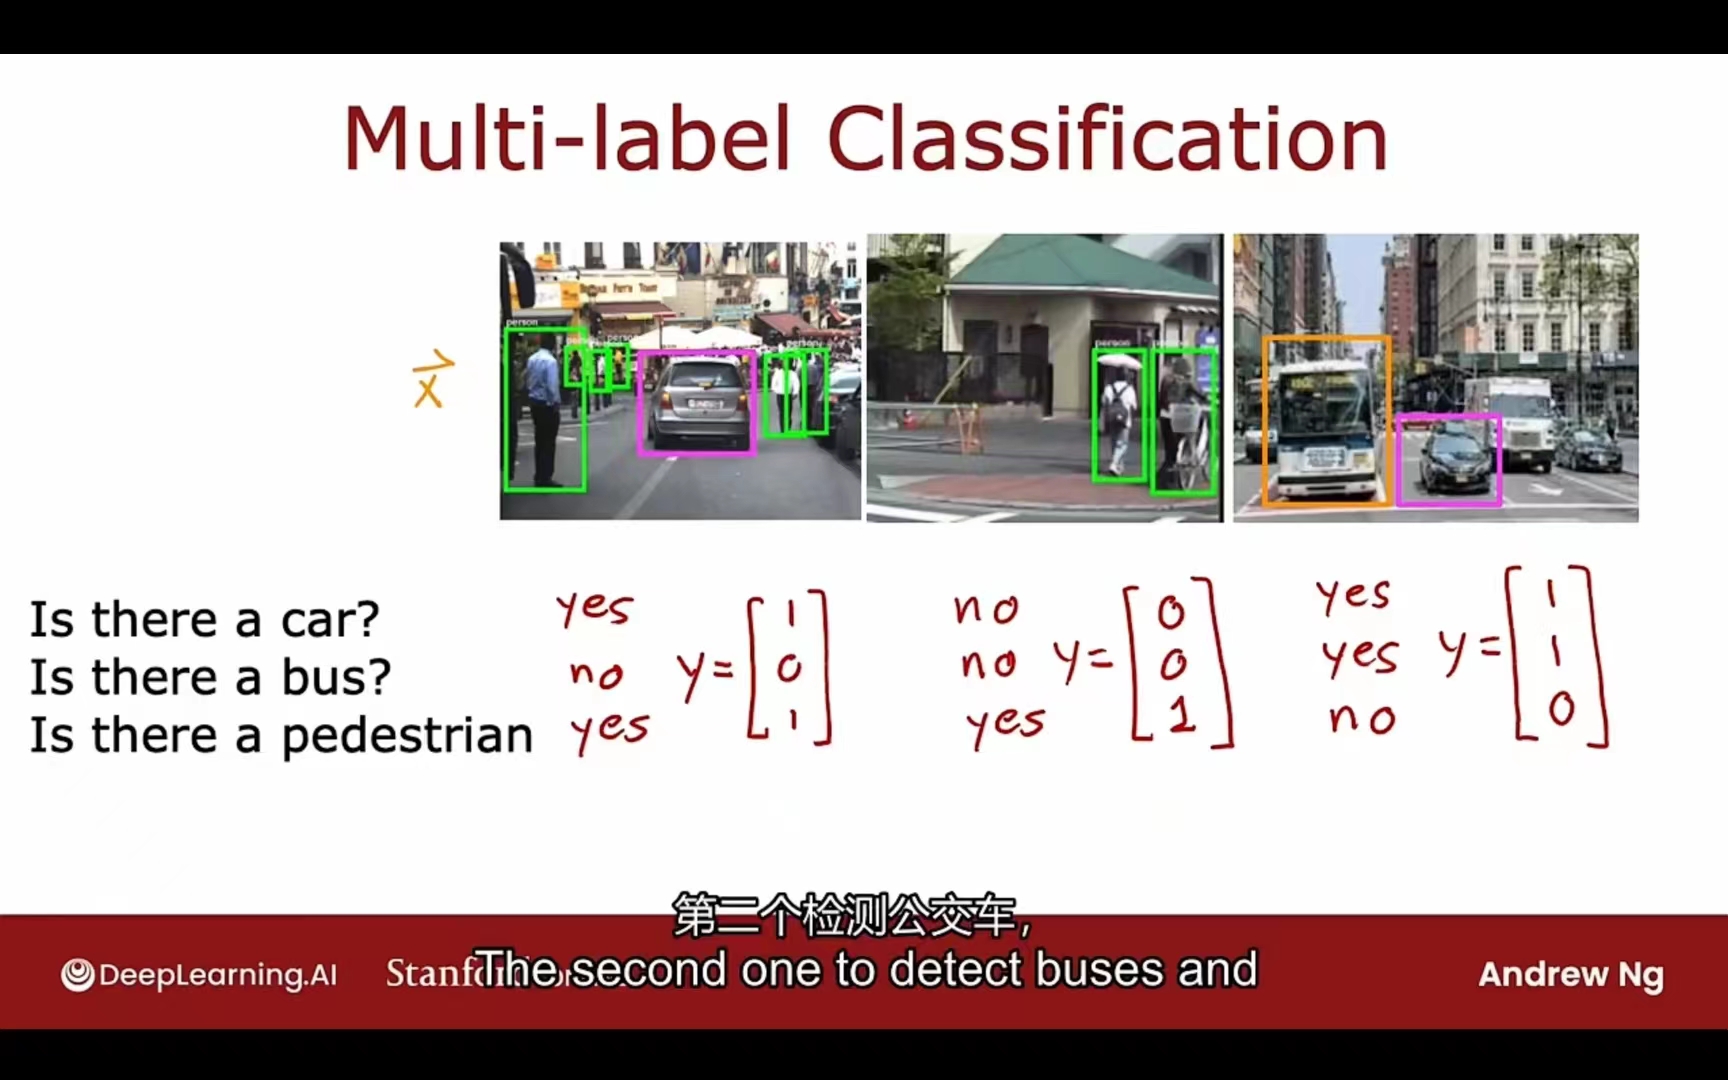
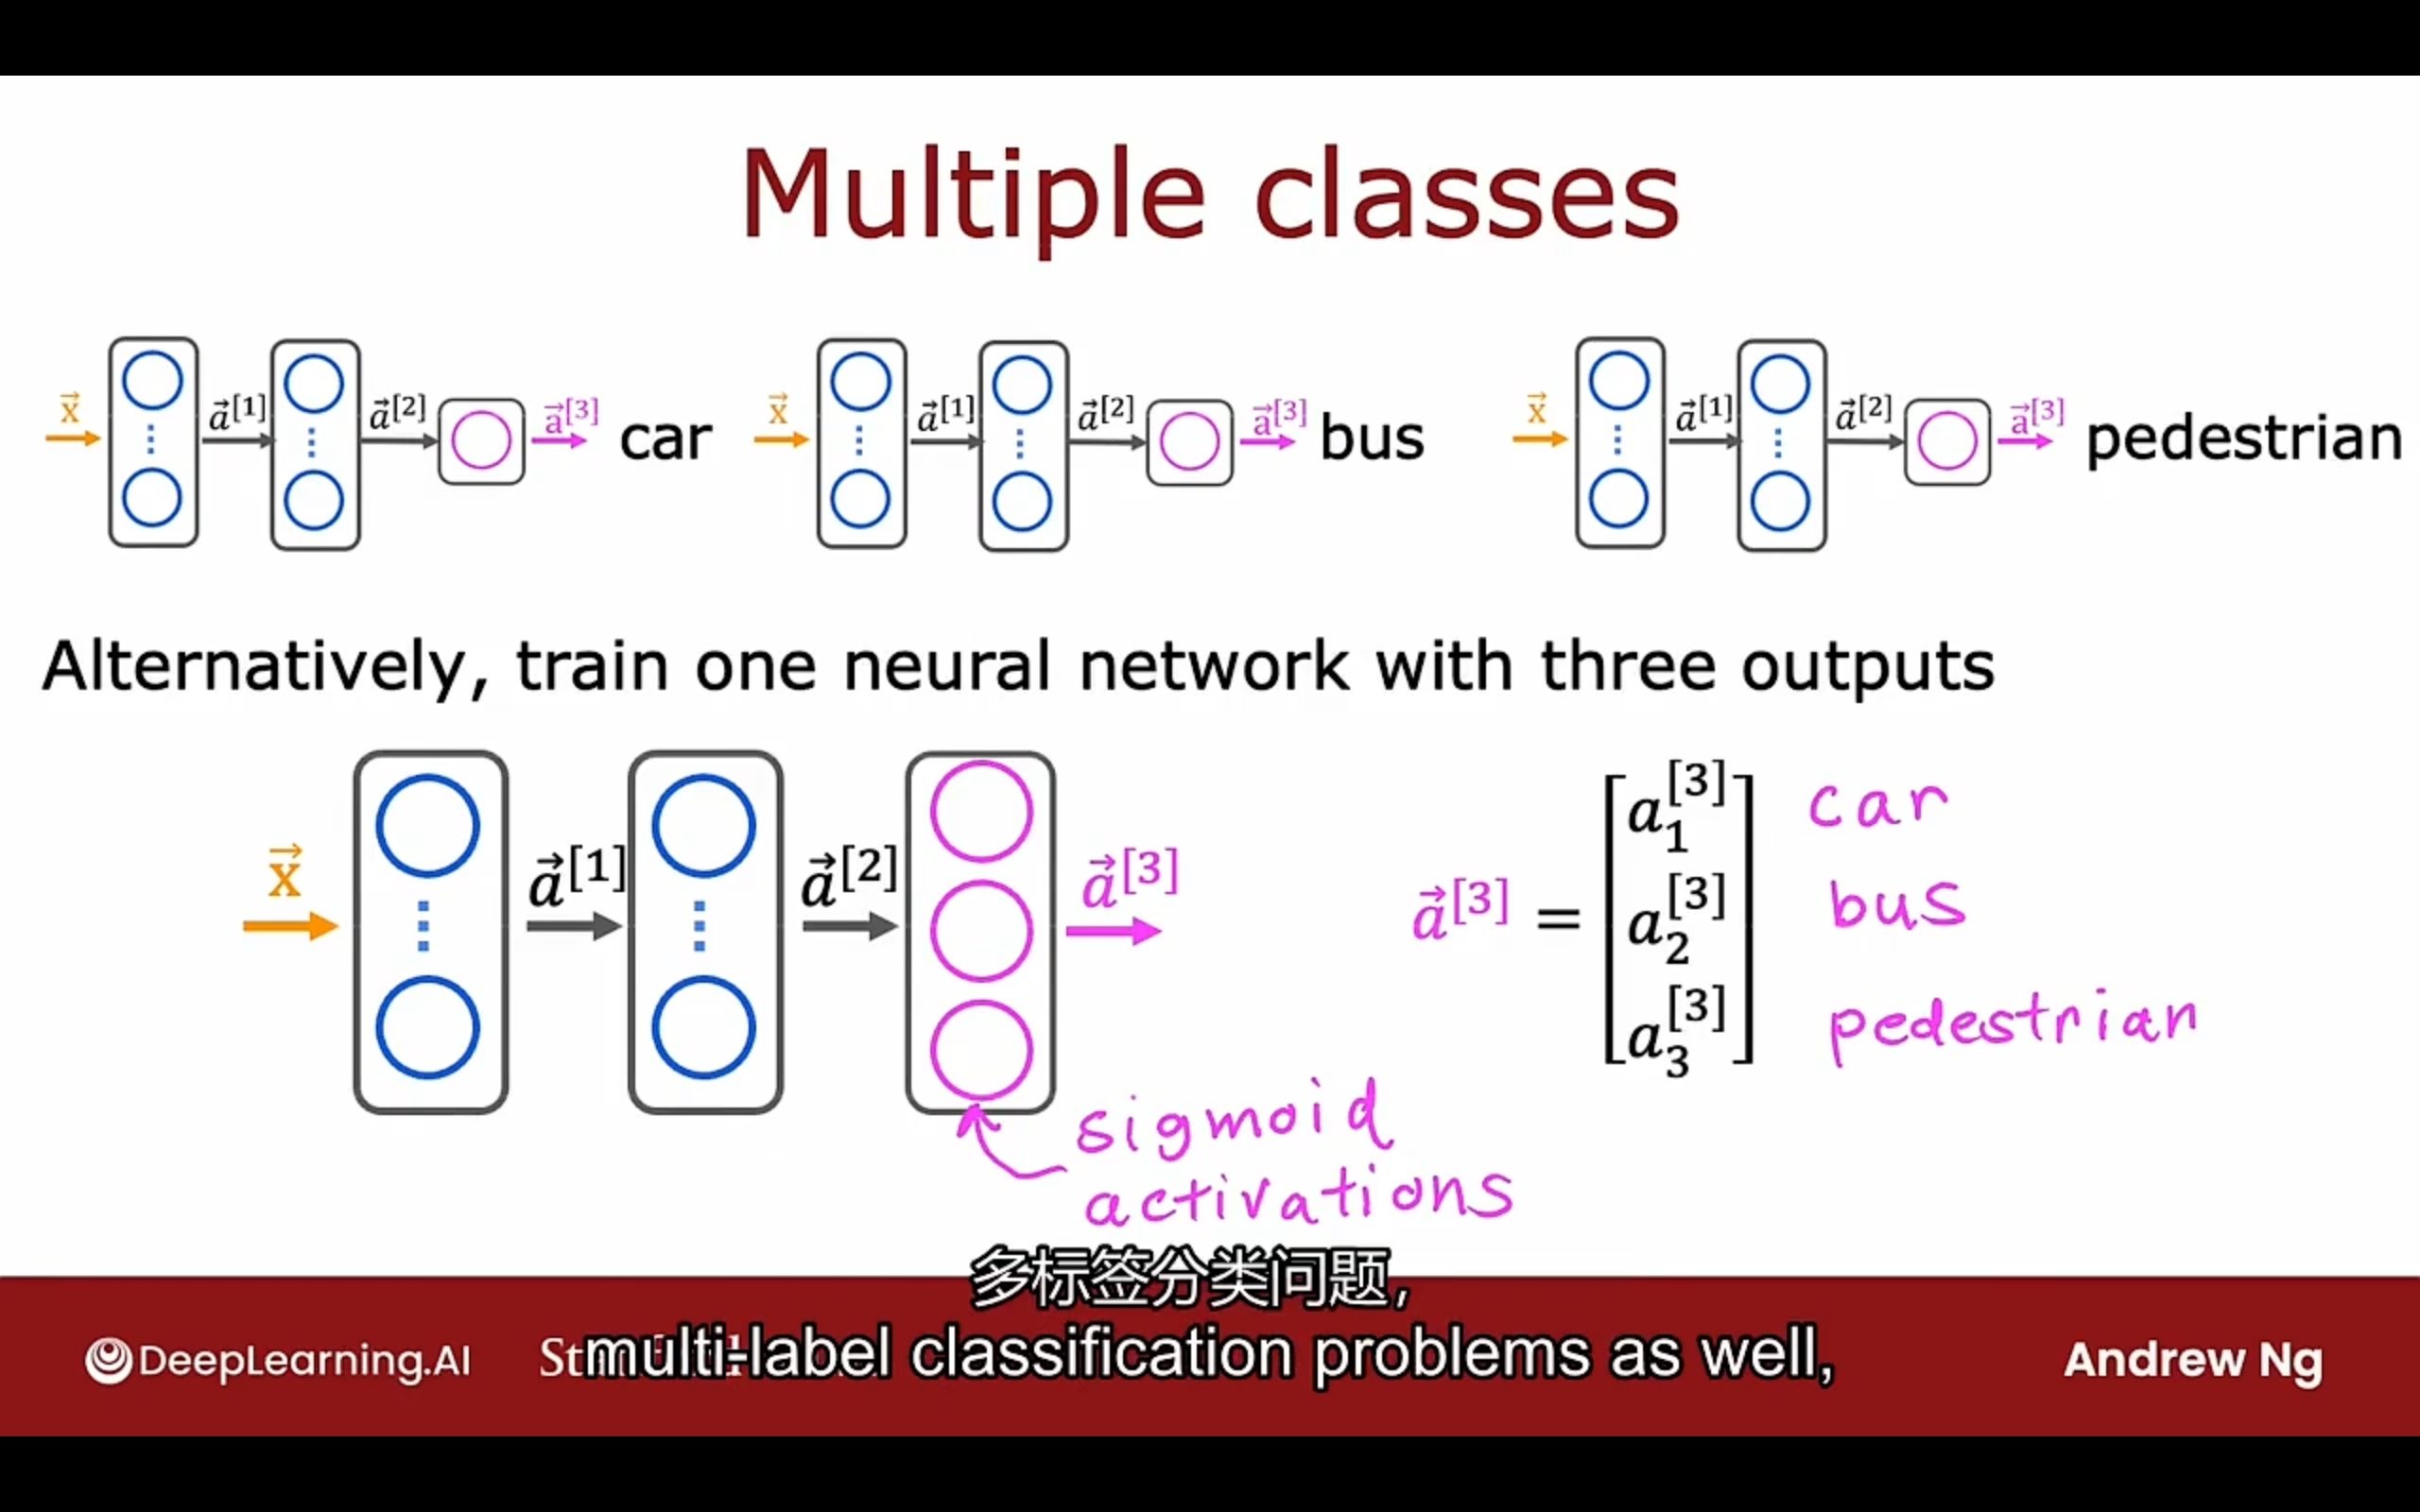
多输出(标签)问题
Adam优化器
Adam optimizers
可以自动调整学习率
对每个参数都有自己的学习率
- 如果$w_j$ or b保持向同样一个方向移动,就加大学习率$\alpha_j$
- 如果$w_j$ or b持续震荡或弹跳,就缩减学习率$\alpha_j$
implement code:
1 | model.complie(optimizer=tf.keras.optimizers.Adam(learning_rate=1e-3)), |
layer分类
Dense Layer 全连接层
Each neuron output is a function of all the activation outputs of the previous layer
主要用于网络的最后一层,负责将前面提取到的特征进行分类和回归
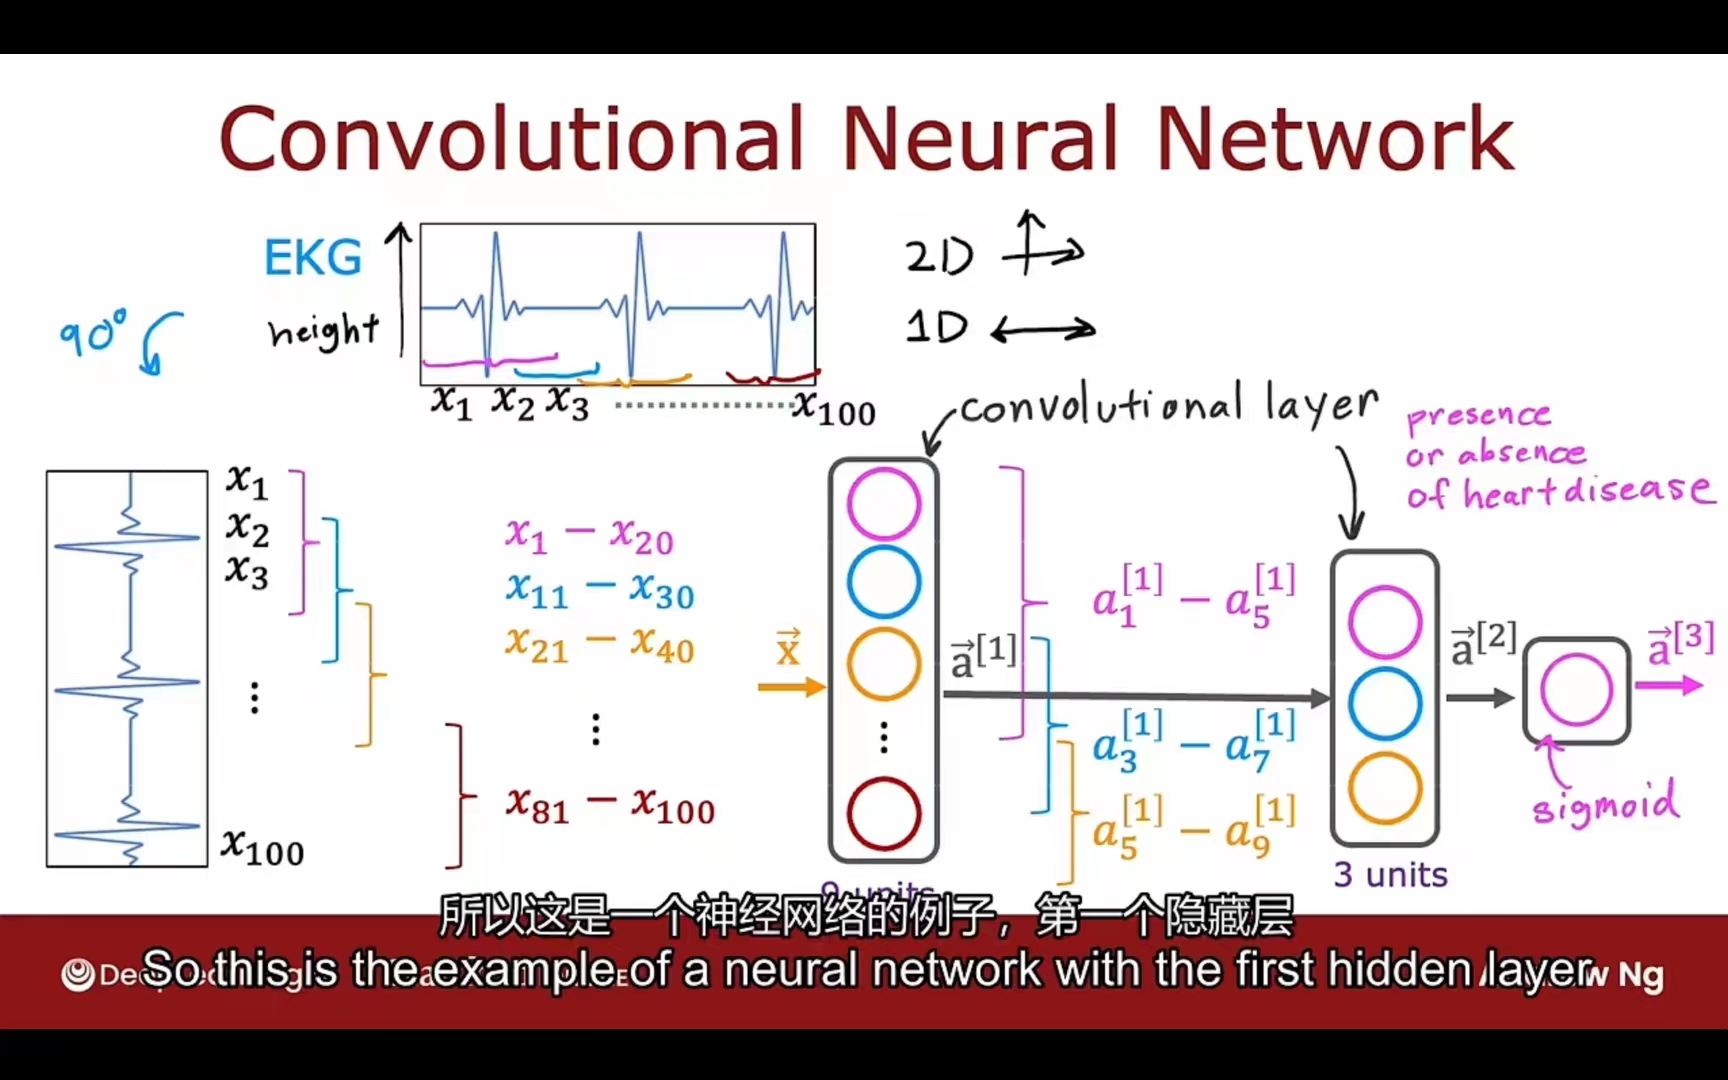
Convolutional Layer 卷积层
Each neuron only looks at part of the previous layer’s inputs
主要用于提取数据的特征
优点:
- 更快的计算速度
- 更少的训练数据需求(不易过拟合)
CNN范例:
PS: Python中导数求法
需要库sympy
1 | import sympy |
从左到右计算损失函数 前向传播
从右到左计算导数 反向传播
参考:https://blog.csdn.net/ft_sunshine/article/details/90221691
tips
- 增大训练集
- 减少特征值
- 获取额外的特征
- 增加高次幂特征
- 增大、减小正则化系数
评估模型
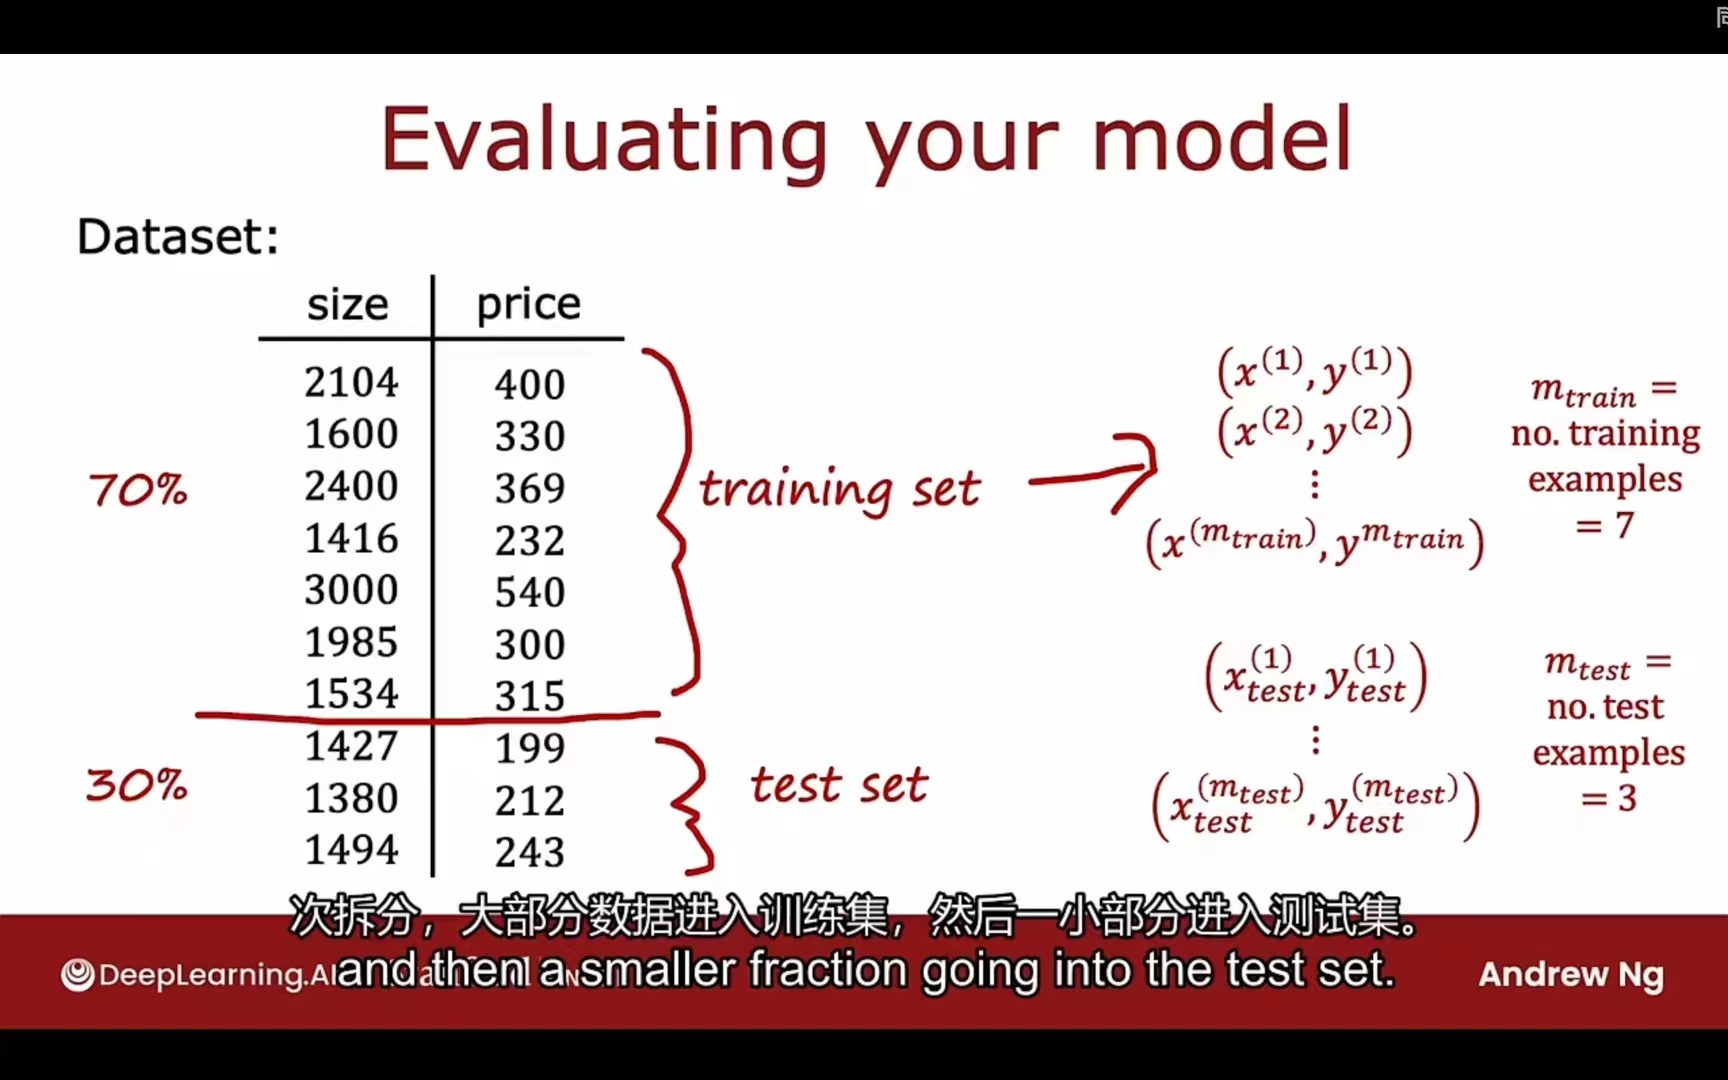
划分数据集:
方式一:
70% 训练集
30% 测试集
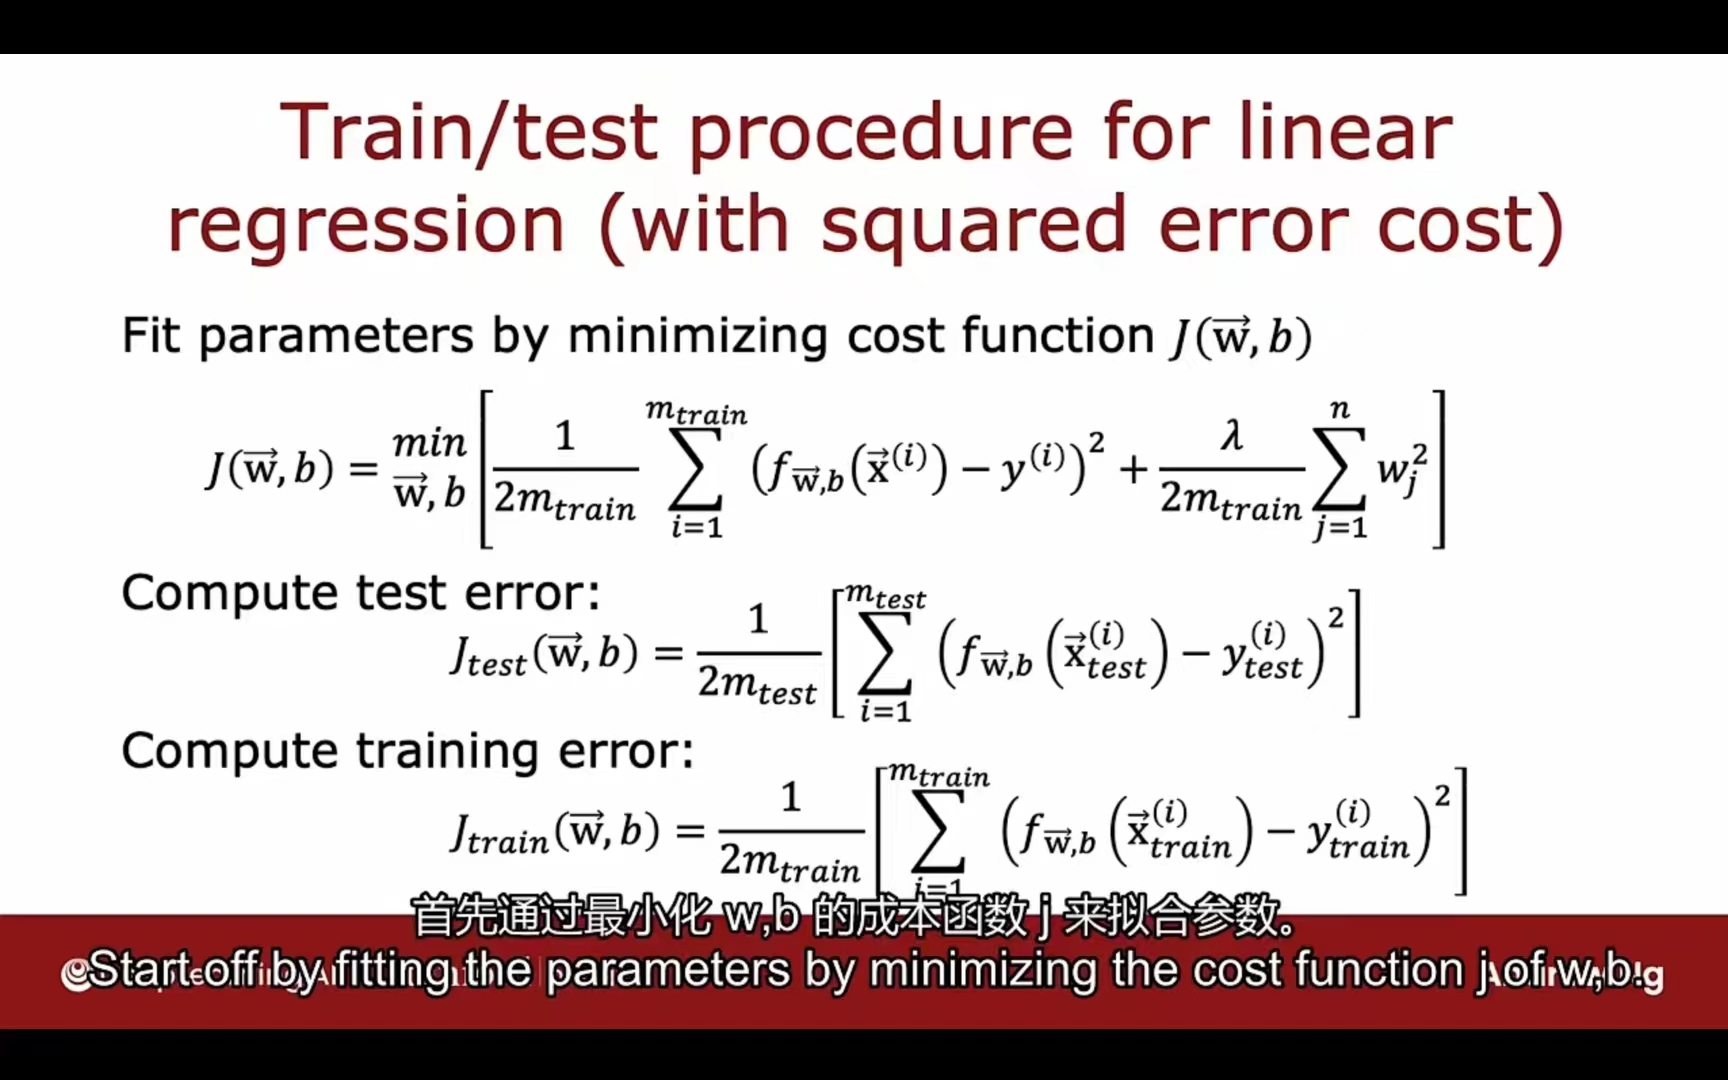
针对均方误差:
针对逻辑回归:
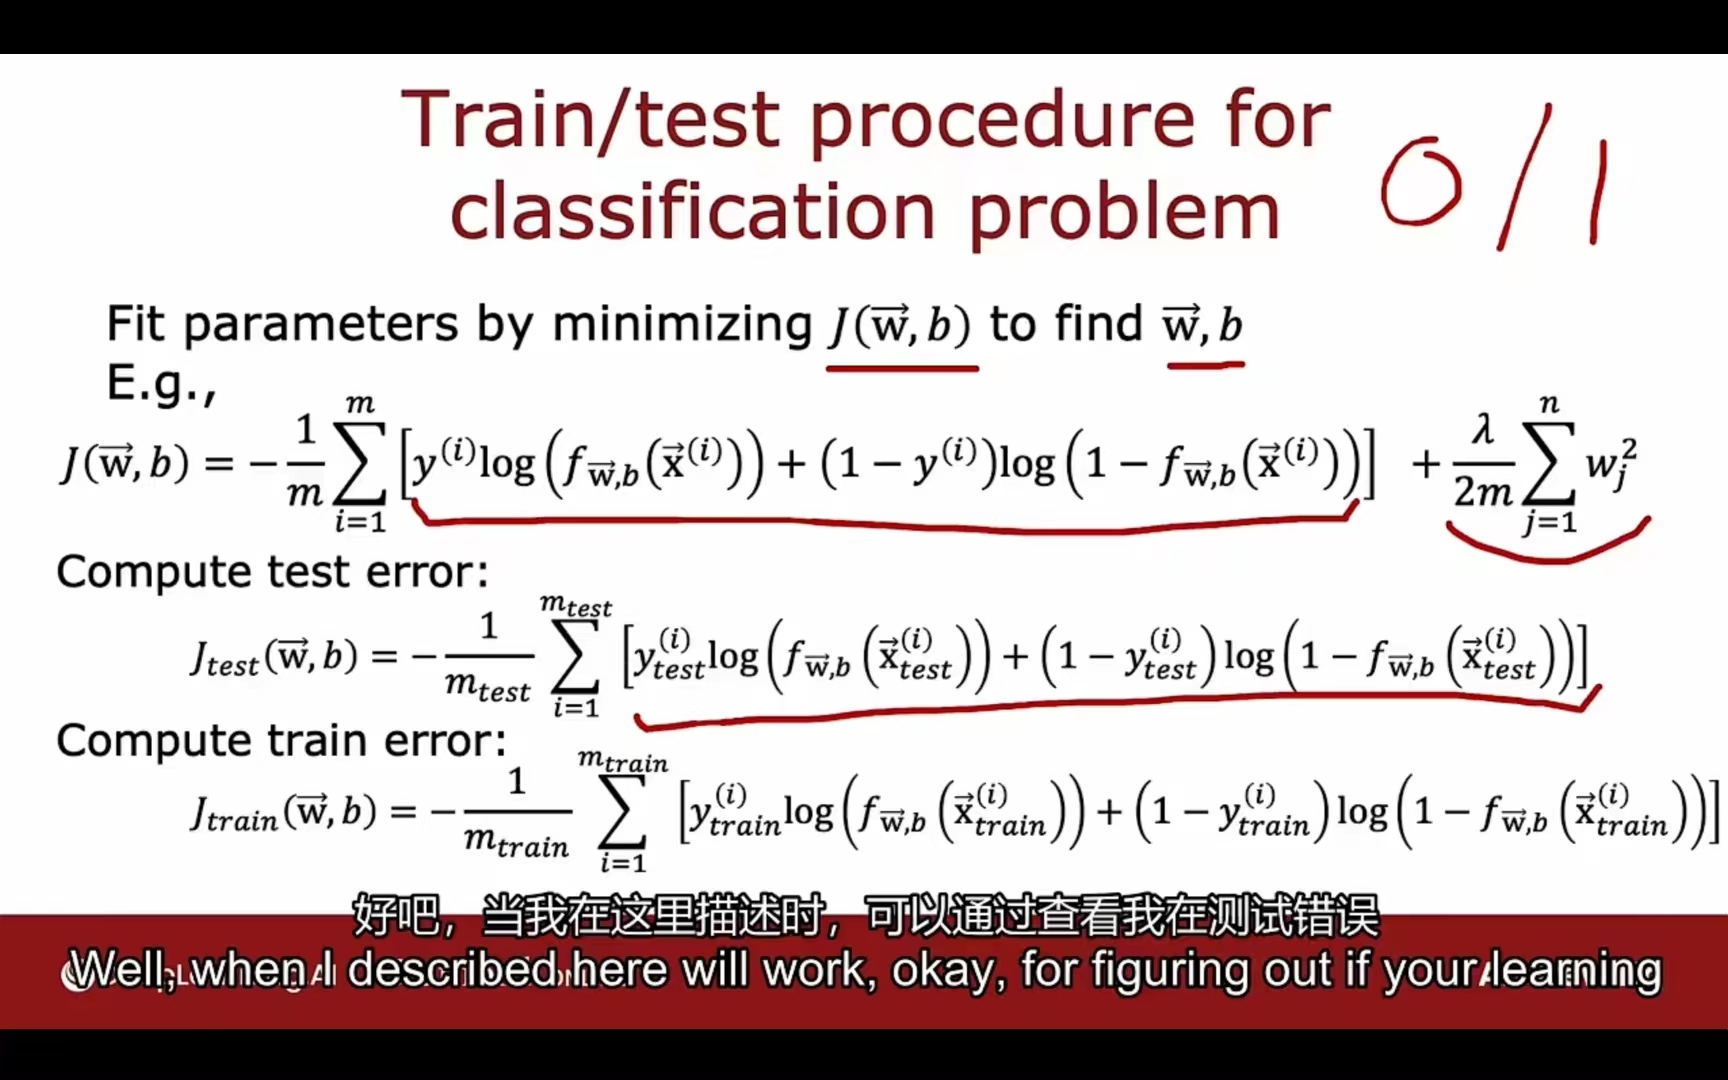
对于分类问题,还可以统计测试集被错误分类的比例
implement code:
1 | X_train, X_test, y_train, y_test = train_test_split(X,y,test_size=0.33, random_state=1) # 2:1 打乱顺序 |
方式二:
- 60% 训练集
- 20% 交叉验证集(验证集 / 开发集) cross validation / development set
- 20% 测试集
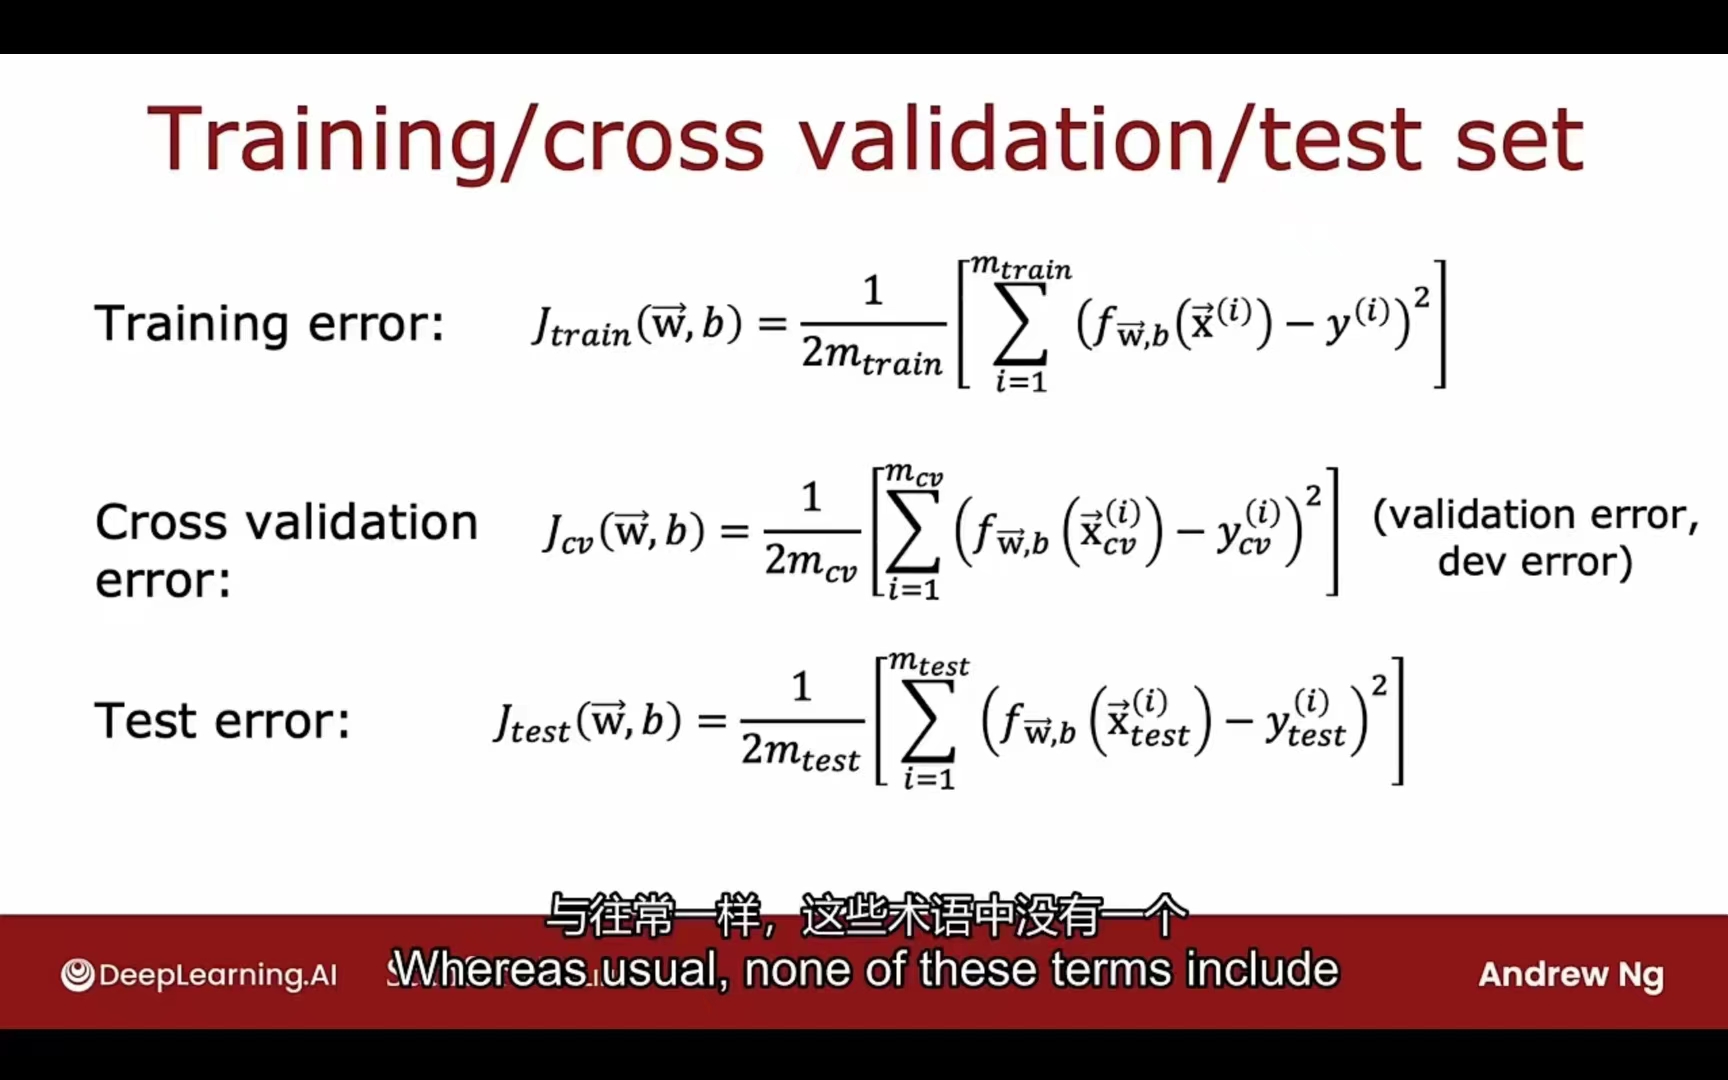
- 训练集用于训练模型
验证集用于选取模型 (选取最小损失的多项式或神经网络结构)
测试集用于测试模型泛化能力
implement code:
1 | # train:cv:test=0.6:0.2:0.2 |
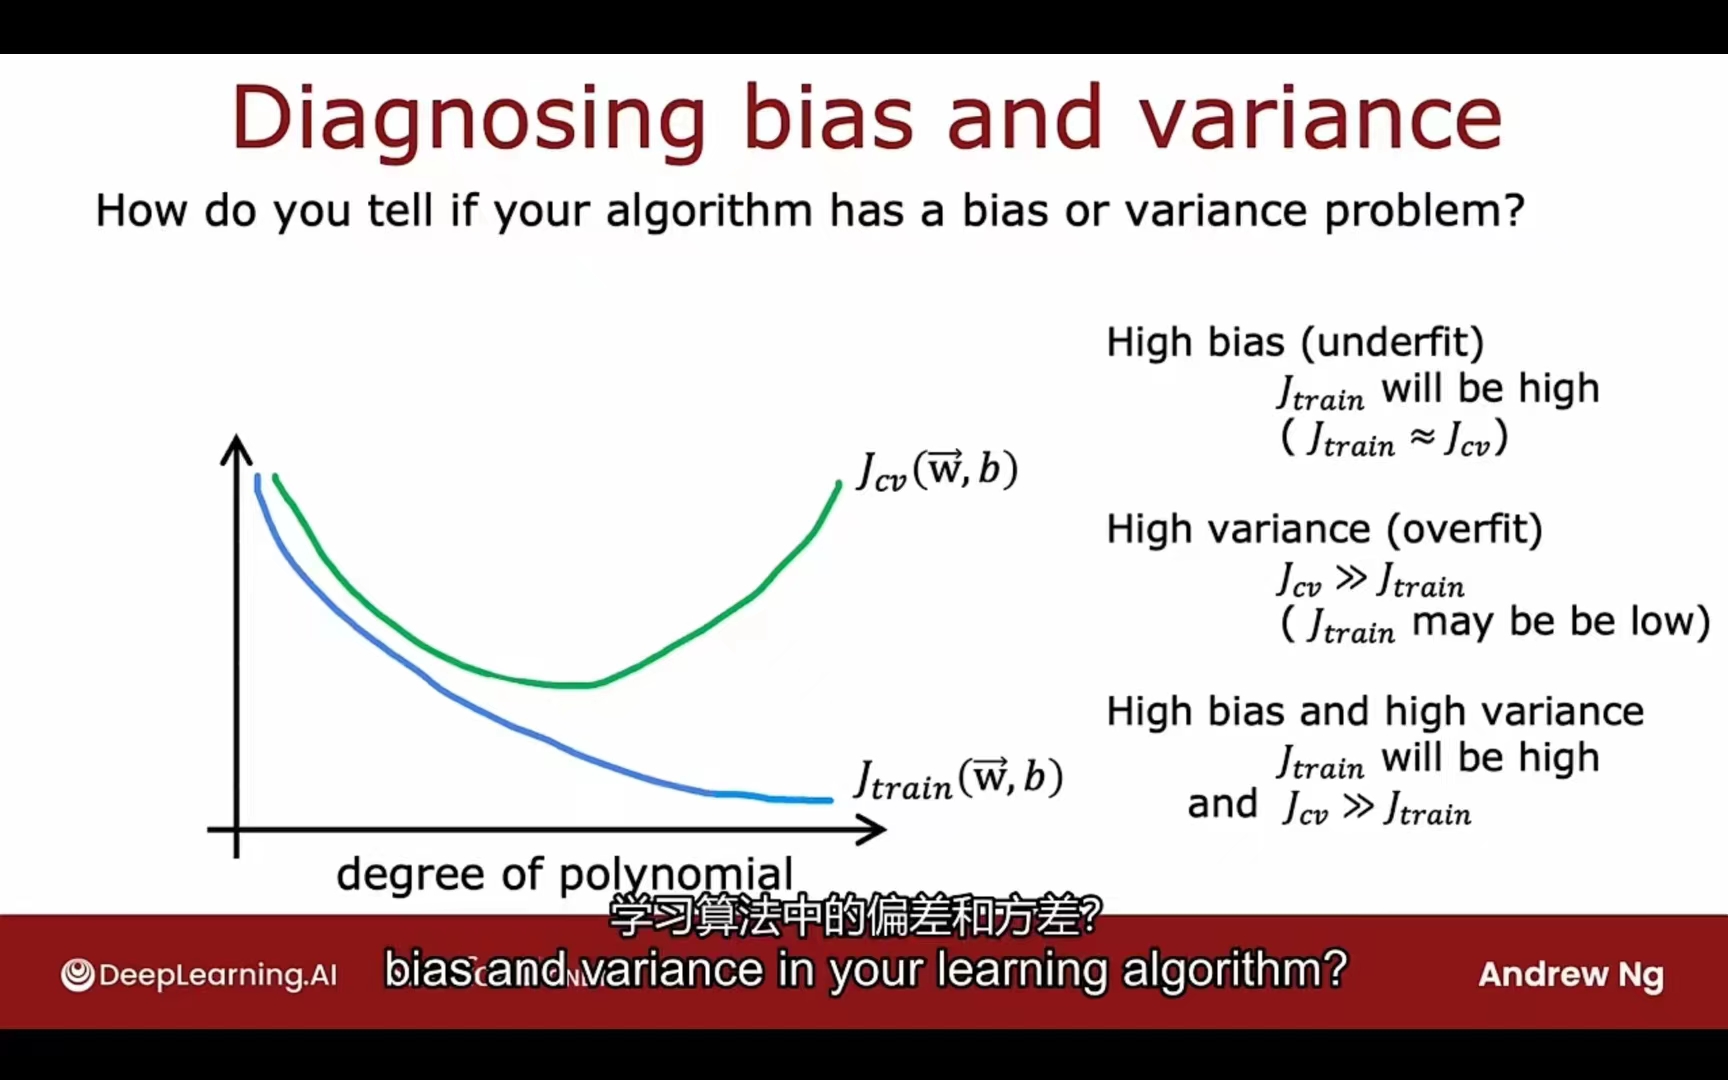
结合偏差和方差
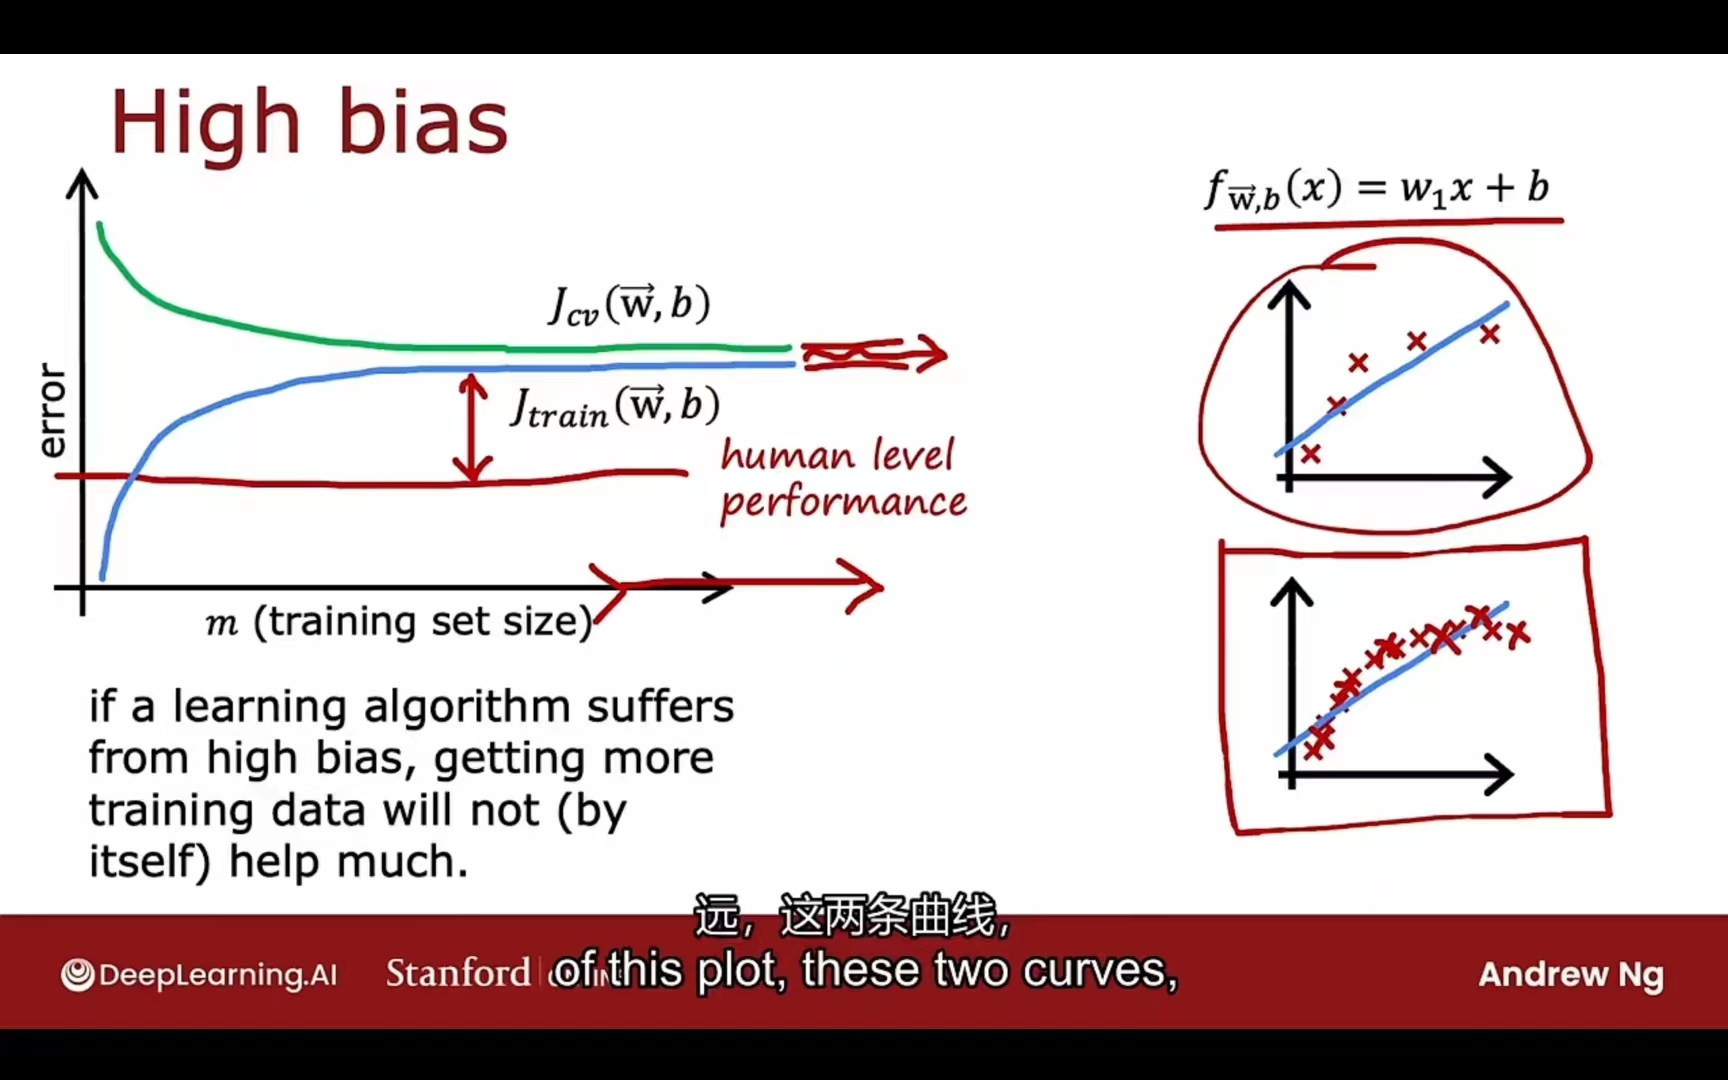
$J_{train}$ 偏大 -> 模型欠拟合(high bias)
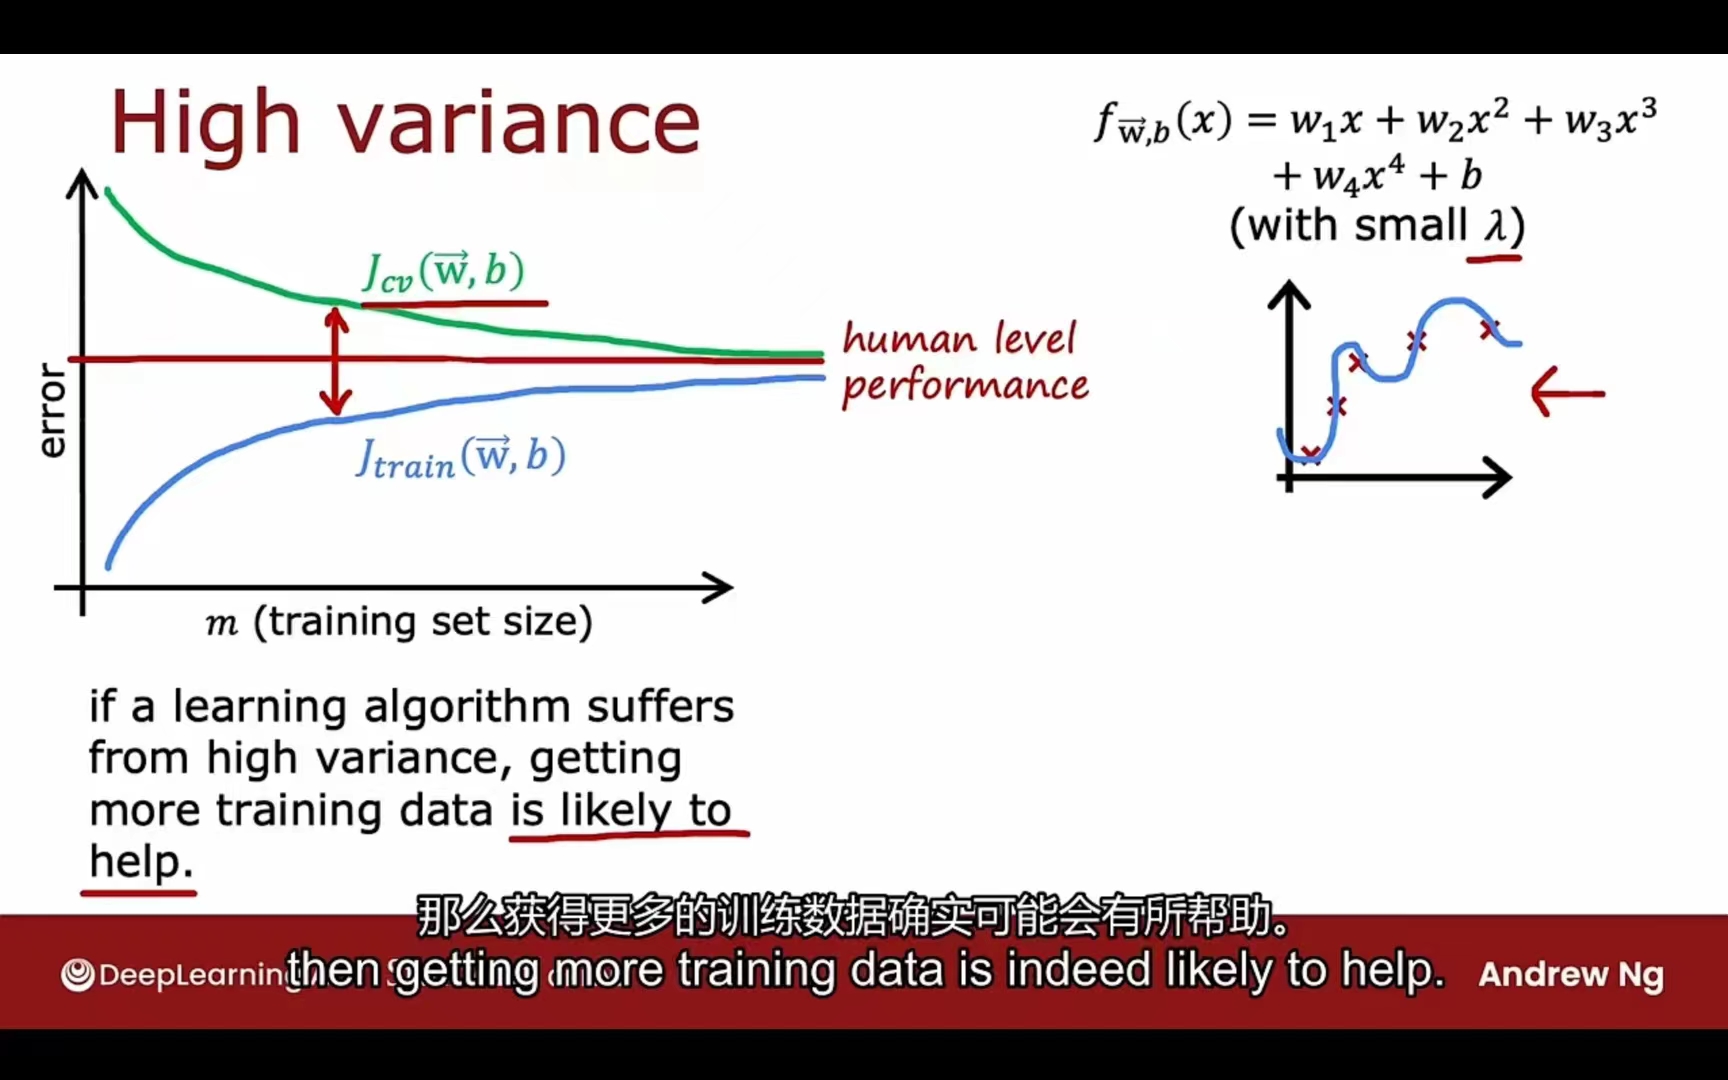
$J_{train}$小,但$J_{cv}$ 偏大 -> 模型过拟合(high variance)
$J_{train}$ 小,$J_{cv}$相较于$J_{train}$也偏小 -> just right
正则化系数
左侧过拟合,右侧欠拟合
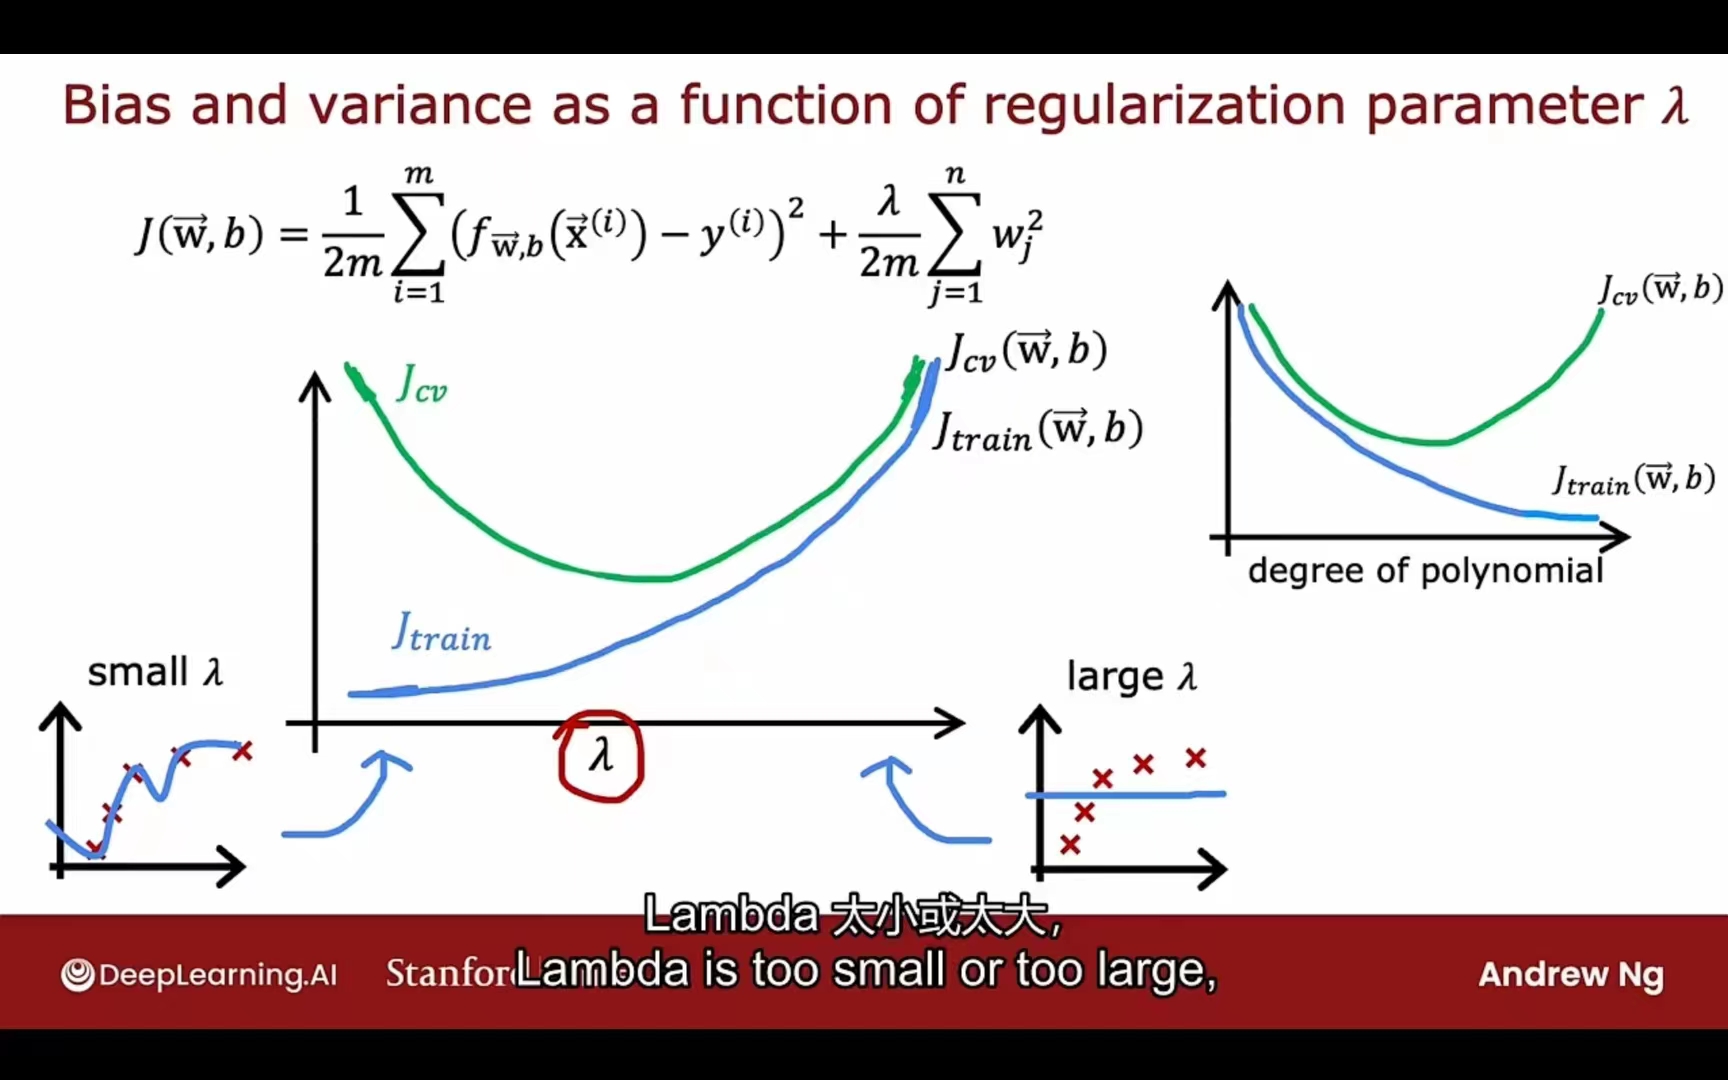
所以通过$J_{train}$ 和$J_{cv}$可以帮助$\lambda$的选择
如何判断J的水平是高的? -> benchmark
- 人类的表现水平
- 同类竞争性算法表现
- 通过经验推断
学习曲线
high bias:
high variance:
总结
- 增加特征数量(high bias)
- 增加高次幂特征(high bias)
- 减小正则化系数(high bias)
- 增大训练集(high variance)
- 减少特征数量 (high variance)
- 增大正则化系数(high variance)
The knowledge above takes short time to learn, but life time to master.
神经网络的修正
训练、调试的循环
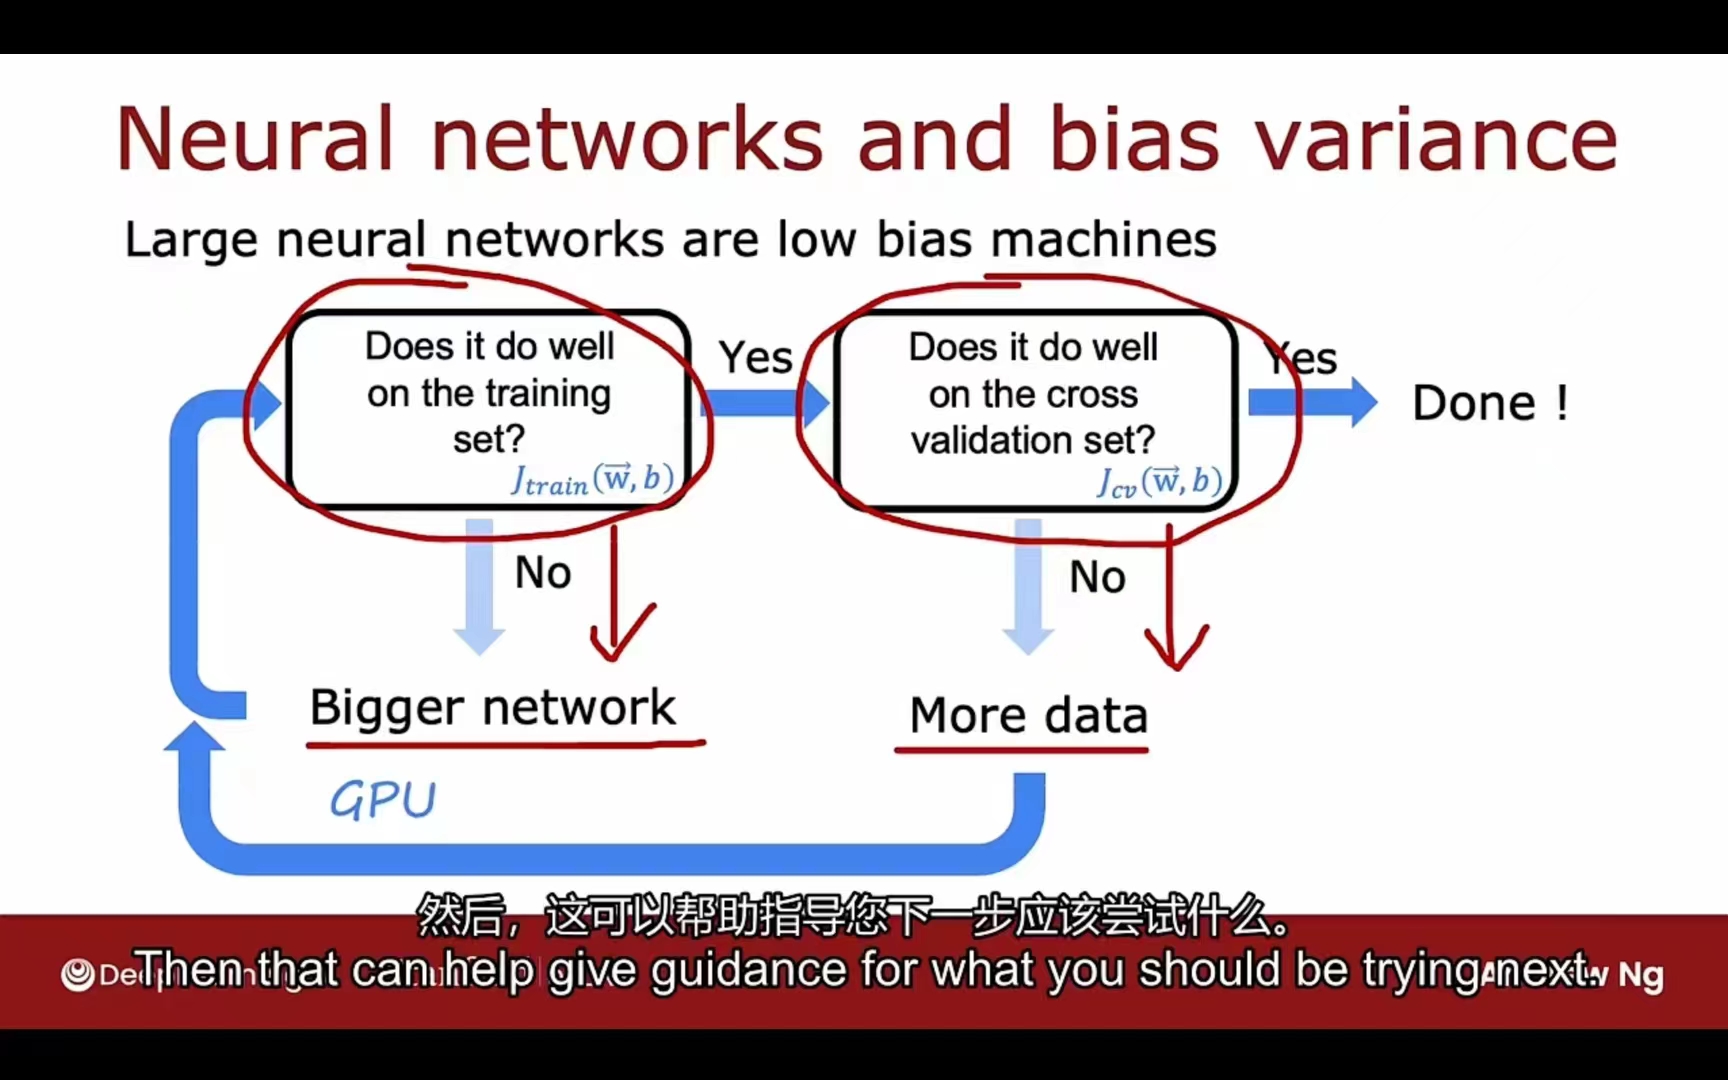
特色:只要正则化方式合适,一个大规模的神经网络通常会比一个小的神经网络表现更好(更小概率出现过拟合现象)代价:计算量更大,训练更慢
1 | layer_1= Dense(units=25, activation="relu", kernel_regularizer=L2(0.01)) |
PS:
- L1:参数绝对值
- L2:参数平方
- L3: L1 + L2
数据添加的技巧
- 添加一些有侧重性的数据
- 改变现存数据变为新数据(图像放缩、扭曲、反转、噪点; 语音噪音增加、损失、失真)
- 数据生成
AI = Code + Data
数据迁移
- 监督预训练 Supervised Pre-training
- 微调 Fine tuning
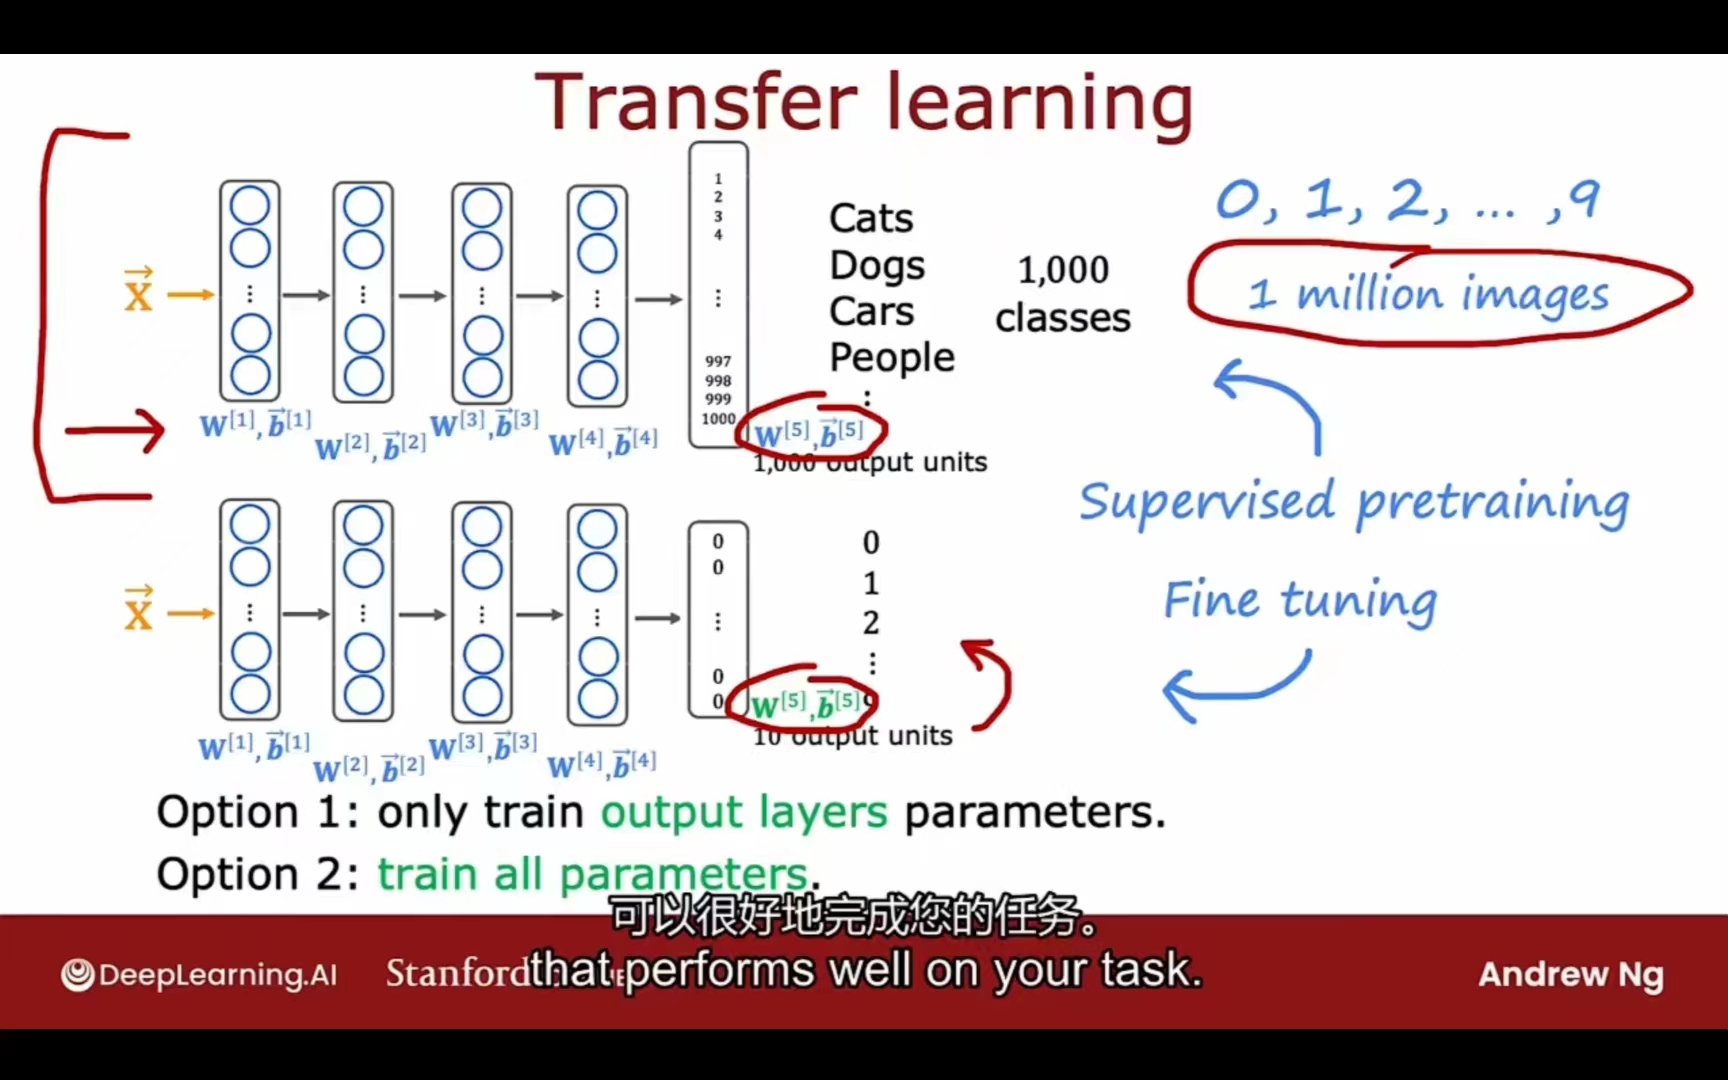
- 只训练自己的最后层的参数
- 训练全部参数(拿之前的模型参数做初始化)
误差度量(倾斜数据集)
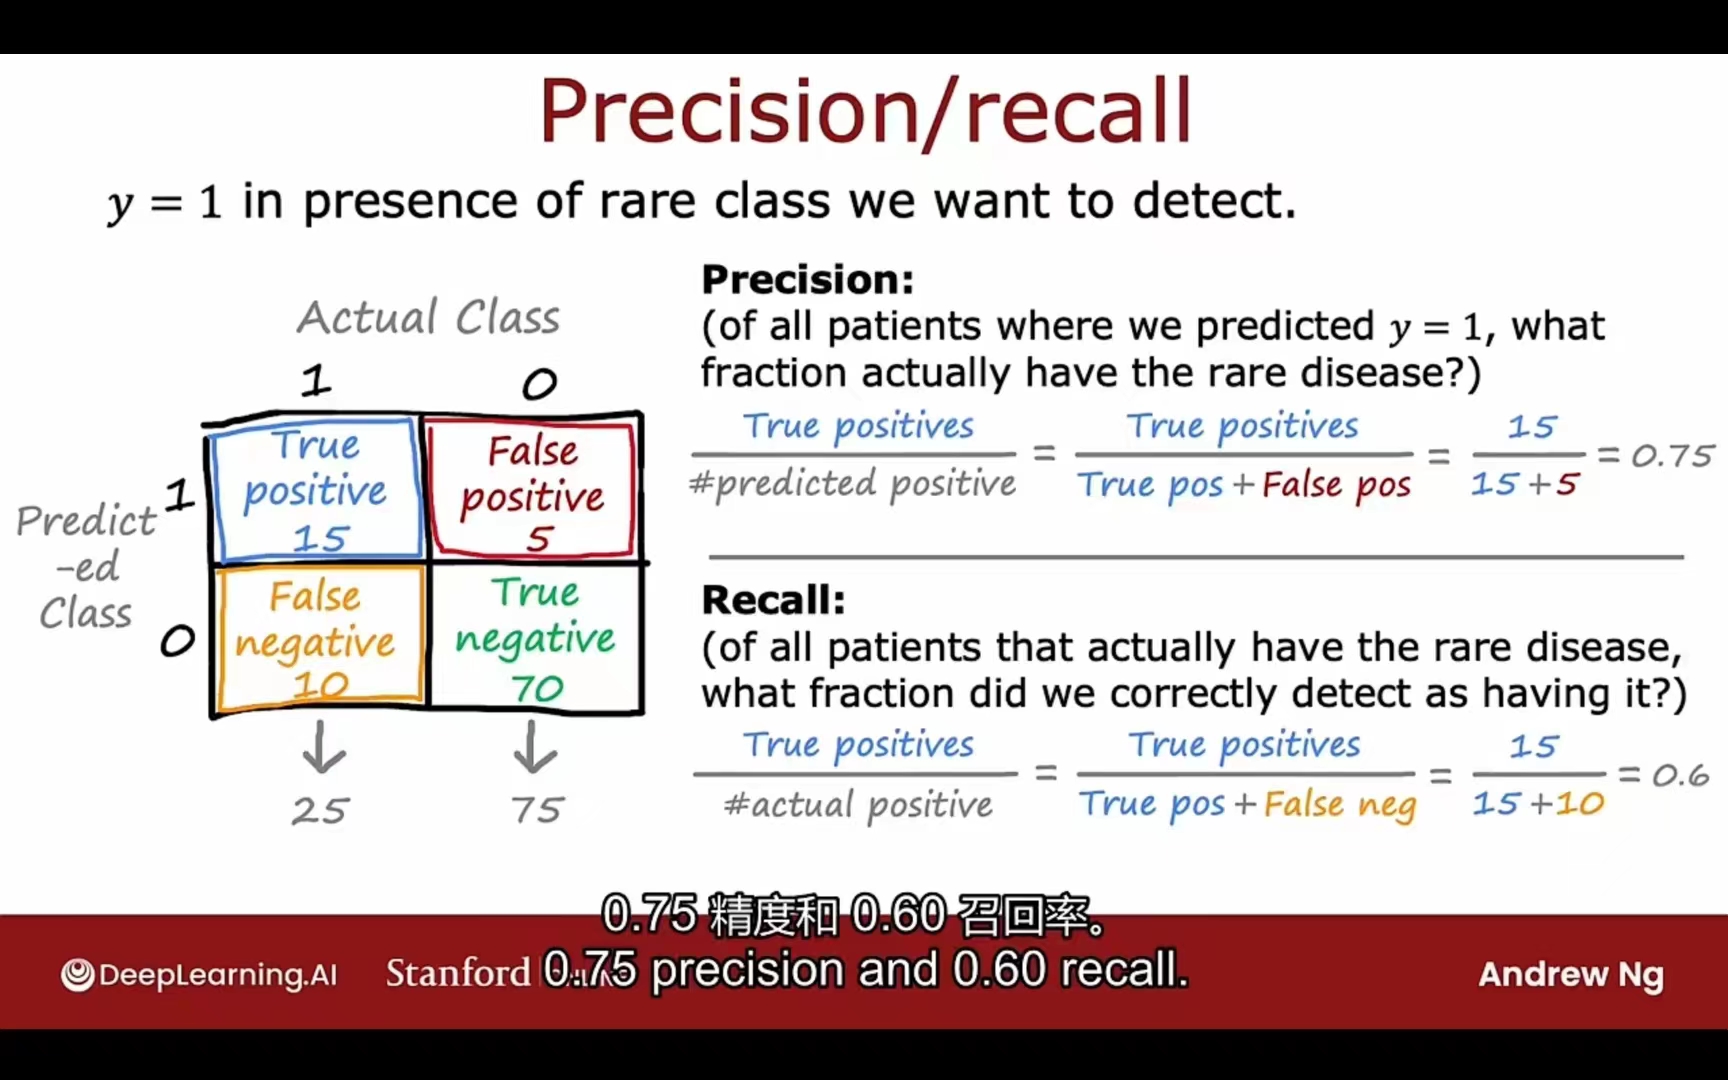
精确率 Precision
预测为1的多少是实际为1
precision = true positives / total predicted positive
召回率 Recall
实际为1的多少是预测为1
recall = true positives / total actual positive
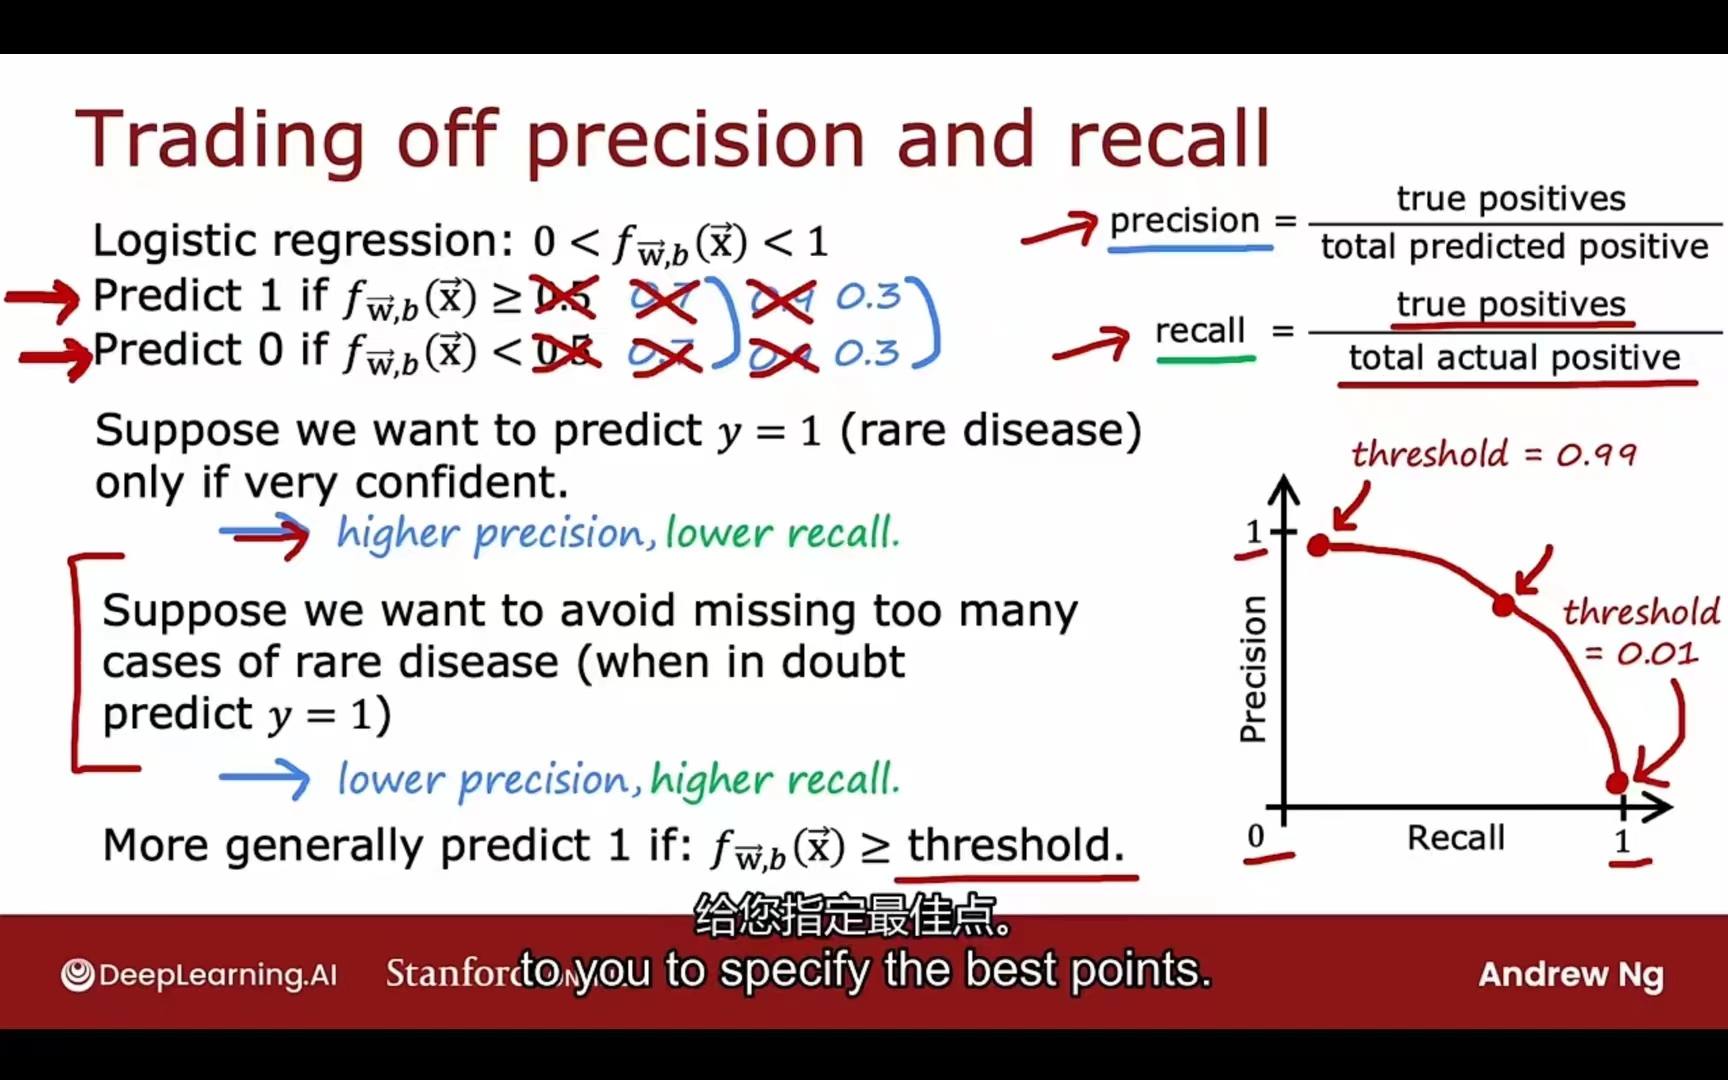
两者的权衡:
根据实际情况:
如果预测为1需要很谨慎
阈值提高(高于0.5)更高精确率,更低召回率
如果预测为1很必要
阈值降低(低于0.5)更低精确率,更高召回率
综合评判:F1 score P和R的调和平均